
This is a continuation from Git Explained 1 of 2 where the fundamental concepts are covered. In this article we introduce some tools for customization and maintenance.
As for Git configuration, there are two files to dictate your Git configuration. ~/.gitconfig and .git/config in project directory. Running `git config –list –show-origin` shows all config entries and where they are from. For example you can custom your Git hooks location. Neither of the two files are being version controlled, so the configuration is only effective in the client environment,
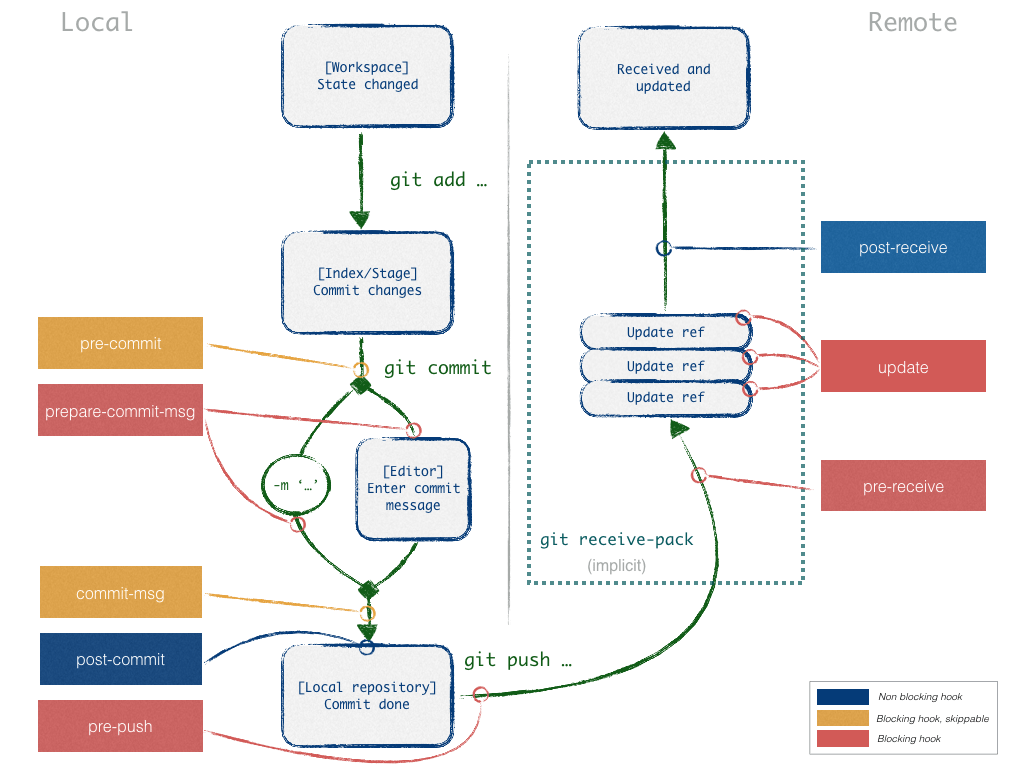
Server side Git hooks
Git implementation supports server side hooks (pre-receive, update, post-receive). They are bash scripts placed in .git/hooks with specific names, fired upon event occurrence. Exit code of 1 from the scripts fails the event. Since server side Git hook consumes server resources, many repository hosting vendors (e.g. BitBucket Cloud) do not support it. You will need to enable it in self-hosted servers (e.g. BitBucketServer).
Client side Git hooks
Since server side hooks are not widely supported in every vendor, client-side Git hooks is good alternative places to implement functions such as code style check, commit size check, etc
The default directory for hooks is .git/hooks/ under the project directory is not version controlled and not easy to share with the team. If the hook needs to be shared among project contributors, we can place hooks files in .githooks/ under project directory. This will make the hook files version controlled. In addition, we need to point the hooks to this directory in configuration, by running `git config core.hooksPath .githooks` from project directory.
Web hooks
Web hooks can be thought of as an event notification mechanism. It is a common feature provided by VCS repository hosting providers. If a certain type of event occurs to the repo, web hook will fire an RESTful API call. The HTTP Endpoint, authentication secret and event payload are pre-configured in the repo settings. Web hooks are commonly supported by Git-based repo implementation, such as BitBucket cloud, GitHub, GitLab or AWS CodeCommit. It can also be enabled in self hosted Git repo. Web hook is a powerful tool to drive downstream event, such as Jenkins to start building the code. The major difference between server side hook and web hook is web hook is RESTful API driven, whereas server side hook is executing a script.
Pipelines
Some repo hosting vendor also provide a feature named pipeline. BitBucket has Pipeline as a CI/CD tool, AWS has AWS Code Pipeline, and GitLab offers CI/CD pipeline as well. These pipelines are usually in the form of a YAML file in the repo with a special name. The YAML spell out the steps to perform along the pipeline.
Squash Commits
For small projects I was in the habit of committing to main branch. I often need to squash a number of commits into one to “clean up”. Usually a Pull Request (e.g. in GitHub) or Merge Request (e.g. in GitLab) have such option during approval. We can squash a few commits with git command as well (suppose we want to squash the most recent 16 commits):
git rebase -i HEAD~16
git push origin +main
The command will open text editor to allow you to mark what to do with each commit. You can mark all except one commit as squash. For the commit to keep, mark it as pick. Then save the text editor. Git rebase will perform the squash for you. However, since this is a rebase, do not do this if there are other collaborators working on the same branch.
Cleanse a repository
Take BitBucket cloud for example, the size of a remote repo has a non-expandable hard limit of 2GB, and a soft limit of 1GB. Once the soft limit is reached, a warning will be displayed on Bitbucket’s landing page as well as when contributors pushes changes. Once the hard limit is reached, the entire repo will turn read-only mode.
Space consumption can be caused by accidental committing of large file. As covered in the previous post, files are stored as blob objects in .git directory. If a file was deleted by `git rm` command, it simply means it is de-referenced from the next commit and on. After all, Git as a distributed version control system, has the ability to magically restore the deleted file when we want. The cost of that magic, is that deleted file is permanently stored in the repo, in the form of blob object, although not present in the working directory. It consumes space not only in remote repo, but also in the local repo of each contributor.
The purpose of Git repository is to store source code which are fairly small texts. However if a contributor pushed in large files, it can be tricky to cleanse a Git repo on the remote side. Here is some guidelines:
- Before cleansing, identify large unwanted files in current working directory, delete them with `git rm` and then commit this change in master branch.
- Consolidate branches (e.g. delete useless remote branches with `git push origin –delete branch_name`). This step itself does not free up space in remote repo but it simplifies the branches;
- Remove large blob objects and commit objects that reference them. This step essentially is re-writing the commit history of repo. Given the risk, it is recommended to perform this step from a separate local project directory with bare repo only without working directory. This article presents some good advices and illustrations. The command recommended is `git filter-branch -f –tree-filter “rm -rf \large_file.zip” –prune-empty — –all` ; and if that is too slow here is an alternative named BFG Repo-Cleaner.
- After this step, each commit will have a new hash id. For the repo size to reduce, either wait until the next garbage collection on the server side, or request cloud vendor to run a manual garbage collection.