
In this posting, we continue to discuss Jenkins’ ability to automate deployment routines. Jenkins supports freestyle project out of the box, as well as Pipeline with several plugins. Freestyle project allows user to specify multiple steps on UI. This does not scale well when your entire process involves many steps. As explained on Jenkins’ website:
While standard Jenkins “freestyle” jobs support simple continuous integration by allowing you to define sequential tasks in an application lifecycle, they do not create a persistent record of execution, enable one script to address all the steps in a complex workflow, or confer the other advantages of pipelines.
In contrast to freestyle jobs, pipelines enable you to define the whole application lifecycle. Pipeline functionality helps Jenkins to support continuous delivery (CD). The Pipeline plugin was built with requirements for a flexible, extensible, and script-based CD workflow capability in mind.
So although freestyle projects are easy to set up, and can do technically everything that Jenkins pipeline can do, the major advantage of Jenkins Pipeline is the ability to manage multiple-step as code, and version control the pipeline-as-code. Here is some more information.
We will start with a freestyle project to understand Jenkins’ ability and then advance to building pipelines.
Freestyle projects
As mentioned, Jenkins calls a task a “build”, and the build can be triggered in a variety of ways:
- Time schedule (with or without parameter)
- Remotely via API
- On completion of other projects
- Poll SCM for changes
- Commit to SCM
There are also several ways to execute a job:
- Execute Shell command, batch command or groovy script
- Invoke Ansible adhoc command, playbook or vault
- Conditional on specified boolean value, file existence, etc
After the job one can specify post-build jobs, for example:
- start other build projects
- notification of various means
- publishing result file
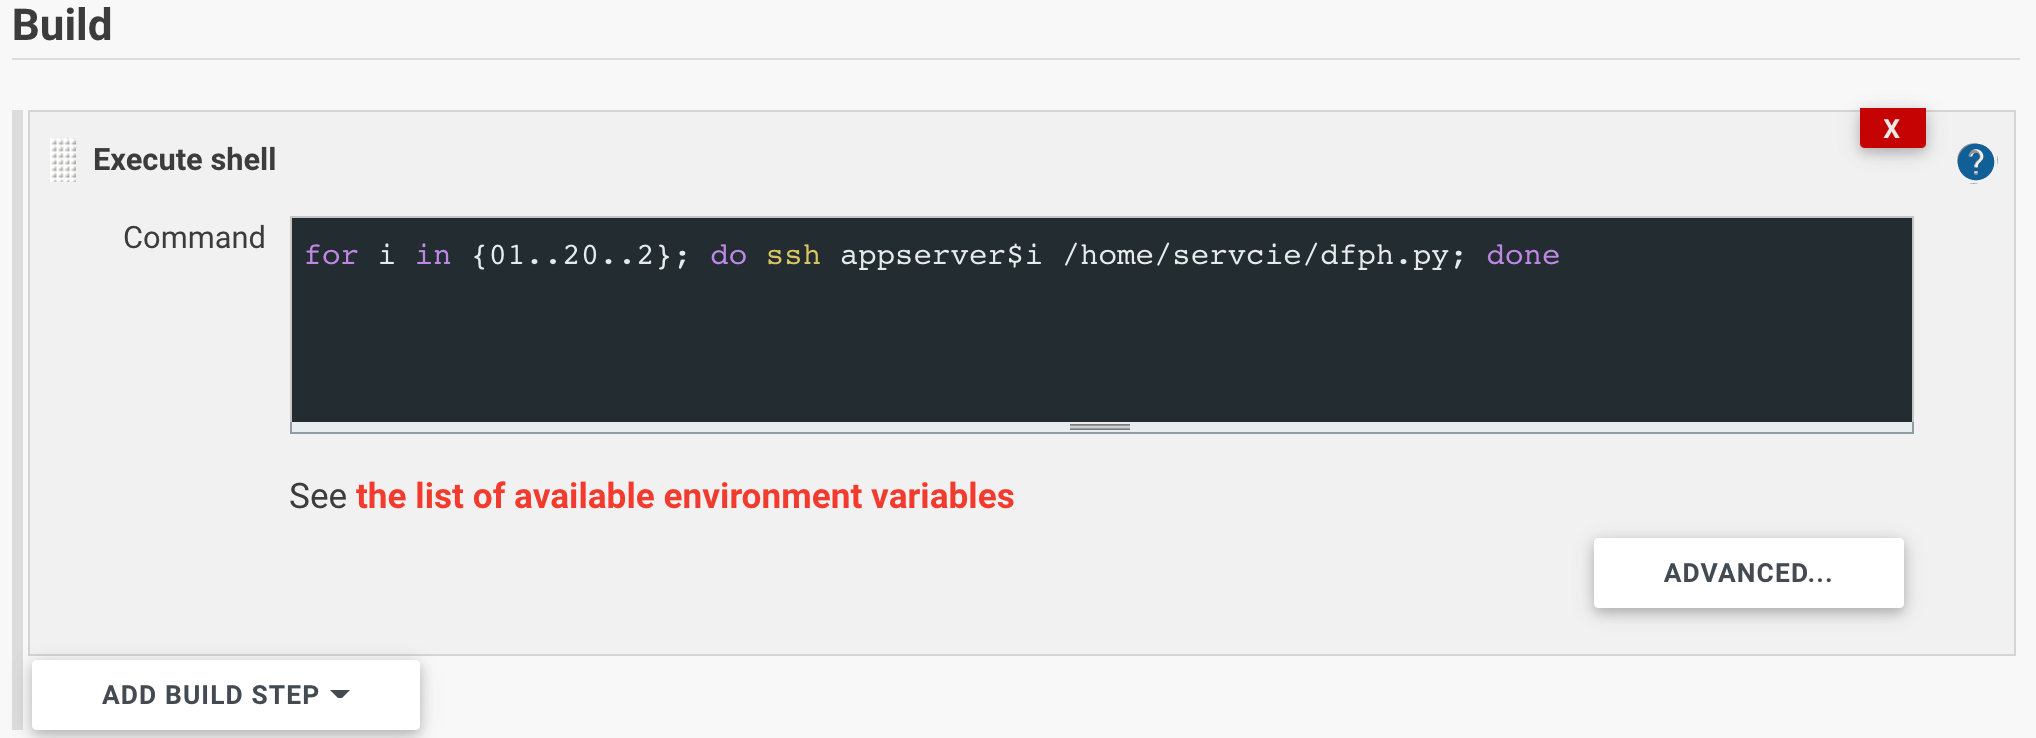
In deployment, it is common task to execute a task over SSH, using SSH command or invoke Ansible command with Ansible plugin. The former fits simple command line tasks. For example:
The Ansible plugin is good for more steps and more complicated inventory hierarchies. This post includes an example of an inventory involving multiple layers. The other limitation with SSH command is lack of a straightforward configuration to escalate privilege and run remote command. On the other hand, Ansible addressed this with become method. Below is a screenshot
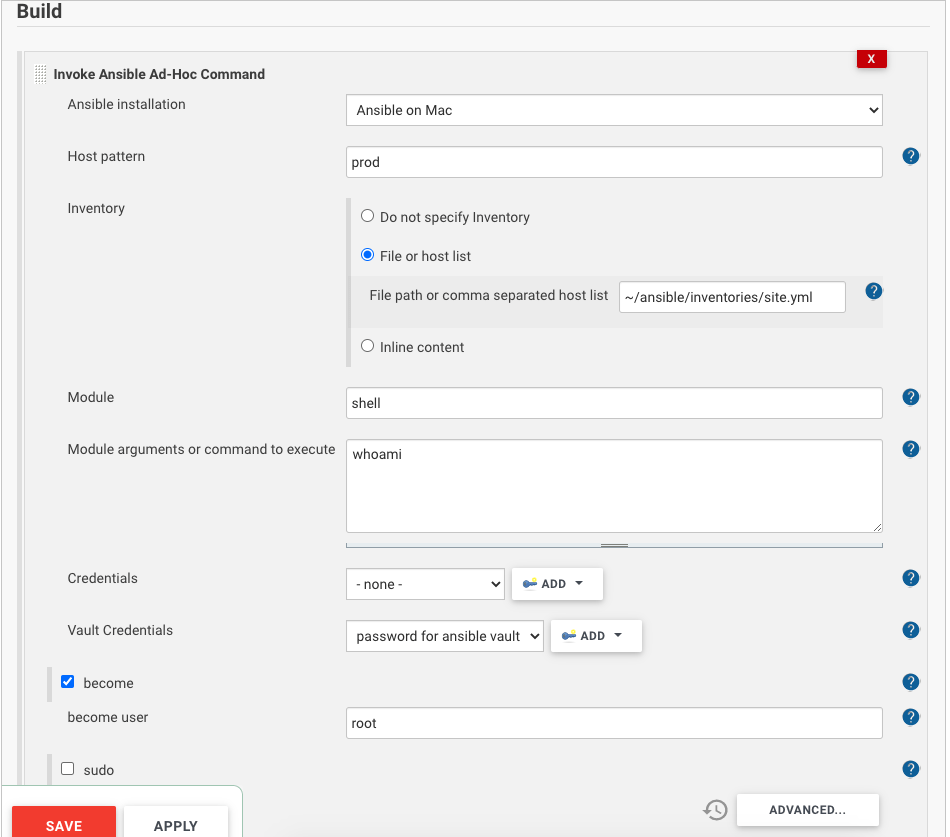
In order to use Ansible command, you will also need to specify where the Ansible binary in Global Tool Configuration. You will also need to store vault credential in Jenkins credential store so it’s not being prompted.
Jenkins Pipeline
Jenkins pipeline allows one to describe actions in a pipeline in groovy Domain Specific Language (DSL). There are two styles of pipelines:
- Declarative pipeline is identified by a block named ‘pipeline’, it is relatively new and supports the pipeline-as-code concept. It can be stored as Jenkinsfile in code repository or edited in Jenkins’ UI.
- Scripted pipeline is identified by a block named ‘node’, it is the conventional format and can only be edited in Jenkins’ UI.
To fully understand the two styles of pipelines you also need to know declarative programming and imperative programming. Read this instruction for a better explanation. Here is another good one that focus on their differences.
Jenkins’ plugin provides UI components for user to input information (e.g. Invoke Ansible Command), now with Jenkins pipelines, plugins can provide step functions in order to help Jenkins user. This page from Jenkins lists the most common ones, many of which requires plugin installation.
One example of step function is SSH Pipeline Steps. It allows one to issue SSH connection from Jenkinsfile. However, in our deployment scenarios, it has some limitations:
- Unable to match a group of host by specific pattern
- Cannot use host name aliases
- SSH tunneling is not supported
- No means of privilege escalation
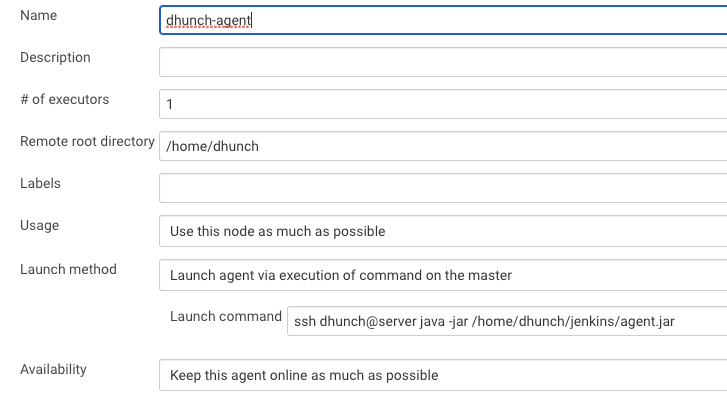
Out of these 1 through 3 are due to the fact that SSH step function does not use the OpenSSH configuration on the machine. The jenkins-ssh-slaves plugin uses trilead SSH2 implementation written in Java. Only OpenSSH implementation uses ~/.ssh/config file. This creates problem whenever SSH tunneling is needed. For example, to register a remote slave node via SSH tunneling, we need to select “Launch agent via execution of command on the master” instead of “Launch agent via SSH” as launch method. Here is an instruction and below is what it looks like:
Similarly, if we use ssh-agent plugin as tool for deployment, we cannot use any configuration made by OpenSSH. Therefore Ansible in Jenkins Pipeline is a better tool for deployment because it can use OpenSSH.
Pipelines with Ansible
In this section I demonstrate the use of Ansible playbook and adhoc command in pipeline through two examples.
In example 1, the job pulls authorized key file from SCM, and then use a playbook from SCM, to push the key file to all servers in the specified inventory.
Here is the playbook file for example 1:
---
# Example:
# ansible-playbook -l all -i ~/ansible/inventories/bh.yml push-key.yml --ask-vault-pass
- name: push key to target
  hosts: all
  tasks:
    - name: sync key to host
      copy:
        src: "{{authorized_keys_src}}"
        dest: "/home/dhunch/.ssh/authorized_keys"
        force: yes
        mode: 0600
Here is the pipeline script (note ampersand is mistakenly displayed as & in the box below):
import java.net.URLEncoder;

pipeline {
    agent any

    options {
        skipDefaultCheckout(true)
    }
    environment {
        BITBUCKET_CREDS = credentials('bitbucket')
        //BITBUCKET_CREDS_USR and BITBUCKET_CREDS_PSW are set
        BITBUCKET_CREDS_USR = "${BITBUCKET_CREDS_USR}"
        BITBUCKET_CREDS_PSW = URLEncoder.encode("${BITBUCKET_CREDS_PSW}", "UTF-8")
        // if password contains special character we need to url encode it. e.g. @->%40
    }
    stages {
        stage('Start') {
            steps {
                echo "Starting pipeline ..."
                deleteDir()
            }
        }
        stage('Prep') {
            steps{
                wrap([$class: 'MaskPasswordsBuildWrapper', varPasswordPairs: [[password: "${BITBUCKET_CREDS_PSW}", var: 'RANDOM']]]) {
                    // MaskPasswordsBuildWrapper requires Mask Passwords Plugin and is to mask specific string in console output.
                    // Otherwise BITBUCKET_CREDS_PSW will display in the clear
                    sh "git init && git config core.sparsecheckout true"
                    sh "git remote add origin https://$BITBUCKET_CREDS_USR:${BITBUCKET_CREDS_PSW}@bitbucket.org/vendorcompoany/configmanagerepo.git"
                    sh "echo 'public_keys/*' >> .git/info/sparse-checkout"
                    echo "Downloading key file"
                    sh "git pull --depth=1 origin master"
                }
            }
        }

        stage('Deploy to Site 1') {
            steps {
                echo '> Deploying to Site 1 ...'
                ansiblePlaybook (
                    installation: 'Ansible on Mac',
                    playbook: '${WORKSPACE}/public_keys/push-key.yml',
                    inventory: '~/ansible/inventories/site1.yml',
                    vaultCredentialsId: 'ansible-vault-pass',
                    extraVars: [authorized_keys_src: "$WORKSPACE/public_keys/authorized_keys",]
                )
                echo '> Deployed to Site 1 ...'
            }
        }

        stage('Deploy to Site 2') {
            steps {
                echo '> Deploying to Site 2 ...'
                ansiblePlaybook (
                    installation: 'Ansible on Mac',
                    playbook: '${WORKSPACE}/public_keys/push-key.yml',
                    inventory: '~/ansible/inventories/site2.yml',
                    vaultCredentialsId: 'ansible-vault-pass',
                    extraVars: [authorized_keys_src: "$WORKSPACE/public_keys/authorized_keys",]
                )
                echo '> Deployed to Site 2 ...'
            }
        }

        stage('Deploy to Site 3') {
            steps {
                echo '> Deploying to Site 3 ...'
                ansiblePlaybook (
                    installation: 'Ansible on Mac',
                    playbook: '${WORKSPACE}/public_keys/push-key.yml',
                    inventory: '~/ansible/inventories/site3.yml',
                    vaultCredentialsId: 'ansible-vault-pass',
                    extraVars: [authorized_keys_src: "$WORKSPACE/public_keys/authorized_keys",]
                )
                echo '> Deployed to Site 3 ...'
            }
        }
    }
    post {
        always {
            cleanWs()
        }
    }
}
In this example, we pull a sub-directory from git repo. We use two tricks to minimize amount of traffic. First, we use git pull with depth=1 so only the required recent commits are pulled, not the entire history. Second we use sparse checkout to get result from a sub-directory, not the entire repo.
When connecting to repo, password is required. We pull the credential from Jenkins’ credential store and they are masked by default. However, the password must be converted to URL string when used in git remote add origin. Otherwise if the password contains special character the URL will not work.
This modification to password brings about another challenge, password masking during the job execution. We will have to build our own wrapper function using class MaskPasswordsBuildWrapper in order to mask any variable.
In example 2, we wrap an Ansible step function to call adhoc command to check version on all hosts. Here is the pipeline script:
def HunchVersionQuery(pattern, siteinventory){
    step([
        $class: 'AnsibleAdHocCommandBuilder',
        ansibleName: 'Ansible on Mac',
        inventory: [$class: 'InventoryPath',path: siteinventory],
        hostPattern: pattern,
        module: 'shell',
        command: 'cat /etc/*release',
        forks: 1,
        vaultCredentialsId: 'ansible-vault-pass'
    ]);
}

pipeline {
    agent any

    stages {
        stage('Start') {
            steps {
                echo 'Staring Pipeline'
            }
        }
        stage('Query Site1') {
            steps {            HunchVersionQuery('*app','~/ansible/inventories/site1.yml')
            }
        }
        stage('Query Site2') {
            steps { HunchVersionQuery('*app','~/ansible/inventories/site2.yml')
            }
        }
        stage('Query Site3') {
            steps {
HunchVersionQuery('*app','~/ansible/inventories/site3.yml')
            }
        }
    }
}
Because Ansible plugin does not provide a warpper function for adhoc command step, we will have to build our own wrapper function in the above code.