
While there are many tools to set up single-node Kubernetes cluster (e.g. minikube, MicroK8s, kind, or k3s with the k3d wrapper), docker-desktop has a significant advantage: it comes with Docker installation, on MacOS, or on Windows. It is installed simply by enabling the option “Enable Kubernetes”. It can be blown away and reset in a heartbeat (with the button “Reset Kubernetes Cluster”). For its versatility, docker-desktop is a great development environment.
However, there are always nuances, which motivates me to write this blog. I wanted to note down what is on earth different about Docker-desktop, because the instructions for applications might differ slightly between single-node cluster on MacOS/Windows and the “real” multi-node cluster.
I will start with with a deep dive into the docker-desktop architecture, then we’ll go through the steps to install some common applications with Kubernetes.
Docker-Desktop on MacOS
There are a number of open-source and proprietary projects involved to bring docker-desktop to implementation. Let’s begin with the following five:
- Hypervisor Framework: Apple’s APIs on MacOS that allows you to interact with virtualization technologies in user space.
- bhyve: A type-2 hypervisor initially written for FreeBSD (and was contributed to FreeBSD in May 2011).
- xhyve: A port of bhyve project to MacOS with integration via Apple’s Hypervisor Framework. The Hypervisor Framework allows xhyve to run entirely in userspace. It is sometimes loosely referred to as xhyve/bhyve hypervisor, and is optimized for lightweight virtual machines and container deployment.
- HyperKit is an open-source toolkit on macOS based on xhyve. HyperKit is lightweight and therefore allows you to embed hypervisor capabilities in your application. The hypervisor component in HyperKit is based on xhyve/bhyve. HyperKit is designed to be interfaced with higher-level components such as the VPNKit and DataKit. Docker-desktop and MiniKube are built on HyperKit.
- LinuxKit is a toolkit for building custom minimal, immutable and purpose-build Linux distributions. It supports several well-known hypervisor platforms, such as HyperKit, Hyper-V, qemu and VMware. LinuxKit started as an internal project in Docker Inc and is now managed as a Moby Project.
Hyperkit is installed as part of docker desktop. The process can be found with ps command:
ps -Af | grep hyperkit
Or in the activity monitor:
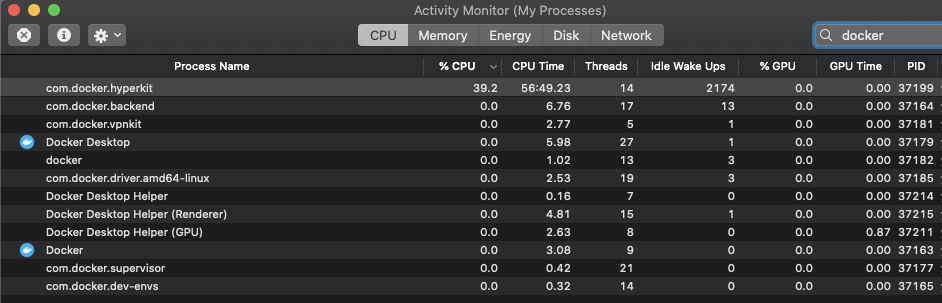
Docker-deskop is essentially a LinuxKit virtual machine (as defined here). It runs containerd process inside of the virtual machine. This is an older article about this architecture. If Kubernetes is enabled, the virtual machine is also installed with kubelet, the agent process running on each Kubernetes node.
Since MacOS is not the direct host of the containers, there is no way to map MacOS file system to container’s as you can with a Docker/Kubernetes host. Prior to Docker 20.10, there used to be a trick to indirectly access host volume from MacOS terminal. It has stopped working according to this issue but workarounds are provided here. This post proposes some good alternatives to access the file system of LinuxKit VM. For example, use netcat:
 user@LinVM # nc -U ~/Library/Containers/com.docker.docker/Data/debug-shell.sock

/ # cat /etc/os-release
cat /etc/os-release
PRETTY_NAME="Docker Desktop"
/ # cat /etc/kubernetes/current-version
cat /etc/kubernetes/current-version
kubeadm version: &version.Info{Major:"1", Minor:"21", GitVersion:"v1.21.2", GitCommit:"092fbfbf53427de67cac1e9fa54aaa09a28371d7", GitTreeState:"archive", BuildDate:"2021-06-18T05:24:26Z", GoVersion:"go1.16.5", Compiler:"gc", Platform:"linux/amd64"}
Typing in this terminal session feels clunky. According to this thread, we can connect to the LinuxKit VM with tty and sane auto completion, using the command below:
stty -echo -icanon && nc -U ~/Library/Containers/com.docker.docker/Data/debug-shell.sock && stty sane
There are some other alternatives, using privileged Docker containers:
docker run -it --privileged --pid=host debian nsenter -t 1 -m -u -n -i sh
The following command uses a smaller image:
docker run -it --rm --privileged --pid=host justincormack/nsenter1
As with Kubernetes, to access the file system on the node is via a privileged container, you can follow the tips from Azure, identify node name, and debug against the node using a special container:
kubectl debug node/docker-desktop -it --image=mcr.microsoft.com/aks/fundamental/base-ubuntu:v0.0.11
Note that the root directory on the host is mounted to container’s file system as /host. This mapping renders a lot of symbolic link as dangled, even though they are actually not on the host file system.
Docker-Desktop on Windows
Docker works with Linux kernel. There have been a couple of efforts to run Linux virtual machine on Windows. For example, Hyper-V backend, and Windows Subsystem Linux (WSL) backend.
Traditionally, Docker on Windows was implemented with Hyper-V as the hypervisor. A LinuxKit distro is running on the Hypver-V VM, provider Linux kernel capabilities. Docker refers to containers running in this architecture as “Windows Containers”, which is a misnomer in my opinion.
The first release of WSL provides a Linux-compatible kernel interface and runs a GNU user space on top of the interface. Neither the Linux kernel code, or a hypervisor is involved. The user space contains GNU Bash shell, command language, command-line tools and interpreters. The absence of Linux kernel in WSL, makes it useless for Docker setup. At that time The Hypver-V backend was still the only option to host docker container during the first version of WSL. This post has a diagram of Docker on Windows with Hyper-V backend.
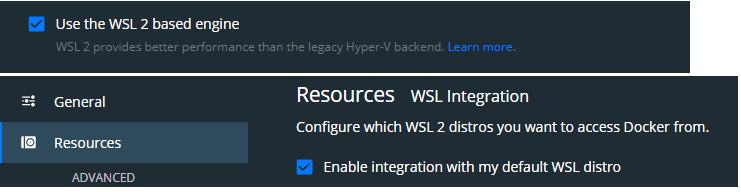
WSL2 comes with a real Linux Kernel (also on top of Hyper-V), making WSL2 a better alternative than the legacy Hyper-V as the backend of Docker on Windows. It can be turned on as the screenshot shows above. The rest of this post assumes WSL2 as backend. In this setup, we run a Bootstrapping distro independent of the WSL2 Linux distro, although both inside of the lightweight Linux Utility VM. Below is the diagram:
The innovative component is the lightweight Linux Utility VM. It is called a VM, but very different from the traditional sense of VM such as VirtualBox or VMware. Traditional VM is isolated from host OS, slow to boot and has large memory footprint. The lightweight Utility VM on the other hand, is integrated with host OS, super fast to boot (i.e. ~1 second), and comes with small memory footprint. It is not turned on until needed. The VM runs both a WSL2 Linux Kernel and GNU/Linux usermode (known as “distribution”, for example, Ubuntu). When an end-user say WSL2, s/he most likely refers to the distribution. Similarly, the so called “docker-desktop on Windows with WSL2 backend”, is also managed as two WSL2 distros: the bootstrapping distro (docker-desktop) and the data store distro (docker-desktop-data).
The detailed components in the Bootstrapping distro is in the second diagram in this post, which has a detailed discussion. With this architecture, you don’t even need the WSL2 Linux Distro for Docker desktop to function. You can even run docker CLI command from Windows PowerShell without any Linux distro (although this is implemented only for backward compatibility and not recommended anymore) . In the following session, we first list out the WSL2 distros. Notice that the docker-desktop distro is not the default. We then connect to the distro using -d switch. Last, we run docker info from windows user space.
PS C:\WINDOWS\system32> wsl -l -v
  NAME                   STATE           VERSION
* Ubuntu                 Running         2
  docker-desktop         Running         2
  docker-desktop-data    Running         2
PS C:\WINDOWS\system32> wsl -d docker-desktop
WINLAPTOP:/mnt/host/c/WINDOWS/system32# cd ~
WINLAPTOP:~# printenv|grep DIST
WSL_DISTRO_NAME=docker-desktop
WINLAPTOP:~# exit
PS C:\WINDOWS\system32> docker info
Client:
 Context:    default
 Debug Mode: false
 Plugins:
  buildx: Build with BuildKit (Docker Inc., v0.5.1-docker)
  compose: Docker Compose (Docker Inc., v2.0.0-beta.6)
  scan: Docker Scan (Docker Inc., v0.8.0)

Server:
 Containers: 93
  Running: 80
  Paused: 0
  Stopped: 13
 Images: 28
 Server Version: 20.10.7
 Storage Driver: overlay2
  Backing Filesystem: extfs
  Supports d_type: true
  Native Overlay Diff: true
  userxattr: false
 Logging Driver: json-file
 Cgroup Driver: cgroupfs
 Cgroup Version: 1
 Plugins:
  Volume: local
  Network: bridge host ipvlan macvlan null overlay
  Log: awslogs fluentd gcplogs gelf journald json-file local logentries splunk syslog
 Swarm: inactive
 Runtimes: io.containerd.runc.v2 io.containerd.runtime.v1.linux runc
 Default Runtime: runc
 Init Binary: docker-init
 containerd version: d71fcd7d8303cbf684402823e425e9dd2e99285d
 runc version: b9ee9c6314599f1b4a7f497e1f1f856fe433d3b7
 init version: de40ad0
 Security Options:
  seccomp
   Profile: default
 Kernel Version: 5.10.16.3-microsoft-standard-WSL2
 Operating System: Docker Desktop
 OSType: linux
 Architecture: x86_64
 CPUs: 4
 Total Memory: 12.32GiB
 Name: docker-desktop
 ID: WHDE:PJF3:HVFC:AZJA:EDKH:VUZR:RRUJ:HHXX:TDV5:4UJG:XY4E:PK4F
 Docker Root Dir: /var/lib/docker
 Debug Mode: false
 Registry: https://index.docker.io/v1/
 Labels:
 Experimental: false
 Insecure Registries:
  127.0.0.0/8
 Live Restore Enabled: false
The wsl -d command as illustrated above is a good way to connect to the docker-desktop distro. The alternative to get to the distro is via privileged container (Docker) or helper pod (Kubernetes), which is the same as in Docker-desktop on MacOS. Refer to the section above for specific steps.
Application Install on docker desktop
The followings are my notes to install commonly used applications in Docker Desktop with Kubernetes. They work on both MacOS or WSL2, requiring Kubernetes enabled.
Metric server
The metric server is provided in the official repository. Releases are publish here, which provides the installation step as follows:
kubectl apply -f https://github.com/kubernetes-sigs/metrics-server/releases/download/v0.5.0/components.yaml
However, there is some issues when deploying it on MacOS, the deployment will fail due to certificates not matching the hostname. To fix the issue, it is recommended to download the yaml file (components.yaml), and edit the file by adding –kubelet-insecure-tls to the args section of the container named metrics-server. This is sufficient to fix the issue. Some people are not comfortable with port 443 being insecure TLS, and would rather change the port to 4443. This is completely unnecessary but if that’s the case, make sure the named port for https is also updated to 4443.
Once metric server has been installed, the following two commands should return meaningful results:
kubectl top no
kubectl top po
This should also allow application (Pods) to query for cluster resource usage. When working with single-node cluster on MacOS or WSL2, multiple Pods might come up with a single command and the memory can be easily over-subscribed. The two commands above allows you to check and make adjustment on the node configuration (in Docker preference).
Dashboard
Similar to metric server, the dashboard is kept in the official repo, in the the path of aio/deploy/recommended.yaml. Here is the published release, where the instruction says:
kubectl apply -f https://raw.githubusercontent.com/kubernetes/dashboard/v2.3.1/aio/deploy/recommended.yaml
However, this is not directly applicable either because the login page requires token or kubeconfig. We need to be able to bypass that. To do so, download the yaml file (recommended.yaml), and add parameter –enable-skip-login to the args section for the container named kubernetes-dashboard.
To display the login page properly, we need to start the proxy using this command:
kubectl proxy
The login page will then be available at this URL. The URL reflects the namespace and service name. On the login page, the skip button will be available.
Rancher
The official installation guide of Rancher 2.5x recommends RKE Kubernetes. If you prefer not to run a separate cluster on MacOS, you can install it on docker desktop (with Kubernetes enabled). The installation steps require Helm 3 and are completed in three helm commands.
- Install Nginx Ingress controller using Helm, following the three commands here. Alternatively, you can apply the rendered template as posted here. The controller will later be used by the ingress that Rancher’s chart creates.
- Follow the steps on this page to install Rancher, even though the page does not say it applies to docker desktop. If you do not have TLS certificate, the Rancher helm chart can generate one for you, using cert-manager.
- The installation exposes rancher application on port 443 of the MacBook, and the cert is issued to “rancher.my.org” by default. To access it, add “127.0.0.1 rancher.my.org” to the host file.
To back out from the steps above, just uninstall with helm. For example:
helm uninstall rancher -n cattle-system
helm uninstall cert-manager -n cert-manager
helm uninstall ingress-nginx
Jenkins
Similar to Rancher, Jenkins instruction assumes minikube cluster instead of docker desktop.
helm repo add jenkinsci https://charts.jenkins.io
helm repo update
kubectl create namespace jenkins
helm install jenkins -n jenkins -f https://raw.githubusercontent.com/jenkinsci/helm-charts/main/charts/jenkins/values.yaml jenkinsci/jenkins
kubectl --namespace jenkins port-forward svc/jenkins 8080:8080
To find out the default password for admin user:
kubectl -n jenkins get secrets jenkins -o jsonpath={.data.jenkins-admin-password} | base64 -D
To uninstall Jenkins:
helm uninstall jenkins -n jenkins
Container Runtime
Although I seem to be a proponent of docker desktop thus far, this post would be incomplete to not discuss what is missing with docker desktop. One key difference between docker desktop and minikube is the container runtime being used. Docker desktop uses docker as the runtime, and it does not support other runtime as of now. Minikube allows user to choose runtime, including containerd.
Because of this difference, Kubernetes nodes with Docker as runtime and with containerd as runtime place pod log files in different locations. To find out the runtime, use the following command:
kubectl describe node <node_name> | grep Runtime
If the runtime is docker, the stdout of container is placed in /var/lib/docker/containers/<sha>/. If the runtime is containerd, the stdout log of pods are stored in /var/log/containers/. This is important to know when you configure log shipping and needs to get stdout from node. The log path used in containerd is the standard path in compliance with Container Runtime Interface (CRI) so you should develop log shipping solution based on that.
Docker’s refusal to comply to CRI also caused Kubernetes to stop supporting it as container runtime as of Dec 2020. For more background, refer to this and this. Here is also an article with great diagrams on the removal of docker-shim.
Bottom line
Docker-desktop is a great tool for a quick single-node Kubernetes environment. As of docker 20.10, docker-desktop still uses docker as runtime. This limits its use case to development only.
If you need a CRI compliant environment, docker-desktop is not a good choice. We will discuss alternatives in the next post.