

Istio is a popular open-source service mesh implementation using Envoy proxy. One of the benefit of using Istio is the ingress and egress it brings to native Kubernetes platform. This article is a hands-on guide to test Istio ingress and egress gateways on Minikube. It was tested on my MacBook. All the information in this post can be found in several different pages from Istio and Minikube documentation. The purpose of this article is a single cheat sheet for myself to quickly set up Istio ingress and egress testing.
Install Istio on Minikube
We start with configuring Minikube on MacBook (or change the command accordingly on other platform), and install metal LB load balancer. The steps with Istio also works with a regular Kubernetes platform.
minikube start --memory=12288 --cpus=6 --kubernetes-version=v1.20.2 --nodes 3 --container-runtime=containerd --driver=hyperkit
minikube addons enable metallb
Then we need to give load balancer an IP address range before setting up the load balancer. Minikube adds an interface named bridge100 to MacOS host environment. The IP address of the host can be found via the following command:
minikube ssh "ping host.minikube.internal -c 1"
For example, my host IP address is 192.168.64.1, so I dedicate the IP range 192.168.64.64 to 192.168.64.80 to the MetalLB load balancer. Then I need to provide this range when configuring the load balancer:
minikube addons configure metallb
kubectl -n metallb-system get po
After the configuration, make sure the MetalLB pod is up. Then we can install istio to the Kubernetes cluster. The steps are completed using istioctl following the instruction, I created a quick and dirty script to put the steps together:
#! /bin/bash
curl -L https://istio.io/downloadIstio | sh -
export PATH=$(realpath istio*/bin):$PATH
ln -sfn $(ls -d -- istio-*) istio
if istioctl x precheck; then
  echo ready to install istio and lable namespace for istio-injection
  istioctl install --set profile=demo -y --verify --set meshConfig.outboundTrafficPolicy.mode=REGISTRY_ONLY
  kubectl label namespace default istio-injection=enabled
else
  echo failed precheck
  exit 1
fi
The script above download the istio zip file, unzips it, installs Istio (in demo mode and set outboundTrafficPolicy to REGISTRY_ONLY), labels default namespace for proxy injection. To use istioctl without spelling out full path, we can run the following command again separately outside of script:
export PATH=$(realpath istio/bin):$PATH
To validate, check istioctl version command.
Install Sample application
For simplicity, the rest of this article uses httpbin to test Istio’s ingress and egress. For completeness, this section gives the steps to install bookinfo application as it is used in other Istio testing as well. It also help understand how to ingress to an application with Istio using an IP provided by the load balancer. Skip this section if just need to test with the simple httpbin application. The Bookinfo application comes within the istio 1.12 directory. In the following steps from the istio directory, we install some observability add-ons as well as the bookinfo application. Then we test access to the website.
kubectl apply -f samples/addons/prometheus.yaml
kubectl apply -f samples/addons/kiali.yaml
kubectl apply -f samples/addons/jaeger.yaml
kubectl apply -f samples/addons/grafana.yaml

kubectl apply -f samples/bookinfo/platform/kube/bookinfo.yaml
kubectl apply -f samples/bookinfo/networking/bookinfo-gateway.yaml

kubectl exec "$(kubectl get pod -l app=ratings -o jsonpath='{.items[0].metadata.name}')" -c ratings -- curl -sS productpage:9080/productpage | grep -o "<title>.*</title>"

export INGRESS_HOST=$(kubectl -n istio-system get service istio-ingressgateway -o jsonpath='{.status.loadBalancer.ingress[0].ip}')
export INGRESS_PORT=$(kubectl -n istio-system get service istio-ingressgateway -o jsonpath='{.spec.ports[?(@.name=="http2")].port}')
export GATEWAY_URL=$INGRESS_HOST:$INGRESS_PORT
curl -s "http://${GATEWAY_URL}/productpage" | grep -o "<title>.*</title>"
On my laptop, the value of $GATEWAY_URL is 192.168.64.64:80. Therefore I can browse to site http://192.168.64.64:80/productpage with local browser. We can also check kiali dashboard:
istioctl dashboard kiali
Then we are good to examine ingress and egress.
Prep Work
The following custom resources are related to traffic management in istio:
- Virtual Service (vs)
- Destination Rule (dr)
- Service Entry (se)
- Gateway (gw, Istio’s ingress or egress)
We will expand on the role of each in a separate article. To execute command from within a Pod, we also use sleep application which is essentially a Pod with a sleeper thread for the purpose allowing user to run troubleshooting command. The sleep application is provided in istio directory:
kubectl apply -f samples/sleep/sleep.yaml
kubectl get po -l app=sleep
Find out the Pod name to execute command. Then we use httpbin website to emulate an external service, and use the sleep Pod (suppose the name is sleep-557747455f-q99cz) to access the service:
kubectl exec -it sleep-557747455f-q99cz -c sleep -- curl http://httpbin.org/headers
As we previously set outboundTrafficPolicy.mode=REGISTRY_ONLY, this step is expected to output nothing. If this is not the case, it means the cluster may have ALLOW_ALL as outbount traffic policy, and you will need to follow this guide to set it to REGISTRY_ONLY. With REGISTRY_ONLY, in order to allow access, we need to register a service entry, by applying the document below:
apiVersion: networking.istio.io/v1alpha3
kind: ServiceEntry
metadata:
  name: httpbin
spec:
  hosts:
  - httpbin.org
  ports:
  - number: 80
    name: http
    protocol: HTTP
  resolution: DNS
Now we should be able to access httpbin service as it is registered:
kubectl get se httpbin -o yaml
Using the exec command above again, we should see output from the curl command.
Ingress Testing
We deploy an httpbin service in order to test ingress. The YAML declaration is prepared by Istio installation package:
kubectl apply -f samples/httpbin/httpbin.yaml
Then we deploy the ingress:
apiVersion: networking.istio.io/v1alpha3
kind: Gateway
metadata:
  name: httpbin-gateway
spec:
  selector:
    istio: ingressgateway
  servers:
  - port:
      number: 80
      name: http
      protocol: HTTP
    hosts:
    - "httpbin.digihunch.com"
The selector above indicates that the gateway deployed to a Pod labeled with istio: ingressgateway. Then we create a corresponding virtual service for this gateway:
apiVersion: networking.istio.io/v1alpha3
kind: VirtualService
metadata:
  name: httpbin
spec:
  hosts:
  - "httpbin.digihunch.com"
  gateways:
  - httpbin-gateway
  http:
  - match:
    - uri:
        prefix: /status
    - uri:
        prefix: /delay
    route:
    - destination:
        port:
          number: 8000
        host: httpbin
Note that the hosts setup must match the configuration in gateway. The virtual service defines two services at URIs /status and /delay to expose, and we can confirm the creation of virtual service:
kubectl get vs httpbin -o yaml
We can then test with curl command from MacOS host to verify that the ingress is working. We need to use the IP address of the service (192.168.64.64 with port 80 as previously indicated):
curl -I -HHost:httpbin.digihunch.com http://192.168.64.64/status/200
curl -I -HHost:httpbin.digihunch.com http://192.168.64.64/delay/2
We use -HHost to emulate this request going to httpbin.digihunch.com (otherwise we’d have to fake DNS entry in /etc/hosts). Both command should give their return without error. The second command will give return after a delay of 2 seconds.
This validates the success of ingress setup.
Egress Testing
To visit an external service, there are four options:
- Just access external service from Pods, when you have global.outboundTrafficPolicy.mode=ALLOW_ANY
- Use ServiceEntry (as illustrated above in Prep Work)
- Bypass envoy proxy (not recommended, because there is no role of service mesh)
- Configure an Egress Gateway
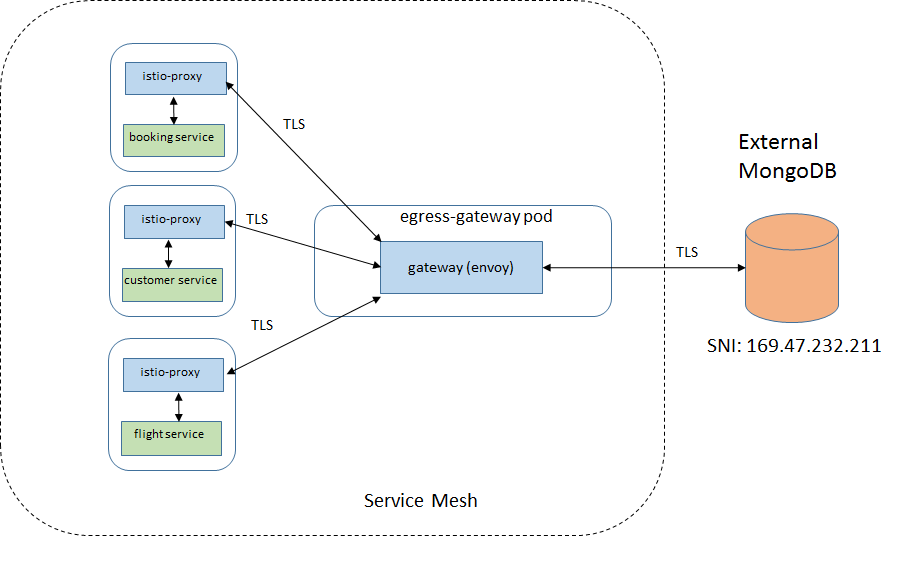
In the Prep Work, we’ve seen how to use Service Entry. However, there is no control of how Pods access the external service. We are going to configure an Egress Gateway to manage the outgoing traffic flow. This allows you to manage route, and apply observability features to the outgoing traffic, something the Service Entry alone will not provide. The egress gateway have two typical use cases as explained on Istio website.
First, we want to confirm that the egress pod exists, with a quick command:
kubectl get po -n istio-system -l app=istio-egressgateway && kubectl get se
It should exist as we installed istio as demo version. We then also need a service entry, as we have already configured in Prep Work. At this point, the egress gateway resource has not been created.
Now, in a separate terminal, we monitor the log of egress pod
kubectl logs -f istio-egressgateway-7d5d69dcfd-kvwxv -n istio-system
With the -f (follow) session on, if we visit external service as we did during Prep Work, there is no new entry pop up at the tail of the log. This is because the external access is still not managed by egress. Now we need to add egress, with the following resources applied:
apiVersion: networking.istio.io/v1alpha3
kind: Gateway
metadata:
  name: istio-egressgateway
spec:
  selector:
    istio: egressgateway
  servers:
  - port:
      number: 80
      name: http
      protocol: HTTP
    hosts:
    - httpbin.org
Then we setup the virtual service with related rules:
apiVersion: networking.istio.io/v1alpha3
kind: VirtualService
metadata:
  name: vs-for-egressgateway
spec:
  hosts:
  - "httpbin.org"
  gateways:
  - istio-egressgateway
  - mesh
  http:
  - match:
    - gateways:
      - mesh
      port: 80
    route:
    - destination:
        host: istio-egressgateway.istio-system.svc.cluster.local
        subset: httpbin
        port:
          number: 80
      weight: 100
  - match:
    - gateways:
      - istio-egressgateway
      port: 80
    route:
    - destination:
        host: httpbin.org
        port:
          number: 80
      weight: 100

---
apiVersion: networking.istio.io/v1alpha3
kind: DestinationRule
metadata:
  name: dr-for-egressgateway
spec:
  host: istio-egressgateway.istio-system.svc.cluster.local
  subsets:
  - name: httpbin
With all applied, we can repeat the access command using curl, and watch for the log tail.
kubectl exec -it sleep-557747455f-q99cz -c sleep -- curl http://httpbin.org/ip
The log should output a line saying curl command access, which indicates that this outbound access is managed by istio egress gateway. The log line looks like below and in the example the IP address 10.244.2.4 is the Pod IP address.
[2021-11-22T01:22:47.547Z] "GET /ip HTTP/2" 200 - via_upstream - "-" 0 45 818 816 "10.244.2.9" "curl/7.80.0-DEV" "9ec0a193-77f0-90a5-b132-21c3259307da" "httpbin.org" "3.216.167.140:80" outbound|80||httpbin.org 10.244.2.4:42372 10.244.2.4:8080 10.244.2.9:52710 - -Looking at the virtual service declaration, you might noticed multiple routes in the virtual service. The first route (mesh) tells sidecars to route request to egress gateway. The second route (istio-egressgateway) tells egress gateway to route traffic to external service as destination.
In real life, there’s more to consider. For example, we usually want the host to allow on egress to be a wild card host such as *.api.google.com. While the hosts field in virtual service can be wild card, the route destination in virtual service has to be a list of fully qualified domains. The other situation is the destination website may issue an HTTP redirect to a different host, which also needs to be registered as a destination. These details can add up to administrative effort.
An other real life scenario is the use of authorization policy. Authorization policy rules use SPIFEE identity of a Pod. If a Pod initiates egress connection to destination host in TLS, then the Pod’s SPIFFEE identity and its identity for external TLS connection are in conflict.
With Azure AKS
The steps above also works on other cloud platform such as AKS. This is an AKS cluster that I tested the steps. The Terraform code provisions a private cluster, as well as a Bastion Host. From the Bastion host, we can perform the same steps as above.
When Istio gets installed, it will created a Service object called istio-ingressgateway in the istio-system namespace. The service is of load balancer type and by default will create a public load balancer in Azure AKS.
The test steps will also work for private load balancers. To tell Azure to create private load balancer on a specific subnet, the Service object needs to include annotation. We have to customize Istio installation in order to do that, using the following overlay file (azoverlay.yaml):
apiVersion: install.istio.io/v1alpha2
kind: IstioControlPlane
metadata:
  namespace: istio-operator
  name: custom-istiocontrolplane
spec:
  profile: demo
  values:
    gateways:
      istio-ingressgateway:
        serviceAnnotations:
          service.beta.kubernetes.io/azure-load-balancer-internal: "true"
          service.beta.kubernetes.io/azure-load-balancer-internal-subnet: "suitable-porpoise-lb-subnet"
This is inspired by this post. Then the command to install Istio becomes:
istioctl install -f azoverlay.yaml -y --verify --set meshConfig.outboundTrafficPolicy.mode=REGISTRY_ONLY
This concludes the hand-on guide for Istio ingress and egress labs. I will need to write another post explaining the related concepts.