
In the previous post, I mentioned that Knative Serving and Knative Eventing should be seen as two different projects. The former is supposed to be widely used as a serving layer for microservices, whereas the latter has a narrower customer base. There are a dozen companies who need to build Platform as a Service, and will benefit from event-driven architecture. They are the niche customer for Knative Eventing. In this post, we go through two demos for Eventing.
Event Driven Architecture
Before jumping into Knative eventing, let’s first understand the value of event-driven architecture. As covered in Knative presentation in 2020, a growing micro-service architecture involves lots of service-to-service communications that looks like a spider web in a diagram. Two services communicating with each other are tightly coupled: changing one requires a change of the other. Event-driven architecture evolves to decouple those interdependent services. Knative eventing tries to standardize the event data with Cloud Event and also proposes a framework to drive this architecture.
The documentation uses different words to express the same concepts. So let’s take a note first: source = producer which emits events, and sink = subscriber = consumer which is the destination of events. Knative Eventing supports two models of in even-driven architecture.
Brokers and Triggers provides an “event mesh”. Event producers delivers events to a Broker. Triggers then distribute them uniformly by consumers.
Broker is a “hub” for events. It is a central location to receive and send events for delivery. We can choose from the following broker types:
- MT (multi-tenant) channel-based broker (which a channel implementation, such as Kaka channel or an in-memory channel)
- GCP broker
- Apache Kafka broker
- RabbitMQ broker
Triggers represents a desire to subscribe to events from a specific broker. It can act as a filter
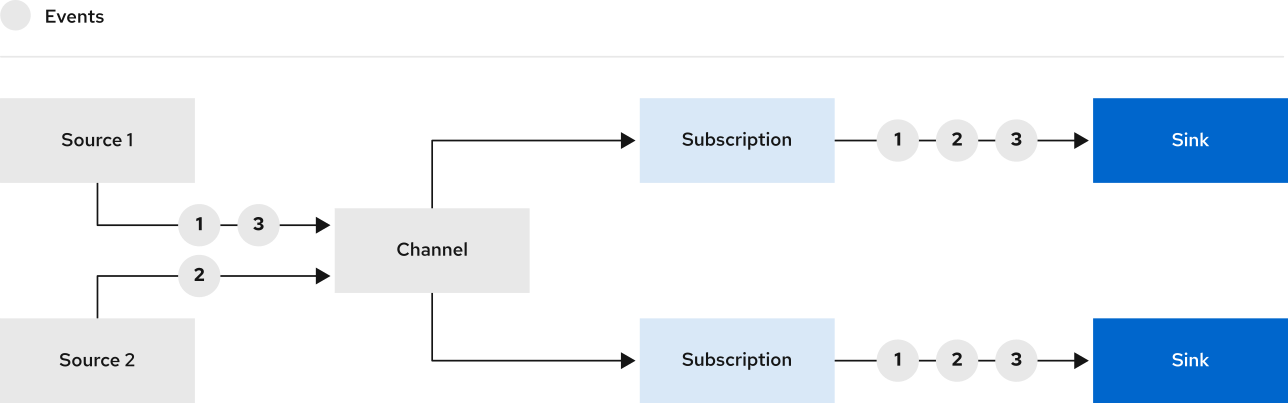
Channels and Subscriptions provide a “event pipe” model which transforms and routes events between Channels using Subscriptions. This model makes more sense when events out of one system needs to be transformed and then routed to another process.
A channel can be either a generic channel object, or a custom channel implementation (such as Kafka channel or in-memory channel)
The subscription consists of a Subscription object, which specifies the Channel and the Sink (aka the Subscriber) to deliver events to. You can also specify some Sink-specific options, such as how to handle failures.
The key difference is Broker-Trigger model allows you to filter events, where as Channel-Subscription model allows you to transform events.
Note that a Knative Service can act as both a Source and a Sink for events, and for good reason. You may want to consume events from the Broker and send modified events back to the Broker, as you would in any pipeline use-case. Between these components, Knative Eventing uses CloudEvents to send information back and forth.
Knative Eventing Lab
We can create a lab cluster using Kind as per the instruction in real-quicK-cluster. In docker-desktop settings, I configured 6 CPU and 8GB memory as the lab involves a number of nodes. The creation takes a couple minutes. This Knative eventing lab has four paths one can take, based on different model and different implementations:
- Lab A demonstrates the configuration of broker-trigger model using Kafka based broker.
- Lab B demonstrates the configuration of channel-subscription model, using in-memory channel.
The two labs share some common steps. We first install Knative Eventing using the provided manifests:
$ kubectl apply -f https://github.com/knative/eventing/releases/download/knative-v1.3.0/eventing-crds.yaml
$ kubectl apply -f https://github.com/knative/eventing/releases/download/knative-v1.3.0/eventing-core.yaml
$ kubectl get pods -n knative-eventing
The Pods should come to READY fairly quickly. In the mean time, we can configure the consumer as well using the manifests below:
apiVersion: v1
kind: Namespace
metadata:
  name: event-example
---
apiVersion: apps/v1
kind: Deployment
metadata:
  name: hello-display
  namespace: event-example
spec:
  replicas: 1
  selector:
    matchLabels: &labels
      app: hello-display
  template:
    metadata:
      labels: *labels
    spec:
      containers:
        - name: event-display
          image: gcr.io/knative-releases/knative.dev/eventing/cmd/event_display
---
kind: Service
apiVersion: v1
metadata:
  name: hello-display
  namespace: event-example
spec:
  selector:
    app: hello-display
  ports:
  - protocol: TCP
    port: 80
    targetPort: 8080
---
apiVersion: apps/v1
kind: Deployment
metadata:
  name: goodbye-display
  namespace: event-example
spec:
  replicas: 1
  selector:
    matchLabels: &labels
      app: goodbye-display
  template:
    metadata:
      labels: *labels
    spec:
      containers:
        - name: event-display
          image: gcr.io/knative-releases/knative.dev/eventing/cmd/event_display
---
kind: Service
apiVersion: v1
metadata:
  name: goodbye-display
  namespace: event-example
spec:
  selector:
    app: goodbye-display
  ports:
  - protocol: TCP
    port: 80
    targetPort: 8080
The consumers (aka sinks) will be able to process events at the validation step at the end.
Lab A – Install Kafka and configure Kafka-based Broker
This lab is for broker-trigger model. We first configure a Kafka Broker, which requires a Kafka cluster. The document uses Strimzi operator to quickly install Kafka cluster. Instead, here we use Helm to install the Kafka cluster:
helm install my-cluster-kafka bitnami/kafka -n kafka --create-namespace --set volumePermissions.enabled=true --set replicaCount=3
At the end of installation, the Helm notes indicate that the bootstrap server is my-cluster-kafka.kafka.svc.cluster.local:9092. All Kafka pods should come ready in about 5 minutes. After cluster install, we need to install Kafka controller and the Broker-layer data plane which allow you to map a Kafka instance to Broker CRD later:
kubectl apply -f https://github.com/knative-sandbox/eventing-kafka-broker/releases/download/knative-v1.3.0/eventing-kafka-controller.yaml
kubectl apply -f https://github.com/knative-sandbox/eventing-kafka-broker/releases/download/knative-v1.3.0/eventing-kafka-broker.yaml
kubectl get pods -n knative-eventing
kubectl -n knative-eventing edit cm kafka-broker-config
As the command above suggests, once data plane is installed, we edit the default broker config by updating the bootstrap.servers with the bootstrap server address noted above. We also need to make sure the replication factor is no greater than number of partitions, which should not be a problem in our lab as the replica count was set to 3.
Now we can create a Broker in the same namespace with consumer:
apiVersion: eventing.knative.dev/v1
kind: Broker
metadata:
  name: default
  namespace: event-example
  annotations:
    eventing.knative.dev/broker.class: Kafka
spec:
  config:
    apiVersion: v1
    kind: ConfigMap
    name: kafka-broker-config
    namespace: knative-eventing
Once the manifest above is applied, we should see the status of broker (named default) to be READY. We can also validate broker creation with kn CLI command:
 $ kubectl -n event-example get broker default
NAME      URL                                                                                    AGE   READY   REASON
default   http://kafka-broker-ingress.knative-eventing.svc.cluster.local/event-example/default   19m   True
$ kn broker list -n event-example
NAME      URL                                                                                    AGE   CONDITIONS   READY   REASON
default   http://kafka-broker-ingress.knative-eventing.svc.cluster.local/event-example/default   19m   7 OK / 7     True
Then we create Triggers that connects both to the broker with filters, and to the consumers by referencing service name. The manifest to create triggers is provided below:
apiVersion: eventing.knative.dev/v1
kind: Trigger
metadata:
  name: hello-display
  namespace: event-example
spec:
  broker: default
  filter:
    attributes:
      type: greeting
  subscriber:
    ref:
     apiVersion: v1
     kind: Service
     name: hello-display
---
apiVersion: eventing.knative.dev/v1
kind: Trigger
metadata:
  name: goodbye-display
  namespace: event-example
spec:
  broker: default
  filter:
    attributes:
      source: sendoff
  subscriber:
    ref:
     apiVersion: v1
     kind: Service
     name: goodbye-display
We can confirm the setups above by monitoring the resources (like we did for broker), or use knative CLI:
$ kn trigger list -n event-example
NAME              BROKER    SINK                      AGE     CONDITIONS   READY   REASON
goodbye-display   default   service:goodbye-display   3m24s   6 OK / 6     True
hello-display     default   service:hello-display     3m24s   6 OK / 6     True
Now we can go to the validation step to send event and validate result.
Lab B – Install in-memory channel and configure Channel
This lab is for channel-subscription model. we first install an in-memory channel:
kubectl apply -f https://github.com/knative/eventing/releases/download/knative-v1.3.0/in-memory-channel.yaml
Then we can map this channel to a Channel resource in Eventing. We can do so by applying the manifest below:
apiVersion: messaging.knative.dev/v1
kind: Channel
metadata:
 name: demo-channel-1
 namespace: event-example
---
apiVersion: messaging.knative.dev/v1
kind: Channel
metadata:
 name: demo-channel-2
 namespace: event-example
The creation of Channel resources can be verified as below
$ kn -n event-example channel list
NAME             TYPE              URL                                                                AGE     READY   REASON
demo-channel-1   InMemoryChannel   http://demo-channel-1-kn-channel.event-example.svc.cluster.local   6m34s   True
demo-channel-2   InMemoryChannel   http://demo-channel-2-kn-channel.event-example.svc.cluster.local   6m34s   True
Now we need to create Subscription which connects Channels to Consumers. Subscriptions can be created with the manifest below:
apiVersion: messaging.knative.dev/v1
kind: Subscription
metadata:
  name: demo-subscription-1
  namespace: event-example
spec:
  channel:
    apiVersion: messaging.knative.dev/v1
    kind: Channel
    name: demo-channel-1
  subscriber:
    ref:
      apiVersion: v1
      kind: Service
      name: hello-display
---
apiVersion: messaging.knative.dev/v1
kind: Subscription
metadata:
  name: demo-subscription-2
  namespace: event-example
spec:
  channel:
    apiVersion: messaging.knative.dev/v1
    kind: Channel
    name: demo-channel-2
  subscriber:
    ref:
      apiVersion: v1
      kind: Service
      name: goodbye-display
We can confirm subscription:
$ kn -n event-example subscription list
NAME                  CHANNEL                  SUBSCRIBER                REPLY   DEAD LETTER SINK   READY   REASON
demo-subscription-1   Channel:demo-channel-1   service:hello-display                                True
demo-subscription-2   Channel:demo-channel-2   service:goodbye-display                              True
Now we can go to validation step.
Validation
For validation, we need to first configure an event source. The source in our lab is a throw-away Pod with curl utility. I use my favourite nicolaka netshoot to fire off the events using. To launch the Pod and get to command shell:
$ kubectl run tmp-shell -n event-example --rm -i --tty --image nicolaka/netshoot -- /bin/bash
If you don't see a command prompt, try pressing enter.
bash-5.1#
We can POST message to the corresponding endpoint URL to fire events. The endpoint is different for each lab:
| Lab | URL |
|---|---|
| A (Kafka-based broker) | http://kafka-broker-ingress.knative-eventing.svc.cluster.local/event-example/default |
| B (channel) | http://demo-channel-1-kn-channel.event-example.svc.cluster.local http://demo-channel-2-kn-channel.event-example.svc.cluster.local |
With the correct URL, we can build a payload for POST method. Below is three curl commands with different payload POST to the same endpoint (taking lab A as an example):
# curl -v "http://broker-ingress.knative-eventing.svc.cluster.local/event-example/default" \
-X POST \
-H "Ce-Id: say-hello" \
-H "Ce-Specversion: 1.0" \
-H "Ce-Type: greeting" \
-H "Ce-Source: not-sendoff" \
-H "Content-Type: application/json" \
-d '{"msg":"Hello Knative!"}'

# curl -v "http://broker-ingress.knative-eventing.svc.cluster.local/event-example/default" \
-X POST \
-H "Ce-Id: say-goodbye" \
-H "Ce-Specversion: 1.0" \
-H "Ce-Type: not-greeting" \
-H "Ce-Source: sendoff" \
-H "Content-Type: application/json" \
-d '{"msg":"Goodbye Knative!"}'

# curl -v "http://broker-ingress.knative-eventing.svc.cluster.local/event-example/default" \
-X POST \
-H "Ce-Id: say-hello-goodbye" \
-H "Ce-Specversion: 1.0" \
-H "Ce-Type: greeting" \
-H "Ce-Source: sendoff" \
-H "Content-Type: application/json" \
-d '{"msg":"Hello Knative! Goodbye Knative!"}'
All the requests should receive 202 return code. As highlighted above, we specified type and source for each event fired to the broker. On the consumer side, we can simply check the pod log to verify the events received. Below is an example of events received as a result of the events sent above (take broker-trigger model as example):
$ kubectl -n event-example logs -l app=hello-display --tail=100
2022/03/09 17:05:59 Failed to read tracing config, using the no-op default: empty json tracing config
☁️  cloudevents.Event
Context Attributes,
  specversion: 1.0
  type: greeting
  source: not-sendoff
  id: say-hello
  datacontenttype: application/json
Extensions,
  knativearrivaltime: 2022-03-09T17:14:19.196589801Z
Data,
  {
    "msg": "Hello Knative!"
  }
☁️  cloudevents.Event
Context Attributes,
  specversion: 1.0
  type: greeting
  source: sendoff
  id: say-hello-goodbye
  datacontenttype: application/json
Extensions,
  knativearrivaltime: 2022-03-09T17:14:42.977803608Z
Data,
  {
    "msg": "Hello Knative! Goodbye Knative!"
  }
$ kubectl -n event-example logs -l app=goodbye-display --tail=100
2022/03/09 17:05:58 Failed to read tracing config, using the no-op default: empty json tracing config
☁️  cloudevents.Event
Context Attributes,
  specversion: 1.0
  type: not-greeting
  source: sendoff
  id: say-goodbye
  datacontenttype: application/json
Extensions,
  knativearrivaltime: 2022-03-09T17:14:27.430702588Z
Data,
  {
    "msg": "Goodbye Knative!"
  }
☁️  cloudevents.Event
Context Attributes,
  specversion: 1.0
  type: greeting
  source: sendoff
  id: say-hello-goodbye
  datacontenttype: application/json
Extensions,
  knativearrivaltime: 2022-03-09T17:14:42.977803608Z
Data,
  {
    "msg": "Hello Knative! Goodbye Knative!"
  }
This is the gist of Knative evening. Note that the format of HTTP payload when we fire off events needs to conform to CloudEvents format. The container image (event_display) used in the container is also created for the purpose of processing events received and display them in stdout.
Conclusion
Persistent storage allows for stateful applications on Kubernetes. It also enables architectural patterns that requires persistent storage. Knative eventing is a framework that enables event driven architecture. It supports many messaging channels (including NATs, a cloud-native messaging system) and broker types (MT channel based, GCP, RabbitMQ).