
My challenge with my just revived wordpress.com site is the plug-ins. Even paid premium users cannot install plug-ins for diagram, etc. I don’t want to upgrade to business plan so I decided to build my own.
14 years ago in university, I prototyped an intranet site using the Windows, Apache, MySQL, and PHP. It took a few weeks. Nowadays, this is referred to as WAMP stack with WordPress. AWS has a post on the best practices for hosting WordPress. However, I just need a single all-in-one server and there are some instruction on that. With Amazon Lightsail it was made a lot easier. The annual cost to host a WordPress site would be $55 in US, given that virtually nobody visits it except myself. The cost consists of:
- Domain registration for $13 a year
- Lightsail blueprint for $3.5 a month
There are several benefit of using this Lightsail blueprint, such as:
- You can actually SSH into the EC2 instance. This is important to myself in the habit of probing into how things work;
- Resources are all packaged into a fixed price plan. Remember the pesky accidental AWS charges?
- You have the whole LAMP stack pre-installed, with the bitnami image for WordPress;
- Start small but with scalability.
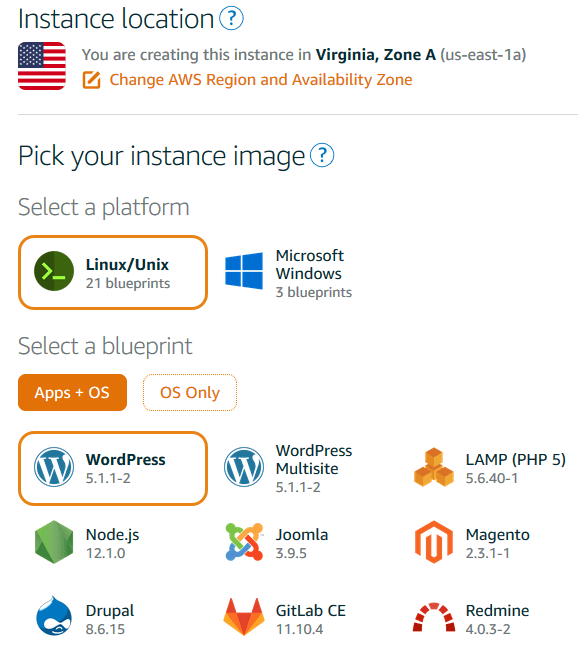
To start with Lightsail is extremely intuitive. Just click and launch:
There is a good instruction here on YouTube. Once launched successfully, there are some post configurations:
- Request a static IP and assign it to the EC2 instance;
- Register a domain (within Lightsail, with Route53 or any other domain registrar) and create an A record referencing the IP address;
- Create a certificate and set up anto-renewal. Here is an instruction but the steps differ if DNS is managed outside of Lightsail;
- Redirect http to https. Refer to the instruction from bitnami;
- Export from wordpress.com and import the xml into this little site.
Notice that all services relevant to hosting are packaged into a single service called bitnami. In order to restart service, instead of restarting php, httpd and mysql individually, you can run the following:
# service bitnami stop
# service bitnami start
In fact, in /etc/rc5.d or /etc/init.d, I do not find the individual services for httpd or mysql. There is actually an instance of MySQL database in the Instance:
# mysql -u root -p
mysql > show databases;
There you go! Now the site is live. This little instruction will come in handy for rebuilding when this site is blown away 🙂
Migrate to new LightSail instance
I have been using the same LightSail instance for 3.5 years and it’s been stable. By Dec 2022, the version of PHP (7.2.17) has been outdated and I decided to launch a new LightSail instance based on new version of image, which comes with newer version of PHP (8.1.13). Here is a note of my steps:
- Create a new LightSail instance with the same SSH key, assign a new static IP to it. As soon as the new instance is created, we can access it by IP on HTTP, using the initial credential provided.
- We need the latest version of All-in-One WP Migration plugin to perform the migration. Ensure its latest version is installed on both old and new instance.
- Export site to file using All-in-One WP Migration plugin. It should produce a single file with wpress extension. For this site, the site is 450MB by Dec 2022
- For the new site, try to upload the file and notice that the max size allowed is 80MB. I made the following changes:
- Change PHP attributes. Edit /opt/bitnami/php/etc/php.ini at the following attributes:
- post_max_size = 512M
- upload_max_filesize = 512M
- Change WordPress attributes. Create /opt/bitnami/wordpress/.htaccess with the following attributes:
- php_value upload_max_filesize 512M
- php_value post_max_size 512M
- php_value memory_limit 512M
- php_value max_execution_time 0
- php_value max_input_time 300
- Restart services related to wordpress
- Change PHP attributes. Edit /opt/bitnami/php/etc/php.ini at the following attributes:
- Now upload the .wpress file and it should take less than 5 minutes to upgrade. After the process, the new site is imported. Delete useless plugins.
- Port the certificate files, including keys, certificate and certificate chains. In my case, I had to edit the following files:
- /opt/bitnami/apache/conf/vhosts/wordpress-https-vhost.conf
- /opt/bitnami/apache/conf/vhosts/wordpress-vhost.conf
- /opt/bitnami/apache/conf/bitnami/bitnami.conf
- /opt/bitnami/apache/conf/bitnami/bitnami-ssl.conf
- Configure HTTP->HTTPS redirect on the new server. Revisit the files above.
- Change DNS record to point to the new server.
- Browse the site, check page and posts and pay attention to: images, tables, code blocks.
- One common issue is images do not display. Check the image URL. The URL might have been replaced by bad values during import. Use a plugin (e.g. Go Live Update Urls) to correct the URLs in tables.
- Use a plugin to find out broken links such as image, etc and fix the broken links. This should be an ongoing maintenance activity but is particularly worth doing on newly migrated site.
Other little things
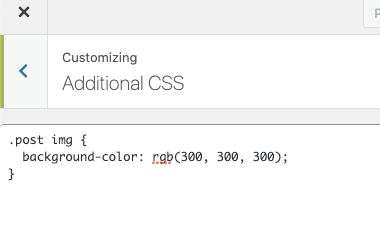
There are many little things to fix. For example, I need to give transparent images white background. This is because when the site’s background is black and the transparent area in the diagram will be black too, making diagrams (authored in white background) illegible. To do this, I have to add the following section to the additional CSS setting of the active theme:
WordPress is dynamic site and if you don’t edit the site often, and don’t want to start a static site from scratch (e.g. using Hugo or Jekyll frameworks), you can use WP2Static plugin. Make sure to configure S3 bucket and CloudFront accordingly.
Now, enjoy blogging.