
Istio service mesh allows application developers to offload non-core features to infrastructure layer. We explored authentication and authorization with Istio in a basic lab. In this post we continue to explore its capabilities with OIDC integration. This capability is made available thanks to the CUSTOM action in authorization policy, supported since the release of 1.9. It enables any workload on Istio to integrate with an external IAM solution.
The rest of this post, provides the step-by-step instruction to configure OIDC integration, based on Istio’s External Authorization use case. My work is influenced by two blog posts from jetstack and elastisys on similar topic, with my own additions, simplifications and clarifications. In this lab I use my own DNS hostname demo1.digihunch.com and to follow along you need to bring your own hostname as well. The prerequisites of this lab is summarized as below:
- An identity provider: we use Google in the lab but it can be anything with OIDC capabilities (e.g. Azure AD, Facebook). Read my old post for more details on OIDC.
- A public IP address for Cluster’s Ingress service: Since we use Google as identity provider on the Internet, we need our service to be exposed on the Internet because the OIDC integration involves a two-way HTTP redirect.
- Public DNS resolution to the service’s public IP: during authentication, the identity provider will call back with JWT. So we need our hostname demo1.digihunch.com resolved to the service’s public IP address. This is also required in other scenarios. For example, cert-manager needs to automatically configure X.509 certificate using Let’s Encrypt.
- An application workload: this is the tenant workload without its own IAM capability. We use a dummy workload base on a hello-world image, for simplicity.
The files required in this lab is in istio-oidc repo under the envoy directory. It is also important to understand the Authentication Code flow in OIDC authorization code flow to make sense of the integration between OIDC provider and Istio on our platform. For example, the client application needs a one-time registration with identity provider. Let’s start with this configuration.
Configure Identity Provider
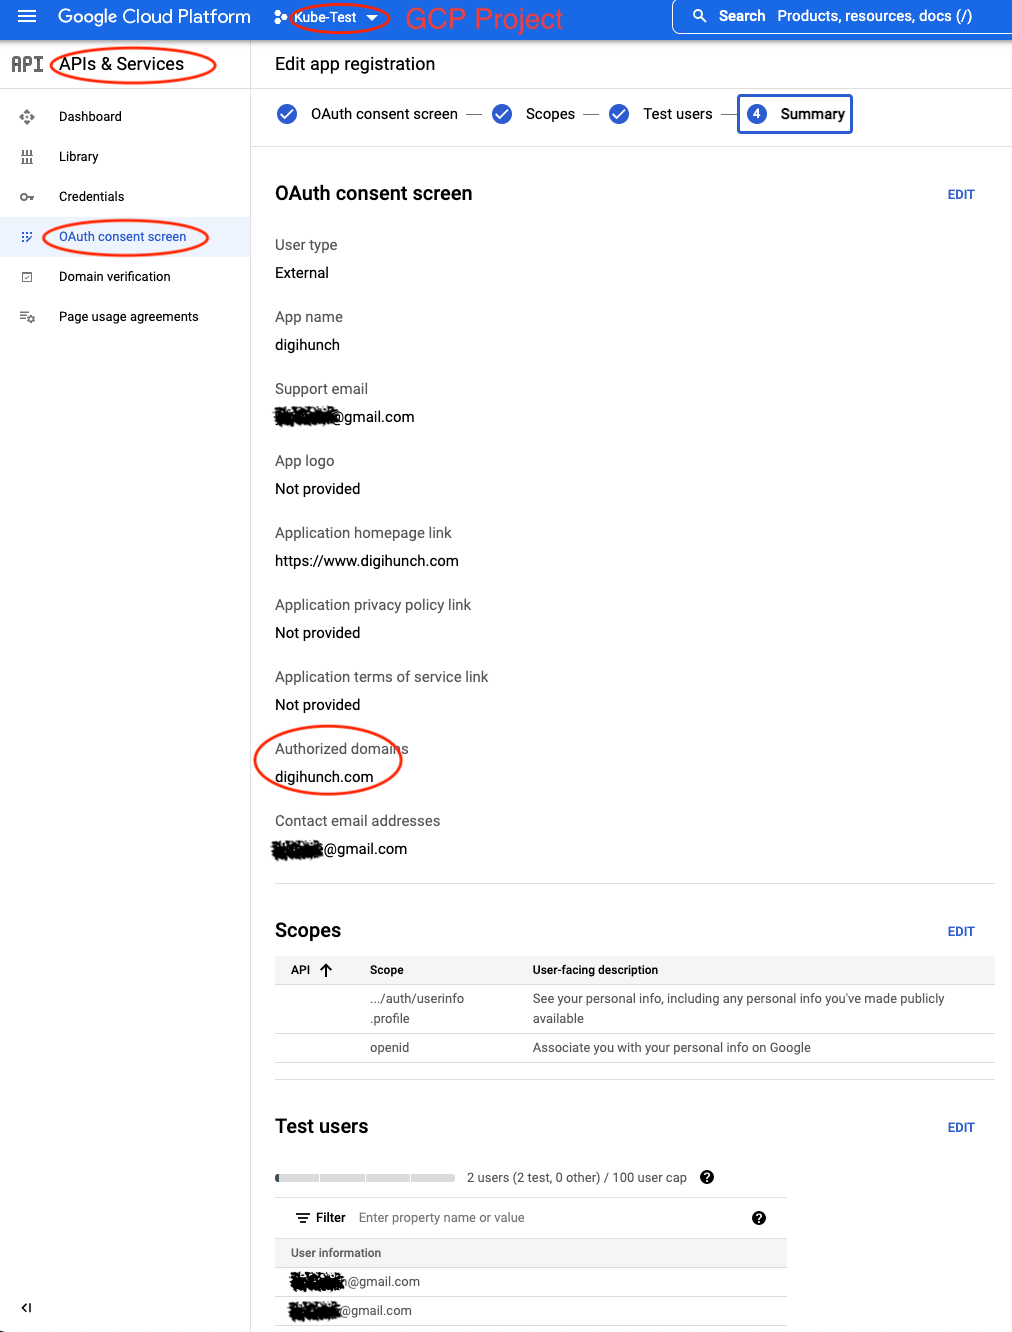
We need a Google account with a GCP project and log on to APIs & Services to register our application. At the console, from the left side bar, click on “OAuth consent screen” and create an App. Provide the followings:
- Step 1. OAuth consent screen. Under App Information, provide App name and User support email.
- Step 1. OAuth consent screen. Under App domain, provide Application home page
- Step 1. OAuth consent screen. Under Authorized domains, provide an Authorized domain.
- Step 3. Test users. Add the emails for Test users.
The summary page looks like this:
Then on the sidebar, click on Credentials. We create new credentials for OAuth 2.0 Client ID. Select Web application and add “https://demo1.digihunch.com/oauth2/callback” as an Authorized redirect URI. The credential created includes a Client ID and a Client secret, which can be downloaded as a JSON file. Here is my screen:
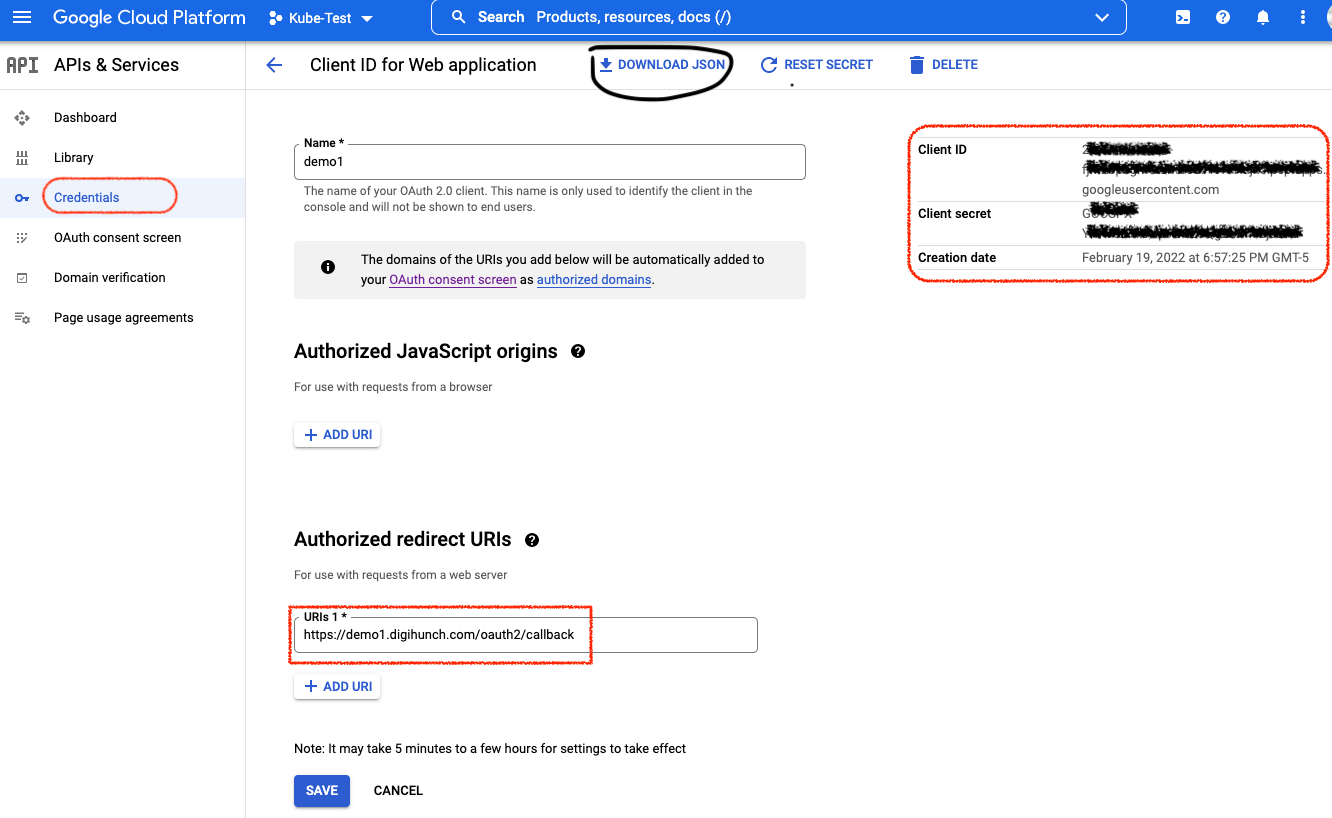
Note that the redirect URIs cannot be localhost. Because the browser will consume the redirect URI and it has no clue where localhost is. It must resolve to the public IP of the ingress.
We need to keep the Client ID and Client secret for later use. According to Google’s documentation, there is a discovery document from which we can understand the keys in their Open ID configuration. We need the value of two keys (issuer and jwks_url) to use later in the configuration.
Configure Infrastructure Services
My real-quicK-cluster project has a few different ways to quickly bring up a cluster. For this lab, I use Azure CLI command to create a simple, three-node cluster:
$ az aks create \
     -g AutomationTest \
     -n orthCluster \
     --node-count 3 \
     --enable-addons monitoring \
     --generate-ssh-keys \
     --vm-set-type VirtualMachineScaleSets \
     --network-plugin azure \
     --network-policy calico \
     --tags Owner=MyOwner
Then we configure kubeconfig credential to connect to the cluster, so that kubectl and helm CLI commands to connect to the newly created cluster.
$ az aks get-credentials --resource-group AutomationTest --name orthCluster
Then we will install the infrastructure services and workload. We can start with loading environment variables for use later:
OIDC_DISCOVERY=$(curl "https://accounts.google.com/.well-known/openid-configuration")
OIDC_ISSUER_URL=$(echo $OIDC_DISCOVERY | jq -r .issuer)
OIDC_JWKS_URI=$(echo $OIDC_DISCOVERY | jq -r .jwks_uri)
COOKIE_SECRET=$(openssl rand -base64 32 | tr -- '+/' '-_')
WEB_HOST="demo1.digihunch.com"
CLIENT_ID="ThisIsTheClientIDFromGoogle"
CLIENT_SECRET="ThisIsTheClientSecretFromGoogle"
For WEB_HOST, CLIENT_ID, CLIENT_SECRET, you need to bring your own values. The COOKIE_SECRET value is randomly generated. The variables OIDC_ISSUER_URL and OIDC_JWKS_URI are parsed from Google OpenID configuration and they should remain static. We can validate the value with echo commands. Also, to use helm v3 later, we need to add the repositories we need. These steps can be skipped if they have been performed in the client environment:
$ echo $OIDC_ISSUER_URL
https://accounts.google.com
$ echo $OIDC_JWKS_URI
https://www.googleapis.com/oauth2/v3/certs
$ helm repo add jetstack https://charts.jetstack.io
$ helm repo add istio https://istio-release.storage.googleapis.com/charts
$ helm repo add oauth2-proxy https://oauth2-proxy.github.io/manifests
$ helm repo update
Now, with Helm ready, we can install Cert Manager, Istio CRD, Control Plane, Gateways as well as OAuth2-Proxy using Helm. We run each of the following commands from the envoy directory, where the required files are stored:
$ helm install cert-manager jetstack/cert-manager \
    --namespace cert-manager \
    --create-namespace \
    --version v1.7.1 \
    --set installCRDs=true
$ helm install -n istio-system istio-base istio/base --create-namespace
$ helm -n istio-system install istiod istio/istiod -f istiod-values.yaml --wait
$ helm -n istio-system install istio-ingress istio/gateway -f ingress-gateway-values.yaml
$ kubectl -n istio-system get po
$ kubectl create ns oauth2-proxy && kubectl label ns oauth2-proxy istio-injection=enabled
$ helm install -n oauth2-proxy \
      --version 6.0.1 \
      --values oauth2-proxy-values.yaml \
      --set config.clientID=$CLIENT_ID \
      --set config.clientSecret=$CLIENT_SECRET \
      --set config.cookieSecret=$COOKIE_SECRET \
      --set extraArgs.oidc-issuer-url=$OIDC_ISSUER_URL \
      --set extraArgs.whitelist-domain=$WEB_HOST \
      oauth2-proxy oauth2-proxy/oauth2-proxy
$ kubectl -n oauth2-proxy get pods -l app=oauth2-proxy
Note that the istiod installation step uses a value file that includes extensionProviders. This is where we tell Istio to connect to external authorization provider:
meshConfig:
  accessLogFile: /dev/stdout
  extensionProviders:
  - name: oauth2-proxy
    envoyExtAuthzHttp:
      service: oauth2-proxy.oauth2-proxy.svc.cluster.local
      port: 4180
      includeRequestHeadersInCheck:
      - cookie
      headersToUpstreamOnAllow:
      - authorization
      headersToDownstreamOnDeny:
      - set-cookie
When we install istio ingress gateway, we need to expose port 80 as well as 443. Port 80 is used in ACME protocol for certificate configuration. We also installed oauth2-proxy with some configurations from oauth2-proxy-values.yaml as well as some argument set imperatively.
Once configuration is successful, we should be able to confirm that oauth2-proxy service is running. We should also be able to tell the External IP address of the Ingress:
$ kubectl -n oauth2-proxy get svc
$ kubectl -n istio-system get service istio-ingressgateway -o jsonpath='{.status.loadBalancer.ingress[0].ip}'
Now we can go to our DNS configuration portal, to populate the DNS A-record for demo1.digihunch.com with this IP address:
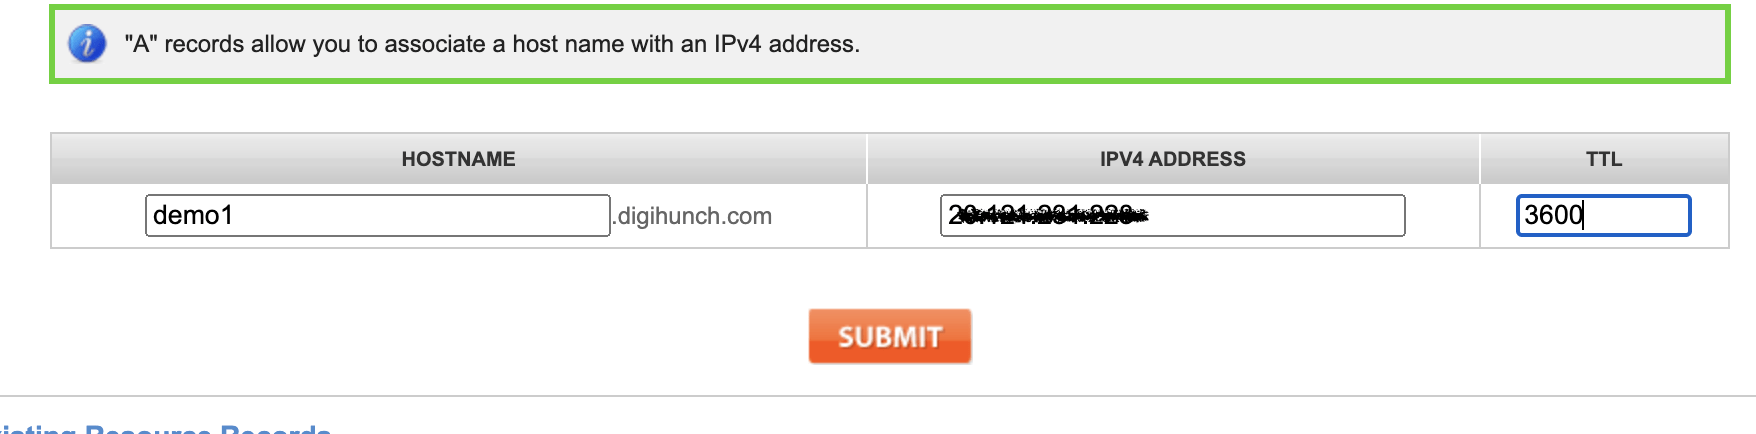
It may take several minutes to a couple of hours, for the A-record update/creation to take effect, depending on the TTL. Sit tight and query DNS with nslookup command, until it is set. In the next step, we will need successful DNS resolution for certificate configuration.
Install workload and configure Certificate
Now we install the workload, along with the necessary constructs such as Gateway CRD, Virtual Service, and certificates. We can use kubectl kustomize command to preview the changes, then apply the changes with -k:
$ kubectl kustomize demo
$ kubectl apply -k demo
When you have your own DNS hostname, modify the kustomization.yaml accordingly before applying. This command uses Kustomization to apply numerous YAML manifests in the demo directory, including the following activities:
- Create a Namespace named demo
- Create Deployment and Service
- Set up PeerAuthentication for the mesh
- Configure Ingress class, ClusterIssuer and Certificate using cert-manager
- Configure Virtual Service and Gateway
This configures everything we need and we need to verify from several aspects. The demo Service is a ClusterIP service exposed within the cluster at port 80. Then we check the status of certificate:
$ kubectl -n istio-system get certificate
$ kubectl -n istio-system describe certificate demo
The column of READY should have a value of True. Check the logs from cert manager Pods if that’s not the case. Common reasons include:
- The automatic ACME validation is just not ready
- The automatic ACME validation is still waiting for DNS resolution
- The Istio ingress gateway port 80 is not open for ACME validation
- The let’s encrypt server applies rate limiting
Note that for the ACME server, we can use staging server’s URL or productions. The former provisions a certificate that may come off as insecure as the CA is not fully trusted by browser. The latter doesn’t have this issue, but the server applies rate limiting. For more details of how validation with ACME work, check out my previous post.
Once the certificate is applied, our website is open to any visitor with HTTPS access:
Then we will use Request Authentication and Authorization Policy to tighten up the access by requiring visiting user to log in with Google identity.
RequestAuthentication and AuthorizationPolicy
We configure a CUSTOM action in the AuthorizationPolicy, and specified the provider by name oauth2-proxy. The YAML manifests for RequestAuthentication and AuthorizationPolicy looks like this:
apiVersion: security.istio.io/v1beta1
kind: RequestAuthentication
metadata:
  name: istio-ingressgateway
  namespace: istio-system
spec:
  jwtRules:
  - issuer: https://accounts.google.com
    jwksUri: https://www.googleapis.com/oauth2/v3/certs
  selector:
    matchLabels:
      app: istio-ingressgateway
---
apiVersion: security.istio.io/v1beta1
kind: AuthorizationPolicy
metadata:
  name: istio-ingressgateway
  namespace: istio-system
spec:
  action: CUSTOM
  provider:
    name: oauth2-proxy
  rules:
  - {}
  selector:
    matchLabels:
      app: istio-ingressgateway
Note that we cannot apply Request Authentication and Authorization Policy before we confirm that the Certificate has been created. This is because when letsencrypt use HTTP resolver to provision certificate with ACME protocol, the request from letsencrypt should get to the validating URI without being asked to provide a Google identity. So do not perform this step yet before confirming the previous step:
$ kubectl apply -f oidc-auth.yaml
Now launch your browser in incognito mode and browse to our URL (https://demo1.digihunch.com) and you will be re-redirected to log on to Google (accounts.google.com). Once logged on, you will have access to the site.
If you run into errors, check the oauth2-proxy log from Pod stdout, which should give a reason of 4xx errors. If oauth2-proxy log indicates no activity, confirm if the request has been forwarded to the proxy. Check the service object of the proxy and make sure it is exposed to the correct port, as indicated in the meshConfig. To check mesh config, examine the configmap named istio in the namespace of istio-system. To check if Istio’s authorization is unable to speak with oatuh2-proxy, inspect the log of istiod Pod.
To clean up the lab, remove the app registration from Google, and then delete the cluster from Azure:
$ az aks delete -g AutomationTest -n orthCluster
In this lab we used a very open AuthorizationPolicy. We can polish it up with more conditions such as:
apiVersion: security.istio.io/v1beta1
kind: AuthorizationPolicy
metadata:
  name: istio-ingressgateway
  namespace: istio-system
spec:
  action: CUSTOM
  provider:
    name: oauth2-proxy
  rules:
  - when:
    - key: request.auth.audiences
      values:
      - $CLIENT_ID
  selector:
    matchLabels:
      app: istio-ingressgateway
Under the rules section, we can explore the claims from the JWT and make creative use of it to achieve our specific goals for IAM.
Bottom line
In this lab, we registered our app with Google and obtained client ID and secret for it to identify our application. We configured oauth2-proxy as our IAM application, carrying the credential validated by Google. We also configured Istio to delegate authorization to oauth2-proxy as external authorization provide, making up an entire OIDC integration.
The third party service (IdP) we integrate with is GCP, which natively supports OIDC protocol. However, if the third party IdP does not support OIDC natively, such as Active Directory via LDAP, then we would need one more proxy to sit between OAuth2 and the external IdP service. One good choice is the Dex connector. Another more complex yet powerful alternative connector is Key Cloak. Consider Dex or KeyCloak as an OIDC proxy, when:
- The external IdP does not support OIDC; or
- We choose not to use the OIDC capability of the external IdP because we want to managed OIDC centrally in our own proxy
- The external identity provider does support OIDC, but the configuration is managed by a different team (e.g. IAM team) other than the platform team
AuthorizationPolicy is the key piece in this integration, and it is executed at the http filter in envoy sidecar proxy. It can be done with alternatives to OAuth2-Proxy such as the authservice project. A slightly different approach to implement OIDC integration is to use leverage extensibility of WebAssembly (a sandboxing technology to extend Envoy), which is suggested in this example for WasmPlugin. However, Wasm is still considered experimental.