

My previous blog discussed as service mesh what Istio can offer in terms of authentication and authorization capabilities. Istio can authenticate an incoming HTTP request, ensuring the JWT issued has not been tampered somewhere in the middle. The fields in the JWT allows for more flexibilities at the point of authorization. This combination allows Istio to integrate with identity providers that can issue JWT.
We’ve also discussed how JWT works, and pointed out that the two key element of request authentication is the JWT (payload signed with private key) itself as well as the JWK (carrying public key). In this post, we will test it in a lab. To start with this lab, we need a test cluster (e.g. Minikube) with Istio installed.
Preparation
I have not find a native Bash way to produce JWT. We will do that with python packages python_jwt and jwcrypto in Python3. Let’s install the modules and import them in Python environment.
$ python3 -m pip install python_jwt jwcrypto datetime
$ python3
>>> import python_jwt as jwt, jwcrypto.jwk as jwk, datetime
Now we’re in the Python3 shell with needed modules loaded. We can take the following steps to produce the JWT as well as the JWK:
RSAkey = jwk.JWK.generate(kty='RSA', size=2048)
private_key = RSAkey.export_private()
public_key = RSAkey.export_public()
raw_payload = {'iss':'digihunch.com','sub':'DIGIHUNCH','role':'reader','permission':'read'}

## use private key to generate jwt token. HTTP request will  bear this token
jwt_token = jwt.generate_jwt(raw_payload, jwk.JWK.from_json(private_key), 'RS256', datetime.timedelta(minutes=50))
print(jwt_token)

## The JWKS keeps public key and is referenced by Istio RequestAuthentication object
jwks='{"keys":['+public_key+']}'
print(jwks)

# Helpful command to print the key in PEM format:
##  RSAkey.export_to_pem(private_key=False)
# Helpful command to verify JWT token:
## header, claims = jwt.verify_jwt(jwt_token, jwk.JWK.from_json(public_key), ['RS256'])
To complete this lab, we need the values of jwt_token and jwks.
Next in the preparation is a local cluster, istio with metallb installed, which is covered in a previous post. We should be able to get the ingress IP address:
$ export INGRESS_HOST=$(kubectl -n istio-system get service istio-ingressgateway -o jsonpath='{.status.loadBalancer.ingress[0].ip}')
$ echo $INGRESS_HOST
We create our own namespace and use the httpbin application:
$ kubectl create ns web
$ kubectl label namespace web istio-injection=enabled
$ kubectl apply -n web -f httpbin.yaml
$ kubectl apply -n web -f httpbin-gateway.yaml
$ curl -I -XGET $INGRESS_HOST/headers
The curl command above (without any token) should return HTTP 200 code, indicating that no authorization token is needed to connect to the service. Note that the Pod for httpbin has the label app=httpbin which will be used in the request authentication. Also note that traffic is served over a named port called http in the Service object for http, which will implicitly enable HTTP based conditions for authorization policies we will build later.
Request Authentication
Let’s create a request authentication object with the following manifest:
apiVersion: "security.istio.io/v1beta1"
kind: "RequestAuthentication"
metadata:
  name: jwt-req-authn
  namespace: web
spec:
  selector:
    matchLabels:
      app: httpbin
  jwtRules:
  - issuer: "digihunch.com"
    jwks: |
      ## jwks output from previous step ##
Replace the last line with the jwks output from the preparation step and store it to jwt-req-authn.yaml. It should look like this:
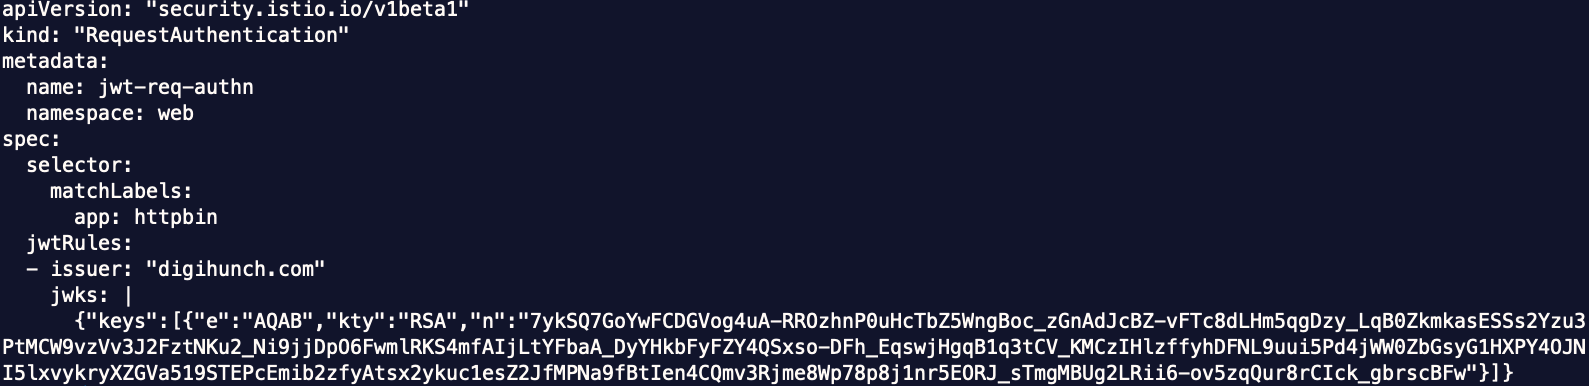
Then apply it to the web namespace:
$ kubectl -n web apply -f jwt-req-authn.yaml
Now the request authentication resource is applied to the httpbin workload. We first test it with a random authentication token and it should be denied of 401 error:
$ curl -I -XGET $INGRESS_HOST/headers --header "Authorization: Bearer randomstring"
HTTP/1.1 401 Unauthorized
www-authenticate: Bearer realm="http://192.168.64.16/headers", error="invalid_token"
content-length: 79
content-type: text/plain
date: Sun, 13 Feb 2022 16:13:32 GMT
server: istio-envoy
x-envoy-upstream-service-time: 31
Then we take the jwt_token from the preparation step and present it to the request authentication resource by sending an HTTP request with the appropriate authorization token. It should return an HTTP 200 code this time:
$ curl -I -XGET $INGRESS_HOST/headers --header "Authorization: Bearer eyJhbGciOiJSUzI1NiIsInR5cCI6IkpXVCJ9.eyJleHAiOjE2NDQ3NzE0NjUsImlhdCI6MTY0NDc2ODQ2NSwiaXNzIjoiZGlnaWh1bmNoLmNvbSIsImp0aSI6Im1faUhla2pNbWRmUmlsWEdCaTFBR3ciLCJuYmYiOjE2NDQ3Njg0NjUsInBlcm1pc3Npb24iOiJyZWFkIiwicm9sZSI6InJlYWRlciIsInN1YiI6IkRJR0lIVU5DSCJ9.sVppwmvDqKvSsVdB05a_mDHymZq7Okvnwu-caTywXQgsUvOA6HfaySp_WXMyTp1HQ4WcTqKE4frZm7QNtrZsPso4bdD_4mEDYTswTCWhblaPy236NJBEH3ilB2BVySBVQKsjyxd94F1KV24SFWiR6lUxk52wKKE3ipBwR79jPizhAu9xxrfJ2Lfi5ypNa_kjBdJi63KCt2Y0eW94Fjq3PZs4ZalHJyaXYSx5Gxyei5f7QdpEOBpvs13mSdi9RqkgVQOjE0V1uBRpMckMyZs-IijknJcSu4fkrjgfNmXsrm__-vlM9UjUl2Jlj0x8bRC8l20IZ6t1ml-GFkwj39JC0g"

HTTP/1.1 200 OK
server: istio-envoy
date: Sun, 13 Feb 2022 16:13:54 GMT
content-type: application/json
content-length: 589
access-control-allow-origin: *
access-control-allow-credentials: true
x-envoy-upstream-service-time: 17
In the example above, jwtRules can be used with other keys such as jwksUri to reference the jwks by Uri. More fields in JWTRules can be found here.
Now we have tested three curl commands:
- Without authentication token at all: http server (istio-envoy) returns 200 code.
- With an invalid authentication token: http server (istio-envoy) returns 401 code for error.
- with a valid authentication: http server (istio-envoy) returns 200 code.
So we have the capability to validate token, but it is not yet mandatory to present the token. We can change this behaviour by tweaking authorization policy.
Authorization Policy
According to Istio documentation, to restrict access to authenticated requests only, this should be accompanied by an authorization rule. We start with the following policy:
apiVersion: "security.istio.io/v1beta1"
kind: "AuthorizationPolicy"
metadata:
  name: auth-pol
  namespace: web
spec:
  selector:
    matchLabels:
      app: httpbin
  action: ALLOW
  rules:
  - from:
    - source:
        requestPrincipals: ["*"]
Applying the manifest above to namespace web to it applies to workload httpbin. Then we
$ curl -I -XGET $INGRESS_HOST/headers
HTTP/1.1 403 Forbidden
content-length: 19
content-type: text/plain
date: Sun, 13 Feb 2022 16:29:58 GMT
server: istio-envoy
x-envoy-upstream-service-time: 35
The requestPrincipals clause makes it mandatory to present a token. The RequestAuthentication validates the token.
We can beef up the authorization policies by adding claims to the conditions, for example:
apiVersion: "security.istio.io/v1beta1"
kind: "AuthorizationPolicy"
metadata:
  name: auth-pol
  namespace: web
spec:
  selector:
    matchLabels:
      app: httpbin
  action: ALLOW
  rules:
  - from:
    - source:
        requestPrincipals: ["*"]
    to:
    - operation:
        methods: ["GET"]
    when:
    - key: request.auth.claims[iss]
      values: ["digihunch.com"]
    - key: request.auth.claims[role]
      values: ["reader"]
Both the to and when conditions are for HTTP traffic only, and we must tell Istio to inspect the traffic as HTTP, which is done implicitly with named ports on the Service object. Refer to this common problem from Istio’s documentation. The request principals, if a none wildcard value is specified, will be a SPIFFE format identity, the same one used for peer authentication, as discussed in the previous post.
The when clause above contains two key-value pairs. The first looks for the value of a standard claim (iss), the second for a custom claim (role). In the preparation step, we created the claims with those claims in Python and they will match the condition here.
Should any of the conditions above not match, a 403 (Forbidden) error code will be returned by the workload’s istio-envoy proxy.
Verify mTLS connection
In some cases, we need to audit whether the TLS traffic between workloads actually take place in mTLS. As I was developing my korthweb project, I don’t find a straightforward way of validating TLS. We can validate that mTLS mode on a workload using the following istio CTL command:
$ istioctl x describe pod my-workload-pod -n [namespace]
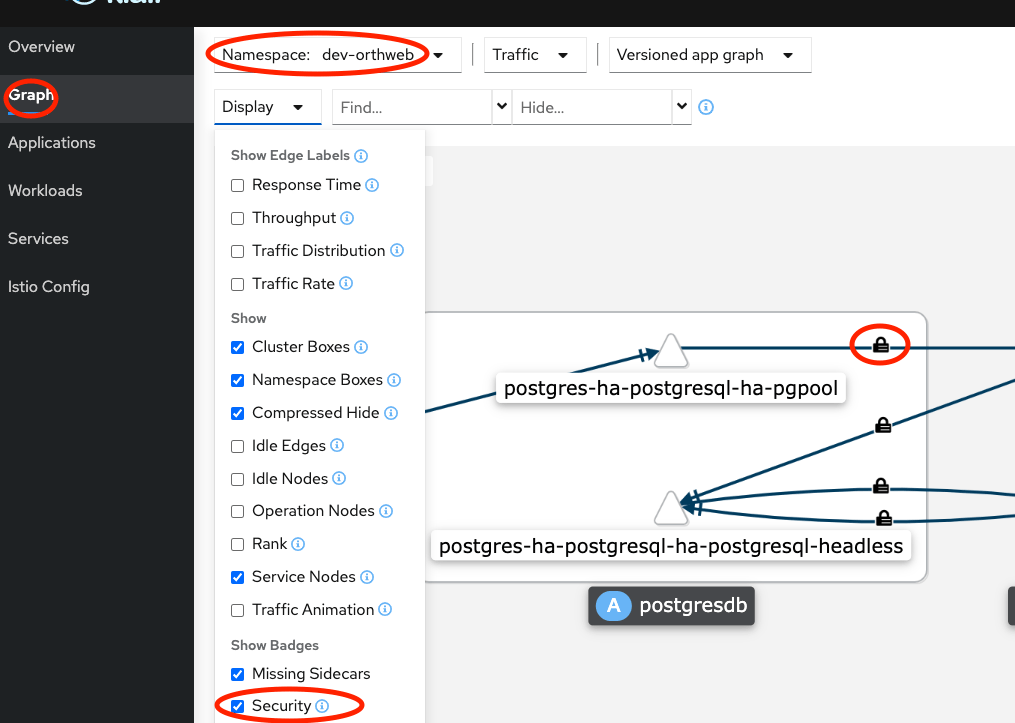
The output shows Effective PeerAuthentication and Applied PeerAuthentication. This verifies configuration. But how can we ensure that traffic are indeed using mTLS? For most of mTLS traffic, we can use Kiali’s observability feature. In Graph, we need to ensure “Security” is checked in the display drop-down. The pad lock will indicate the traffic is mTLS. To get reliable results, we have to artificially create some live traffic between workloads (e.g. curl from one Pod to another) so Kiali can pick up the update.
Unfortunately, even artificial traffic does not make Kiali the most reliable way to detect mTLS. There are three other approach to verify TLS traffic.
The first approach is to let Envoy proxy emit TLS related traffic. We can apply the following annotation line to a Pod, to tell its Envoy proxy to emit measurements related to tls_inspector:
sidecar.istio.io/statsInclusionPrefixes: "tls_inspector,listener.0.0.0.0_15006"
The metrics will be exposed to Envoy’s admin port (15000 on istio-proxy) with the path /stats. For example:
$ kubectl -n orthweb exec orthanc-7f4c9b759-lxnrb -c istio-proxy -- curl localhost:15000/stats | grep tls_inspector
  % Total    % Received % Xferd  Average Speed   Time    Time     Time  Current
                                 Dload  Upload   Total   Spent    Left  Speed
100 22194    0 22194    0     0  21.1M      0 --:--:-- --:--:-- --:--:-- 21.1M
tls_inspector.alpn_found: 13
tls_inspector.alpn_not_found: 0
tls_inspector.client_hello_too_large: 0
tls_inspector.connection_closed: 0
tls_inspector.read_error: 0
tls_inspector.sni_found: 13
tls_inspector.sni_not_found: 0
tls_inspector.tls_found: 13
tls_inspector.tls_not_found: 0
We still need some live traffic to bump up the measurement. Comparing between tls_found and tls_not_found is a good way to determine if a Pod is receiving both TLS and plaintext traffic in PERMISSIVE mode.
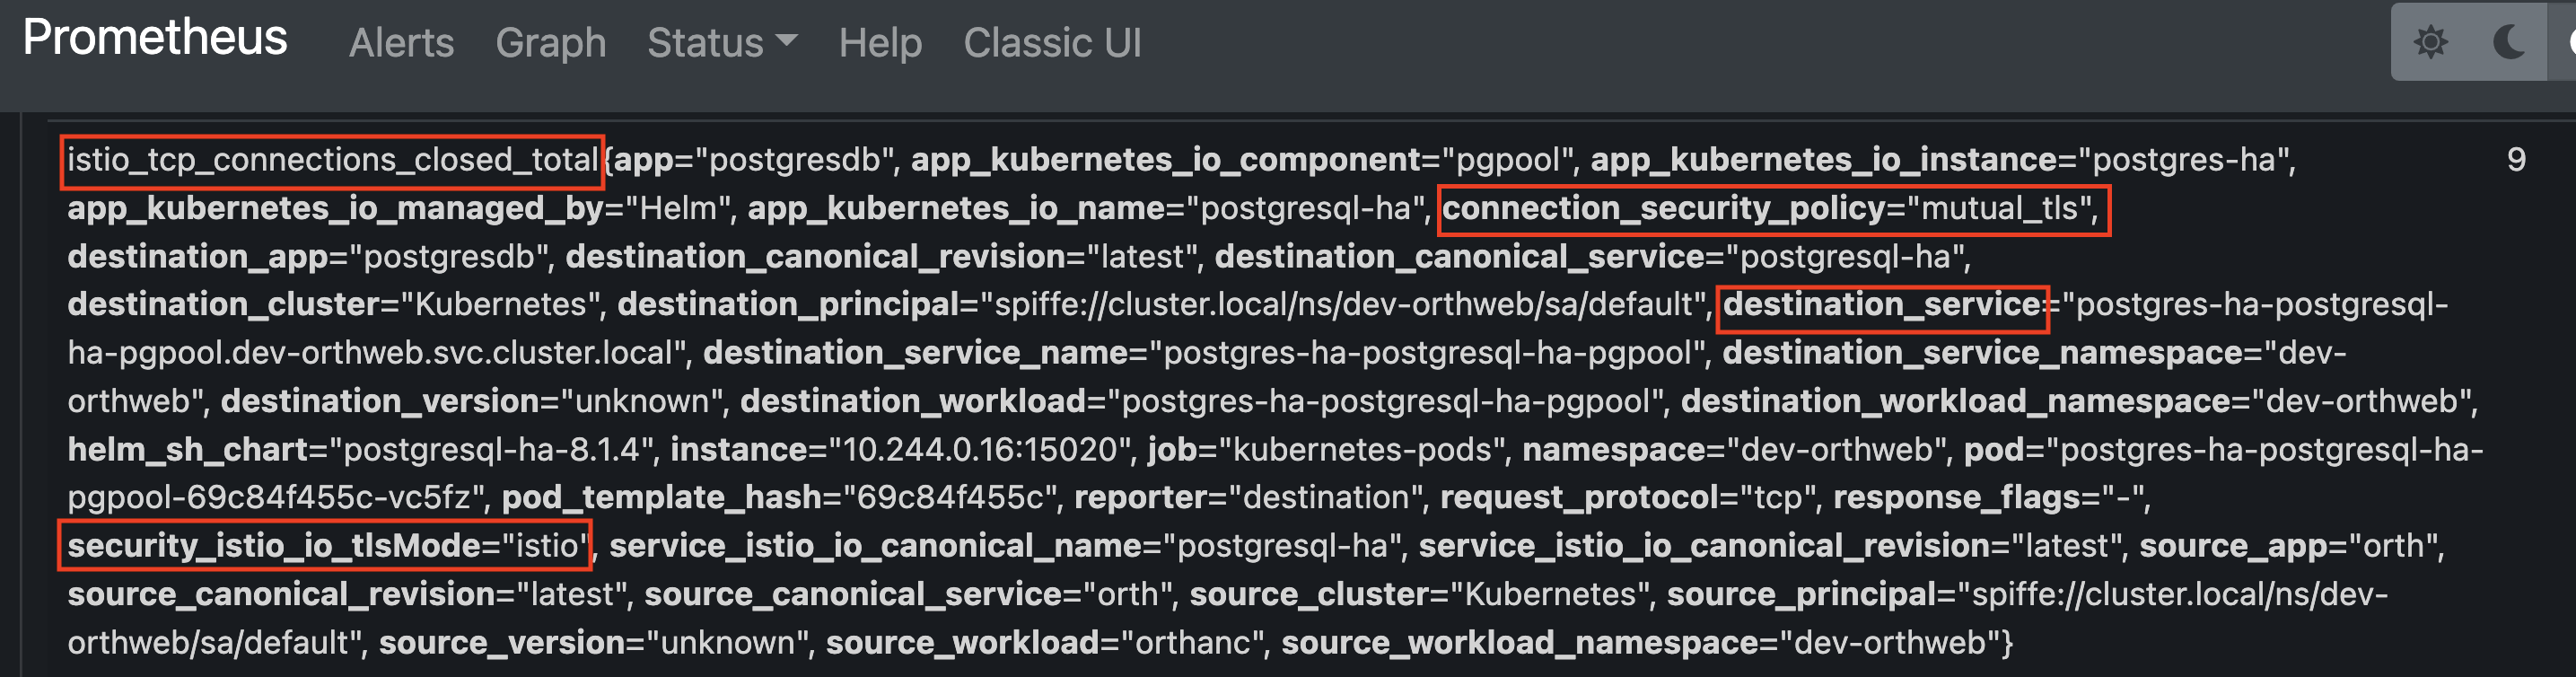
The second approach to tell mTLS is via the connection_security_policy metric label. It is set to mtutual_tls if the connection is in mTLS. We need the dashboard for Prometheus:
$ istioctl dashboard prometheus
In the prometheus dashboard, click on “Graph” at the top, then search for “istio_tcp_connections_closed_total” for “istio_tcp_connections_opened_total“, the result should include a metrics called connection_security_policy which is labelled as mtutual_tls, as illustrated below:
For more about collecting and querying metrics from Prometheus, check out Istio’s documentation here and here.
The third approach is to utilize the AUDIT feature of Authorization Policy. When a rule in Authorization Policy has a source with namespace or notNamespace field, it requires the incoming connection to have an SPIFFE identity and use mTLS. We can set the Authorization Policy’s action to AUDIT and use RBAC access logging, the same way we would do to troubleshoot RBAC access issues. From the log we can check RBAC failures due to missing SPIFFE identity.