

I’ve worked on a few AKS projects previously. Since I joined AWS I wanted to put aside some time to check out EKS (Elastic Kubernetes Service). Here in this post, I put down my first impression on EKS, and also share my Terraform template in cloudkube project to create an EKS cluster.
Similar to AKS, EKS exposes API endpoint and the control plane components are hidden from AWS users. When creating EKS cluster it does not create the underlying VPC and subnets. Therefore, you have create an existing VPC and at least two subnets ahead of time, and specify them during EKS creation. Bear in mind that there is a list of requirement for the VPC and subnets.
In the cluster, the CNI that EKS officially supports is Amazon VPC CNI plugin. It is available as an add-on. Similar to Azure CNI, each Pod gets its own IP address. In addition, EKS supports other compatible CNI plugins such as Calico, Cilium, Weave Net and Antrea.
Computing Nodes in EKS
There are three modes to address computing capacity: self-managed nodes, EKS managed node groups and AWS Fargate. The documentation has a comparison table.
With self-managed nodes, users create EC2 instances separately and then register them to the control plane. The instances must use the same IAM role and AMI. You can use Auto Scaling groups of Bottlerocket (AWS-sponsored purpose-built Linux distro for container host) nodes. The self-managed node option is mostly for AWS outpost customers who bring in their own computing capacity from data centre.
If you provision computing capacity from AWS, it makes sense to assign EKS managed node groups when creating EKS cluster. We can turn on Cluster Autoscaler, a Kubernetes construct to manage the auto scaling of node groups. Sometimes we want to have more than one node groups. For example, to build a multi-architecture cluster, we need one node group with amd64 nodes and the other with arm64 nodes (e.g. instances with Graviton processor). In general, arm-based CPU delivers better performance with less power consumption and the industry is slowly moving towards more arm-based CPU architecture.
Fargate is what I call managed computing service for EKS. With Fargate you do not need to tweak Cluster Autoscaler to self-manage computing capacity. The Fargate documentation has a long list of considerations. For example, Pods must match a Fargate profile (here‘s an example) at the time that they’re scheduled to run on Fargate. So we need to build Fargate profile and Pod labelling properly. Also, Fargate does not support DaemonSet. Another big consideration is that Fargate does not support non-VPC CNI. In my opinion these are pretty significant limitations. Many workloads (system-level or application-level) would need Daemonset (e.g. kube-proxy, some CNI or CSI drivers, Dynatrace monitoring).
The pro of Fargate is the serverless computing model. The construct of a Fargate profile isn’t complicated. You just specify subnets, namespace and labels. However, the downside is the long list of considerations. Some teams may consider these restrictions too much. The other overhead is the need to manage Fargate profile to ensure all Pods are scheduled somewhere.
To me, using Fargate alone impairs portability of workload. The good thing is that Fargate and Managed Node Group are not mutually exclusive on a cluster. In most cases, we can go partially serverless, and reap the benefits of both of them.
Node AutoScaling
For workloads that don’t have a matching Fargate profile, we have to figure out node autoscaling ourselves. I touched on Cluster Autoscaler in “Autoscaling on Kubernetes Platform“. CA works on AWS as well and is triggered upon a Pod coming to unschedulable status in Scheduler. There is some limitations though. For example, CA interacts with Autoscaling Group (instead of EC2 instances directly). When it determines it’s time to scale up, it bumps up the desired capacity by one at a time in the Autoscaling group. The configurations in Autoscaling group may also be at play and CA do not have direct control. For example, the “scaling cooldown“. The pool of nodes is homogenous as per the pre-configured launch template and CA has no control. If a Pod requires a different type of node (e.g. ARM64 CPU, spot instance, etc), then we’d first have to create a node group with the desired node type. Moreover, in the worst cases, one-at-a-time scale-up does not meet the increase of demand driven by Pod increases, causing nuances such as racing conditions.
Because the Cluster Autoscaler doesn’t really deal with the nodes themselves, this kind of integration is clunky and slow. Nearly half of Kubernetes customers on AWS report that configuring cluster auto scaling using the Kubernetes Cluster Autoscaler is challenging and restrictive, according to this blog post. As a result, AWS launched an open-source cluster autoscaler project, Karpenter. Karpenter first only supported EKS but now the support includes other CSPs. For EKS, Karpenter directly interact with different types of EC2 instances.
Karpenter makes node scaling work in a more cloud-native manner. In the presence of unschedulable Pods, Karpenter bypasses the Kubernetes scheduler and works directly with the Cloud provider, to launch the minimal compute resources needed to fit those Pods and immediately binds the Pods to the newly provisioned Nodes without waiting for scheduler. As Pods are removed or rescheduled to other nodes, Karpenter looks for opportunities to terminate under-utilized nodes. Karpender defines a CR called Provisioner to specify node provisioning configuration, such as instance size, zone, CPU architecture, etc. It is a manifest that describes a node group so the node scaler is aware of all the available node types. You can have multiple Provisioners for different needs, just like node groups. The Provisioner CR can also set TTL for empty Nodes, such that once a Node has no pods other than DaemonSet, Karpenter will terminate the Node on TTL expiry.
Karpenter’s idea is similar to the idea of AutoPilot cluster in GKE. The new EKS workshop has an section on how to set up CA and Karpenter in practice.
Identity Management for EKS
For IAM, we need to be concerned with three aspects. The management traffic to the cloud service, the management traffic for Kubernetes cluster and business traffic.
| Traffic type | AWS | Azure |
|---|---|---|
| I. Cloud Service Endpoint (Management Traffic for Cloud Service) | AWS IAM identity | Azure RBAC |
| II. Kubernetes API (Management Traffic for K8s Cluster) | IAM mapping or OIDC | Azure RBAC (implementation of OIDC) |
| III. Business traffic | Up to Kubernetes Ingress | Up to Kubernetes Ingress |
For business traffic (type III), it is all up to the Ingress. I’ve written another article on managing ingress traffic on Kubernetes platforms. We interact with cloud service endpoint (type II) with either AWS CLI or Terraform, to create any object, including resources needed for a cluster. This is generally how we work with cloud service, not specific to Kubernetes. Usually the IAM identity assumes another IAM role, which empowers it with a lot of permissions.
For access to Kubernetes API (type III), EKS supports OIDC and IAM mapping. AWS documentation refers to this as “Cluster Authentication“. There is one special scenario where your identity for type II access inherits your identity for type I access. As the document puts:
When you create an Amazon EKS cluster, the AWS Identity and Access Management (IAM) entity user or role, such as a federated user that creates the cluster, is automatically granted
system:masterspermissions in the cluster’s role-based access control (RBAC) configuration in the Amazon EKS control plane. This IAM entity doesn’t appear in any visible configuration, so make sure to keep track of which IAM entity originally created the cluster.
This special scenario (I call it the “implicit master user“) allows us to perform critical activities on the cluster, such as creating IAM mapping, or OIDC configuration.
The above addressed how AWS resource access Kubernetes resource. On the other hand, to address how a Kubernetes resource access AWS resources, we need IRSA (IAM Roles for Service Account). We have a service account in Kubernetes and map it to an IAM role.
AppMesh
AppMesh is AWS’ Envoy based service-mesh offering supporting Kubernetes cluster, ECS service and even EC2 instance. AppMesh’s control plane is a managed AWS service, with a controller running on the Kubernetes cluster. To install AppMesh on the cluster:
- On the EKS cluster, install AppMesh Controller using Helm
- Associate the cluster with IAM OIDC provider
- Create an IAM role for the appmesh-controller service account
After these steps, you can create a mesh using CloudFormation, Terraform, etc. The data plane (Envoy proxy) can run on Kubernetes (as sidecar). Traffic between control plane and data plane can go through private link (Interface VPC endpoint) for added security. Like Istio, AppMesh enables mTLS. For observability, you can export Envoy metrics with Prometheus. Coupled with XRay, AppMesh also supports distributed tracing.
AppMesh uses a different set of CRDs than Istio. Key CRDs are:
- Mesh: represents an entire service mesh. At mesh level you can configure Egress filter (to allow or deny external traffic) and set IP version (v4 vs v6)
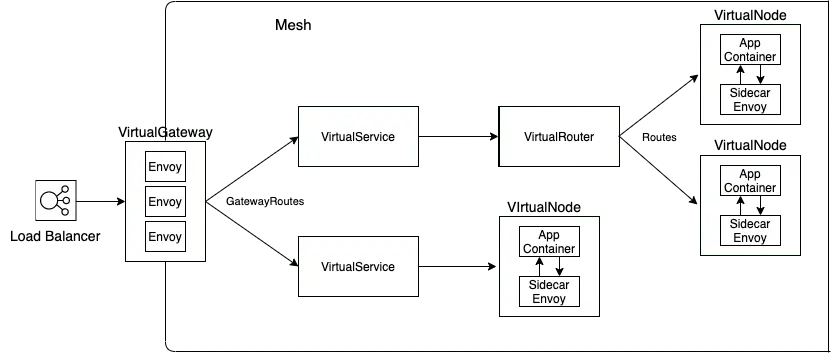
- VirtualGateway: a CRD that represents an Ingress in to the Mesh. A virtual gateway allows resources that are outside of your mesh to communicate to resources that are inside of your mesh. A virtual gateway references Envoy proxy deployment by podSelector. It references GatewayRoutes by namespaceSelector, and optionally gatewayRouteSelector. You also specify listeners in the manifest to reference Envoy proxy Service (LoadBalancer Type).
- GatewayRoute: A gateway route is attached to a virtual gateway and routes traffic to an existing virtual service. If a route matches a request, it can distribute traffic to a target virtual service. In the manifest, you specify a list of httpRoute, each with matching condition and action. In the action section you can specify virtualService as target.
- VirtualService: an abstraction of a real service provided by a virtual node directly or indirectly by means of a virtual router. Dependent services call your virtual service by its virtualServiceName, and those requests are routed to the VirtualNode or VirtualRouter that is specified as the provider for the VirtualService.
- VirtualRouter: Virtual routers handle traffic for virtual services. In a virtual router manifest, you can define Route to direct incoming requests to virtual nodes as target.
- VirtualNode: A virtual node acts as a logical pointer to a particular task group (i.e. ECS service, Kubernetes deployment). It represent a Service in the AppMesh. In the manifest, you reference Pods by podSelector, specify listeners for any inbound traffic that your virtual node expects, and specify serviceDiscovery for your task group.
You can configure those Custom Resources using YAML manifests (and check the API reference a lot). Alternatively, you can configure them from AWS CLI or AWS console. The console will help you visualize what can be configured. For further details on how these CRs play together, there is a workshop for AppMesh.
EKS cluster using Terraform
Officially, there is an EKS blueprint project for provisioning EKS cluster in Terraform.
I also keep my own Terraform code in the AWS directory of cloudkube project. It works out to be a little more complex than my Terraform template to create Azure Kubernetes Cluster (Azure directory). Because I had to create Cognito resources with initial credential to allow users to connect to cluster without using the implicit master account.
Below is the diagram of the processes.
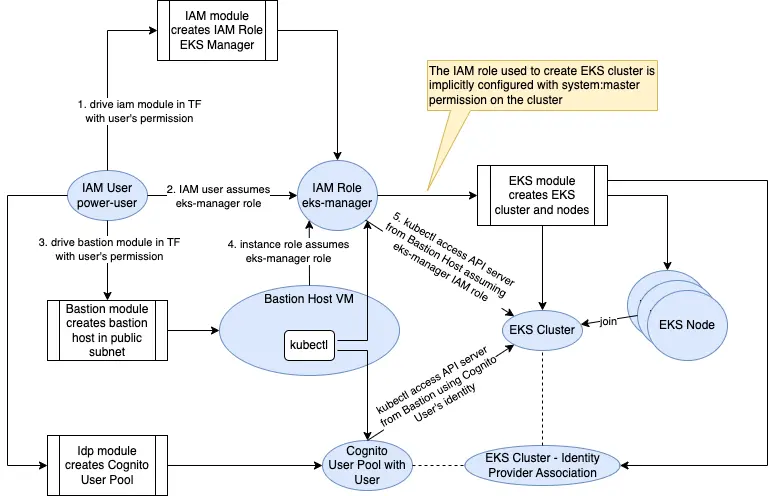
The template configures kubectl access on a Bastion host, which assumed the same role that our IAM user uses to create the Kubernetes cluster. Therefore, the IAM role is the master identity.
Note that the IAM user (power-user) has very powerful permissions. Usually it is ideal to assign lots of permission to IAM Roles (temporary credential) instead of IAM user (long-term credential). So the role chaining would look like:
- The IAM user that Terraform uses has no permission other than assuming a “PowerUser” role
- The PowerUser role trusts the IAM user. It also has the permission to assume the “EKS-Manager” role
- The EKS-Manager role trusts PowerUser’s role session.
However, the role chaining scenario above is not currently supported in Terraform.
I use a Bastion host because the cluster endpoint is on private subnet. The bastion host is on a public subnet. However, if we do not like public subnet and public IP, we can place the bastion host on a private subnet, and use SSM system manager agent with SSH tunnel plugin to have SSH access to private bastion host.
Summary
I first came across this article about EKS and its awfulness and then decided to check out EKS. I’m not sure all points are still valid but it’s generally real-life experiences. There are also many peripheral services, such as AMP (AWS Managed Prometheus), AMG (AWS Managed Grafana), ADOT (AWS Distro for Open Telemetry), AppMesh (Another Envoy-based Service Mesh, easier to manage than Istio but less Powerful), with a lot to explore.