

In the previous post, we have discussed built-in storage classes on Azure Kubernetes. Further to that, we will examine some third-party software defined storage (SDS) options that are compatible with Azure Kubernetes Service in this post. Then we take Portworx on Azure as an example. Although, these options are specific to Azure, most of the players also have solutions for other managed Kubernetes platforms. Also, the methodology to study storage options remain the same regardless of cloud service provider.
In fact, I touched on software defined storage (SDS) in the context of general non-containerized workload in a separate post. In short, storage providers decouple the SDS appliance from the full storage solution in order to lower the cost and increase flexibility. To the storage consumer (e.g. a process running on Linux OS), SDS can present a block disk or file system. There are also SDS solution that can host your own object storage and we will discuss that later. In fact, SDS has gained significant popularity in recent years. For example, the report “Validating Software-Defined Storage Operating Models for the Enterprise” by archiectingit divided the evolution into four phases and cited that Gartner predicts the SDS revolution to reach 50% of the storage market by 2024, from 15% in 2020.
This post discusses SDS in the context of container storage. Then we will install Portworx on Azure Kubernetes.
SDS for Kubernetes
Many SDS appliances also developed the capability to present storage volumes to containerized workload. I put together a list of SDS products that works on Azure with their supported access modes:
| Solution | Licence | Development and Support | Access Mode |
| Portworx | Closed source. Free Essential tier. Enterprise features on License. | Commercially supported by PureStorage | RWO, RWX |
| Ceph by Rook | Open source. Rook is a graduated CNCF project. | Developed and commercially supported by Red Hat, Canonical and SoftIron | RWO, ROX, RWX |
| OpenEBS | Open source. Sandbox CNCF project. | Developed and commercially supported by MayaData et al. | RWO |
| Longhorn | Open source. Incubating CNCF project. | Originally developed by Rancher, and commercially supported by SUSE | RWO |
| StorageOS | Closed source. License required. | Commercial support by Ondat. | RWO |
| LINBIT | Open-source with enterprise plans | Enterprise support |
RWO is the most commonly supported mode. The report “Performance Benchmarking Cloud Native Storage Solutions for Kubernetes” makes a comparison of performance among some of the options in early 2021. Another potentially opinionated comparison list is by LINBIT.
Portworx is a leading player with commercial SDS solution and I will test its free Essential tier in the rest of this post. Ceph is one of the most mature leading open-source offering and I will test it in the next post.
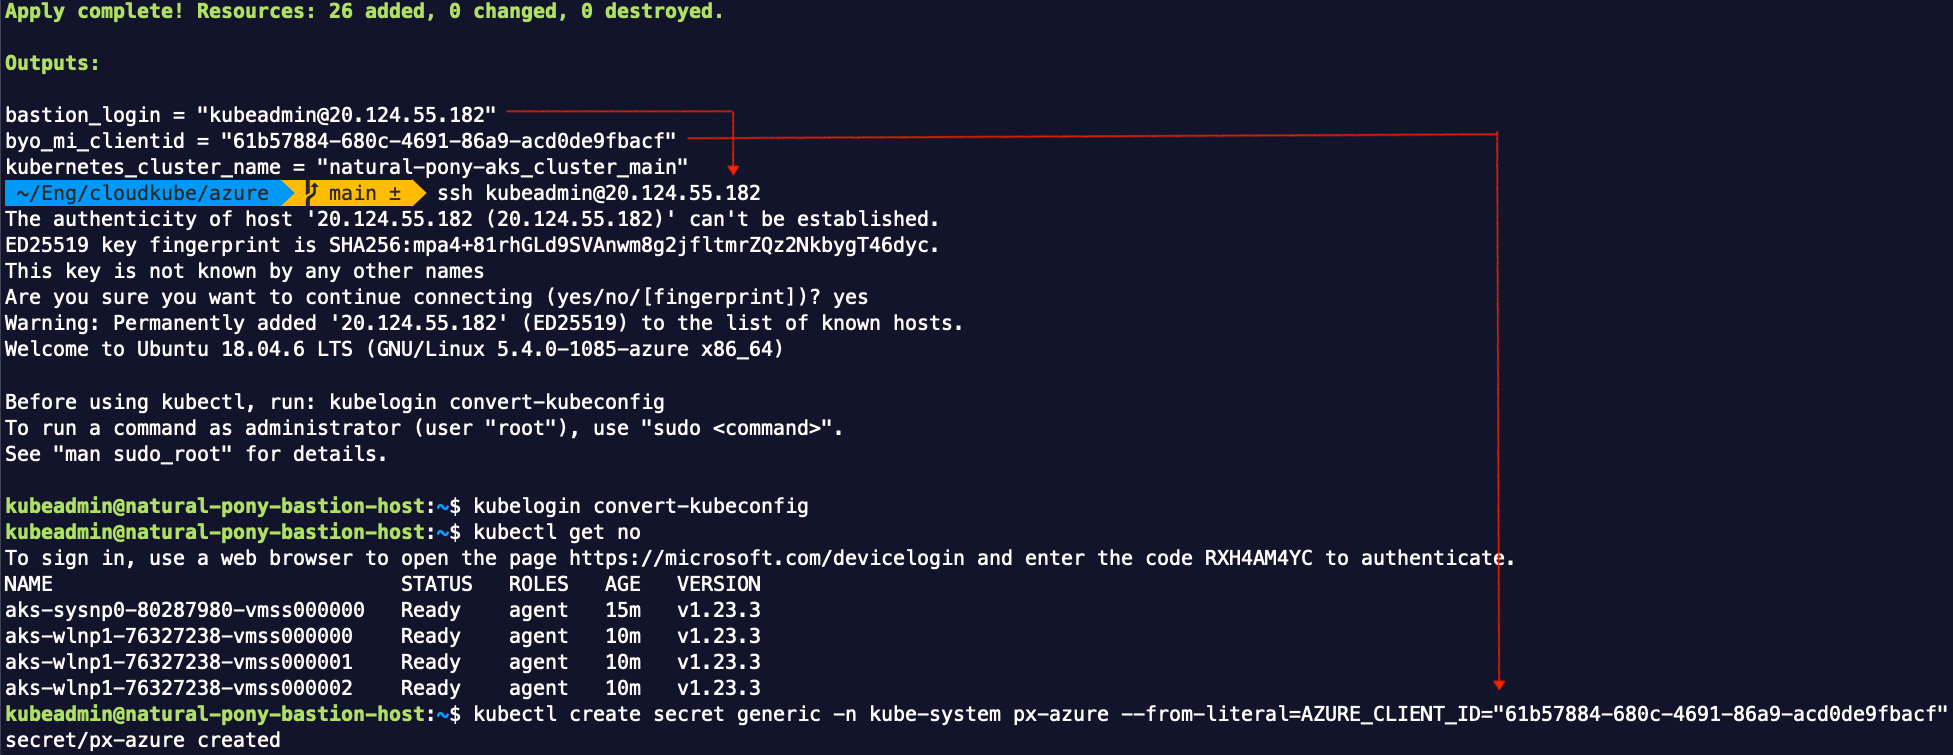
For Portworx, we can use the terraform template cloudkube for Azure. The template assigns the kubelet’s managed identity as contributor of the node resource group. The template also creates a bastion host with direct SSH access to the nodes.
Portworx Operator on Azure
We use Portworx Operator to configure storage cluster. Portworx has an instruction for AKS but it is not tailored to specific identity model. For simplicity, use my cloudkube Terraform template to create the AKS cluster, and skip the “Prepare Your AKS Platform” page. Instead, follow the “Deploy Portworx using Azure managed identity on new AKS cluster” page starting at step 7.
At that step, we need to create a secret with the client ID of the managed identity for node agent. The terraform template outputs the BYO identity’s client ID. After cluster creation, we simply SSH to the bastion host and create the secret using the output.
To install Porworx using operator, we can follow a wizard in PX-central. If this is the first time, we need to create an account and log in to the portal. If this is not the first time and you have previously created a cluster, you need to detach that cluster by going to Profile from bottom left corner on the portal page.
Follow the guide in “Install Portworx on AKS using the Operator“. In the wizard, click on “Portworx Essentials” for free tier, or “Portworx Enterprise” for the 30-day trial. Then select operator with latest version. In the rest of the wizard steps, select options applicable to Azure environment. The last step will present two kubectl commands to install operator and install the CR. Run the command to install operator and verify result:
kubectl apply -f 'https://install.portworx.com/2.9?comp=pxoperator'
kubectl -n kube-system get deployment portworx-operator
Portworx Custom Resource
To install the CR, we need to customize the given manifest in order to use our managed identity. We can download the YAML manifest (portworx_essentials.yml) and modify it in text editor. As the page “Deploy Portworx using Azure managed identity on new AKS cluster” suggest at step 9: in the env section, remove the AZURE_CLIENT_SECRET and AZURE_TENANT_ID sections but keep the AZURE_CLIENT_ID section. My CRD declaration looks like this:
# SOURCE: https://install.portworx.com/?operator=true&mc=false&kbver=&oem=esse&user=myuserid&b=true&kd=type%3DPremium_LRS%2Csize%3D150&s=%22type%3DPremium_LRS%2Csize%3D150%22&c=my-very-long-px-cluster-id&aks=true&stork=true&csi=true&mon=true&tel=false&st=k8s&promop=true
kind: StorageCluster
apiVersion: core.libopenstorage.org/v1
metadata:
  name: my-very-long-px-cluster-id
  namespace: kube-system
  annotations:
    portworx.io/install-source: "https://install.portworx.com/?operator=true&mc=false&kbver=&oem=esse&user=myuserid&b=true&kd=type%3DPremium_LRS%2Csize%3D150&s=%22type%3DPremium_LRS%2Csize%3D150%22&c=my-very-long-px-cluster-id&aks=true&stork=true&csi=true&mon=true&tel=false&st=k8s&promop=true"
    portworx.io/is-aks: "true"
    portworx.io/misc-args: "--oem esse"
spec:
  image: portworx/oci-monitor:2.10.2
  imagePullPolicy: Always
  kvdb:
    internal: true
  cloudStorage:
    deviceSpecs:
    - type=Premium_LRS,size=150
    kvdbDeviceSpec: type=Premium_LRS,size=150
  secretsProvider: k8s
  stork:
    enabled: true
    args:
      webhook-controller: "true"
  autopilot:
    enabled: true
  monitoring:
    prometheus:
      enabled: true
      exportMetrics: true
  featureGates:
    CSI: "true"
  env:
  - name: AZURE_CLIENT_ID
    valueFrom:
      secretKeyRef:
        name: px-azure
        key: AZURE_CLIENT_ID
---
apiVersion: v1
kind: Secret
metadata:
  name: px-essential
  namespace: kube-system
data:
  px-essen-user-id: aaaabbbbccccddddmyverylongpxessenuserid
  px-osb-endpoint: ssssssyyyyyyyzzzzzzmyverylongpxosbendpoint
In this custom resource manifest, I specify to get the cluster to create disk from Azure, even though it has the capability of using an existing disk. Then apply the CRD manifest:
kubectl apply -f portworx_essentials.yml
This will take up to 10 minutes to create several related resources. There are several check points to ensure the cluster is created successfully. Here are some useful commands:
kubectl -n kube-system get po   # all Pods related to portworx should be ready and running, especially the portworx-api ones
kubectl -n kube-system get storagecluster    # the status should report online
PX_POD=$(kubectl get pods -l name=portworx -n kube-system -o jsonpath='{.items[0].metadata.name}')
# get the name of one of the portworx Pod for storage cluster
kubectl -n kube-system exec -c portworx -it $PX_POD --tty --stdin -- /opt/pwx/bin/pxctl status
# should report "Status: PX is operational" with valid license loaded
kubectl get sc    # portworx related storage classes are available
The pre-built storage classes are not CSI based. However, CSI should be automatically enabled in recent operator versions. We should create our own CSI storage classes and PVCs using our own storage classes. Here are two examples:
kind: StorageClass
apiVersion: storage.k8s.io/v1
metadata:
  name: px-csi-database
provisioner: pxd.portworx.com
parameters:
  repl: "2"
  priority_io: "high"
  io_profile: "db"
---
kind: StorageClass
apiVersion: storage.k8s.io/v1
metadata:
  name: px-csi-artifact
provisioner: pxd.portworx.com
parameters:
  repl: "2"
  priority_io: "medium"
  io_profile: "sequential"
That is a bare minimum Portworx installation. Check out their documentation for the full features. With this minimum install we can go to the section “Validate Persistent Storage” from the previous post to validate the persistent volume.
For troubleshooting purpose, pxctl is the utility and it is available on Portworx Pods.
Performance
We care not only the functionality, but also the performance. So I ran a quick performance test using kube-str, using all default configuration. The result is as follows:
| read_iops | write_iops | read_bw | write_bw | |
| px-csi-database | IOPS=969.614136 BW(KiB/s)=3894 | IOPS=729.698059 BW(KiB/s)=2935 | IOPS=1172.772827 BW(KiB/s)=150639 | IOPS=691.626526 BW(KiB/s)=89053 |
| px-csi-artifact | IOPS=780.681946 BW(KiB/s)=3139 | IOPS=682.522766 BW(KiB/s)=2746 | IOPS=773.548584 BW(KiB/s)=99549 | IOPS=659.015320 BW(KiB/s)=84890 |
Note that those numbers reflect performance under default configuration, and they should not be considered as the best performance that Portworx can deliver on Azure Kubernetes. Before moving to production, it is important to establish your own test parameters that best represents the container workload, and then iterate through different parameters for the storage class based on the requirement and performance output.