
In the previous post, we understand that to host stateful workload, we need to manage persistent storage to the Kubernetes platform. In this post, I will explore the different storage options. These options are specific to Azure Kubernetes service. However, the principals apply to any Kubernetes platform regardless of cloud vendor.
In another old post, I discussed in-tree and CSI storage classes, and from a developer’s perspective, how to mount volumes statically and dynamically once the storage class is available. Here in this post we are concerned with how to make storage classes available, from a platform specialist perspective.
Storage in Azure Kubernetes
As soon as the Azure Kubernetes cluster is launched, a number of built-in storage classes are available. Unlike third-party storage classes, they do not require kubelet identity to be contributor for node resource group. As discussed we shall use CSI based storage classes.
- managed-csi
- managed-csi-premium
- azurefile-csi
- azurefile-csi-premium
The main difference between them is the backing technology. However, form Kubernetes workload’s perspective, the Pods as storage consumers are concerned with the access mode instead of backing technology. Here are supported access modes:
- ReadWriteOnce: read-write by a single node
- ReadOnlyMany: read only by many nodes
- ReadWriteMany: read-write by many nodes
- ReadWriteOncePod: new in Kubernetes 1.22 to restrict volume access to a single Pod
The storage classes managed-csi and managed-csi-premium support ReadWriteOnce. The storage classes azurefile-csi and azurefile-csi-premium support ReadWriteMany.
Apart from these built-in options, Azure also suggests a few more options based on other types of Azure resources. For example, AKS can integrate with HPC cache and it for HPC. We can also self-manage a virtual machine configured as NFS server, and use the NFS subdir external provisioner to configure storage class. Despite of the overhead with managing a VM, you have more configurability. My previous client reports that they gain better performance than the built-in options.
Another alternative is Azure NetApp Files. However, being a full enterprise grade solution (similar to FSx ONTAP), Azure NetApp Files costs an arm and a leg. In this comparison, it cost 60 to 100 times as the cost by built-in options.
Another option is Azure Ultra Disk, which needs to be enabled at cluster level. You can provision performance target (DiskIOPSReadWrite and DiskMBpsReadWrite) in the storage class. Ultra Disk is a good middle ground between the pricey NetApp files and the less performant built-in options.
Terraform Template for AKS
To explore the storage options, I use my own terraform template to create an AKS cluster. The template is in the azure directory of the cloudkube repo. The template consists a few configurations with Azure Kubernetes to facilitate storage configuration. First, it configures an SSH key pair to use between the bastion host and the node. Users can SSH to Kubernetes nodes from bastion host as soon as terraform apply is completed. Second, the third party storage options installed after the cluster creation need their Pod to instruct Azure to create Azure disks. This requires that a Kubernetes node agent have the permission to provision resources in the node resource group. This is important to understand because there are a couple of managed identities at play (refer to this post) when building an AKS cluster.
In Azure Kubernetes, it is the managed identity of kubelet, that needs to have contributor permission over the resource group for the nodes (not the one for the AKS cluster itself). A managed identity is expressed by a client ID, an object ID (aka principal ID), and the identity ID. We can find them out with an AZ CLI command as below:

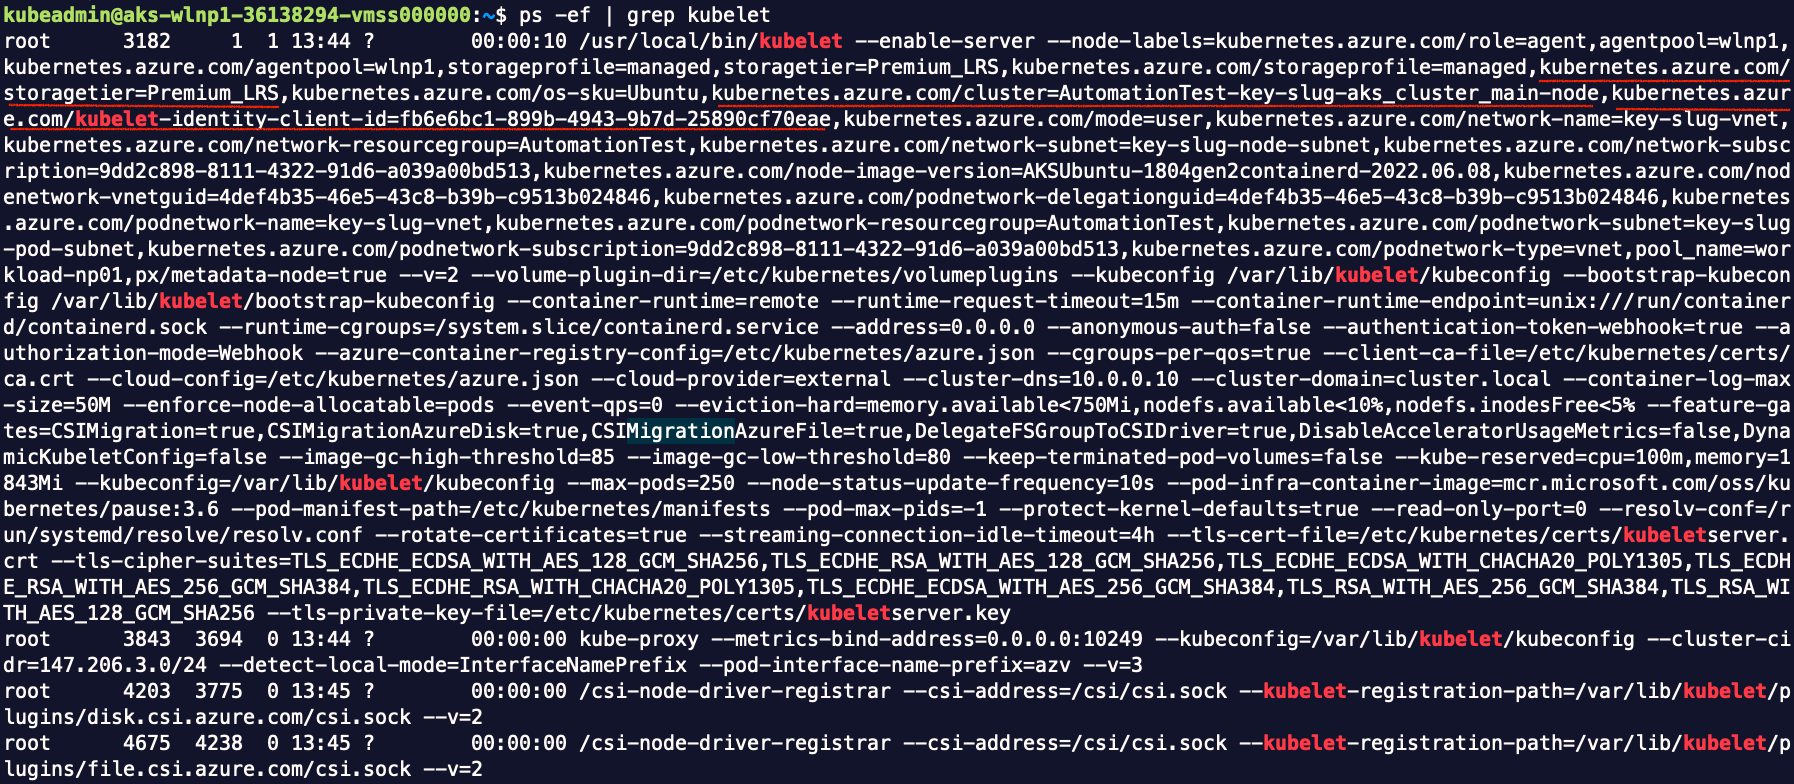
We can also tell that the kubelet managed identity represents node agent, by connecting to a node and looking at the argument (kubernetes.azure.com/kubelet-identity-client-id) of kubelet process:
In the template, I also chose to designate the same BYO identity for both the cluster and for kubelet (node agent), in order to minimize my requirement on permission. If I had left it with a system assigned identity for node agent, I would have to assign that identity as a contributor for the node resource group, either as a user, or via Terraform’s identity. Either way, it is beyond what a Contributor is allowed to do.
Benchmarking with kubestr
I used fio utility for storage benchmarking from virtual machines. However, fio utility is not for container. For fio testing on Kubernetes, I’d have to use a Docker image, and test with target volume attached. Fortunately, the Kasten team shared their initiative in the open source project Kubestr. The kubestr release is available as an executable on common platforms. It connects to the cluster the same way as kubectl and here is a demo. To begin with, download the utility to bastion host, and run it without any argument, which prints the storage classes and volume snapshot classes:
curl -L -o kubestr.tar.gz https://github.com/kastenhq/kubestr/releases/download/v0.4.31/kubestr_0.4.31_Linux_amd64.tar.gz
tar -xvf kubestr.tar.gz && rm kubestr.tar.gz && chmod +x kubestr

./kubestr   # if kubectl is configured, this command will print out the details of storage classes and volume snapshot classes
In addition to outputting details, it is also very simple to perform storage benchmarking with kubestr. All we need to do is giving it the storage class name and it will run four tests by default with common global options (ioengine=libaio verify=0 direct=1 gtod_reduce=1). The four tests are:
| JobName | block_size | filesize | iodepth | rw |
| read_iops | 4k | 2G | 64 | randread |
| write_iops | 4k | 2G | 64 | randwrite |
| read_bw | 128k | 2G | 64 | randread |
| write_bw | 128k | 2G | 64 | randwrite |
During each test, it measures and reports IOPS and bandwidth (throughput). If your I/O profile falls out of the four jobs, you can even customize your test by supplying a fio config file. For example, you need a longer test duration, or you need a larger total size for the test. Before the test, kubestr automatically mount their test volumes using the storage class being tested.
./kubestr fio -s my-storage-class # benchmarking a storage class
For read_iops and write_iops, we mainly look at the IOPS. For read_bw and write_bw, we mainly look at the bandwidth. The iops and bw based on samples are reported as first line of result, followed by min, max and average.
Metrics
With kubestr I ran a performance test amongst the native storage classes with Azure Kubernetes Service, with results as below:
| read_iops | write_iops | read_bw | write_bw | |
| managed-csi | IOPS=314.729797 BW(KiB/s)=1275 | IOPS=297.071136 BW(KiB/s)=1204 | IOPS=315.311188 BW(KiB/s)=40887 | IOPS=261.048645 BW(KiB/s)=33941 |
| managed-csi-premium | IOPS=493.395844 BW(KiB/s)=1990 | IOPS=426.731812 BW(KiB/s)=1723 | IOPS=455.950348 BW(KiB/s)=58894 | IOPS=422.888855 BW(KiB/s)=54662 |
| azurefile-csi | IOPS=259.333282 BW(KiB/s)=1053 | IOPS=283.985779 BW(KiB/s)=1152 | IOPS=240.447403 BW(KiB/s)=31298 | IOPS=230.689804 BW(KiB/s)=30048 |
| azurefile-csi-premium | IOPS=394.044739 BW(KiB/s)=1586 | IOPS=371.181793 BW(KiB/s)=1494 | IOPS=380.360535 BW(KiB/s)=49018 | IOPS=491.313446 BW(KiB/s)=63310 |
These numbers are based on default test parameters (e.g. 100Gi PVC size). The numbers indicate that block storage generally performs better in default setting. So we should use managed disk instead of azure file unless multiple pods needs to access the same volume.
Validate Persistent Storage
We can use mysql as a quick and dirty test of storage classes. We can deploy the following manifest:
apiVersion: v1
kind: PersistentVolumeClaim
metadata:
  name: mysql-pvc
spec:
  storageClassName: managed-csi-premium # the storage class being tested
  accessModes:
    - ReadWriteOnce
  resources:
    requests:
      storage: 5Gi
---
apiVersion: v1
kind: Secret
metadata:
  name: mysql
data:
  password: eHl6   # base64 code of xyz
---
apiVersion: apps/v1
kind: Deployment
metadata:
  name: mysql
  labels:
    app: mysql
spec:
  replicas: 1
  selector:
    matchLabels:
      app: mysql
  template:
    metadata:
      labels:
        app: mysql
    spec:
      containers:
        - image: mysql:5.6
          name: mysql
          env:
            - name: MYSQL_ROOT_PASSWORD
              valueFrom:
                secretKeyRef:
                  name: mysql
                  key: password
          ports:
            - containerPort: 3306
              name: mysql
          volumeMounts:
            - name: mysql-persistent-storage
              mountPath: /var/lib/mysql
      volumes:
        - name: mysql-persistent-storage
          persistentVolumeClaim:
            claimName: mysql-pvc
---
apiVersion: v1
kind: Service
metadata:
  name: mysql-service
  labels:
    service: mysql
spec:
  selector:
    app: mysql
  ports:
  - name: tcp-mysql
    protocol: TCP
    port: 3306
    targetPort: 3306
Once the Pod has been created, then we use a throw-away Pod to connect to mysql service and build some data:
$ kubectl run mysql-cli --rm -i --tty --image imega/mysql-client -- /bin/sh
If you don't see a command prompt, try pressing enter.
/ # mysql --host=mysql-service.default.svc.cluster.local --user=root --password=xyz
Welcome to the MariaDB monitor. Commands end with ; or \g. Your MySQL connection id is 9 Server version: 5.6.51 MySQL Community Server (GPL) Copyright (c) 2000, 2018, Oracle, MariaDB Corporation Ab and others. Type 'help;' or '\h' for help. Type '\c' to clear the current input statement. MySQL [(none)]>
From the mysql shell, we create a test database with dummy data populated:
CREATE DATABASE `testdb`;
USE testdb;
CREATE TABLE IF NOT EXISTS tasks (
  task_id INT AUTO_INCREMENT PRIMARY KEY,
  title VARCHAR(255) NOT NULL,
  description TEXT,
  created_at TIMESTAMP DEFAULT CURRENT_TIMESTAMP
) ENGINE=INNODB;
INSERT INTO tasks (title, description) VALUES ('Job A','Morning Standup');
INSERT INTO tasks (title, description) VALUES ('Job B','Latte with two shots of espresso');
INSERT INTO tasks (title, description) VALUES ('Job C','Coding coding and coding');
INSERT INTO tasks (title, description) VALUES ('Job D','git commit');
Each SQL command should return with number of rows affected and then we can exit the MySQL shell and Pod shell. Once we exit out of the Pod shell, the Pod is deleted. We can re-connect to validate the data are still present:
$ kubectl run mysql-tester --rm -i --tty --image imega/mysql-client -- mysql --host=mysql-service.default.svc.cluster.local --user=root --password=xyz --database testdb --execute='SELECT * FROM tasks;'
If you don't see a command prompt, try pressing enter.
Got error: Access denied for user 'root'@'147.206.3.15' (using password: NO)
+---------+-------+----------------------------------+---------------------+
| task_id | title | description                      | created_at          |
+---------+-------+----------------------------------+---------------------+
|       1 | Job A | Morning Standup                  | 2022-06-22 20:29:12 |
|       2 | Job B | Latte with two shots of espresso | 2022-06-22 20:29:12 |
|       3 | Job C | Coding coding and coding         | 2022-06-22 20:29:12 |
|       4 | Job D | git commit                       | 2022-06-22 20:29:13 |
+---------+-------+----------------------------------+---------------------+
Session ended, resume using 'kubectl attach mysql-tester -c mysql-tester -i -t' command when the pod is running
pod "mysql-tester" deleted
The output validates the persistent storage of the data. When testing a different storage class, simply start over with a different storage class specified in the PVC part of the manifest.
Summary
This post focuses on storage options for persistent volumes on Azure Kubernetes service. I use my own Terraform template with some custom configuration. I also covered kubestr as benchmarking tool and ran it against the built-in storage classes.
In some situations, the built-in options do not suit your needs. For example, you might want your application to use persistent volume in a consistent way across multiple cloud vendors. We will have to resort to third-party software defined storage layer. In the next post, I will explore a couple of SDS-based options, namely Portworx and Ceph. The custom configurations in the Terraform template will be helpful when we configure Portworx.