

Background
There are many benefits of using OIDC to authenticate to kube-api server, especially with multiple clusters that need consistent log-in experience. With the last post on how OIDC Authorization Code Flow works, now I will discuss options with authentication for kubectl to connect to kube API server.
To start, let’s look at the anatomy of kubeconfig file. The full schema is in the documentation. Looking at my kubeconfig file, there are three sections:
- clusters: each entry specifies a cluster’s name, server address and certificate authority data (in base64 encoding or a file location).
- users: each entry specifies a username. Some users are identified with client key and certificate. Some specify a command to provide client authentication. Refer to the authentication strategies.
- contexts: each entry links a user to a cluster
Therefore, the key to use OIDC integration, is to use command to provide client authentication.
Vanilla Kubernetes
The documentation on authenticating has a diagram on how to use OpenID Connect tokens. The diagram does not give details on how access_token and id_token were obtained. So it could be any OIDC flow (Authorization Code Flow, Implicit Flow, etc) as we have discussed.
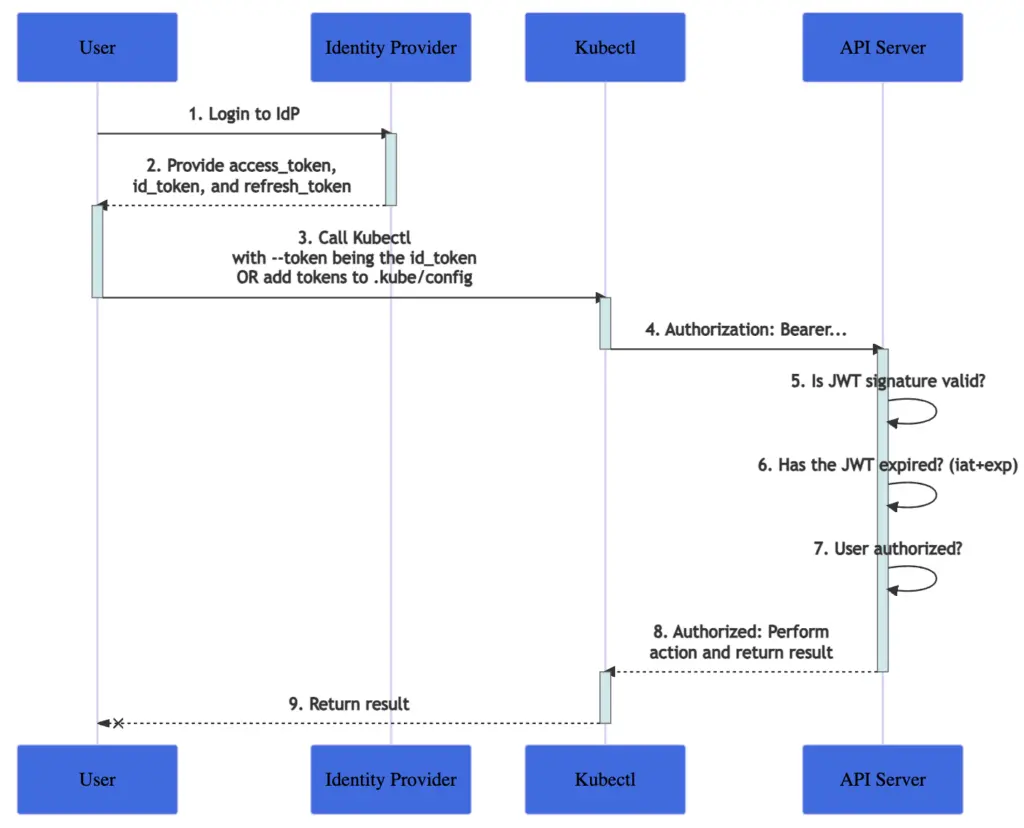
Although the instruction does not mandate which OIDC flow to use, we should use Authorization Code Flow in this architecture. The API server needs to trust the OIDC issuer, and the document covers how to configure API server.
In the diagram, step 2 and step 3 are required by kubectl itself does not perform these activities. All kubectl does is carry the JWT token in the Authorization Bearer. Vanilla Kubernetes does not provide a solution for OIDC integration. It only provides some instructions and we still need some helper scripts to glue all these instruction steps together.
There are many open-source project for this purpose. For example, Jetstack has kube-oidc-proxy and Int128 developed kubelogin. Other projects such as k8s-auth-client, k8s-oidc-helper, and gangway are no longer being updated. The kubelogin project remains influential. It has a clear diagram too:
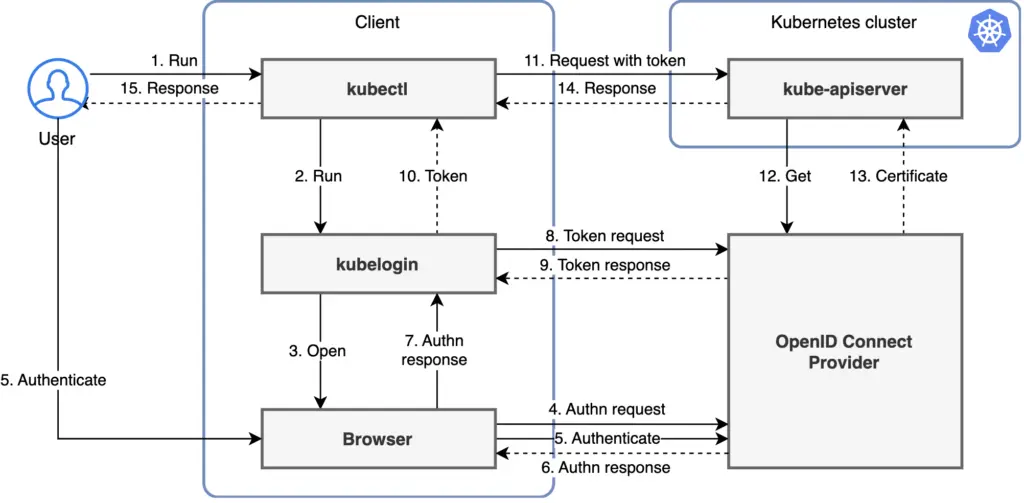
From the diagram we can see kubelogin proposes authorization code flow.
Also, one design concern with Kubernetes control plane is the placement of endpoint. From this diagram we can see that even if the cluster endpoint is on private subnet, OIDC integration should still work. The control plane (specifically kube-apiserver) initiates outbound connection to OIDC Provider. There is no inbound connection to it from the OIDC provider.
In the kubelogin setup, the redirect URI is set to localhost:8080 because it stands up a server on the same host where browser is running. The browser can always resolve localhost. For a full configuration steps, Okta has this blog post on how to use kubelogin as helper, and Okta as Authorization Server to authenticate kubectl via OIDC.
Step-by-step with kubelogin
We’ll go through an example with int128/kubelogin because it works with any Kubernetes flavour, including managed Kubernetes services. It is also fairly simple. The instruction covers a few types of Authorization Servers (Google Identity Platform, KeyCloak, Dex with GitHub, Okta and Ping Identity). I’ll take KinD cluster as an example and use Azure AD as Authorization Server.
First, we’ll register an App in Azure Portal. Go to “App Registrations” and “New registration”. Give it a name “kubeoidc” and set Redirect URI to “Web” with URL “localhost:8000”. Click on Register.
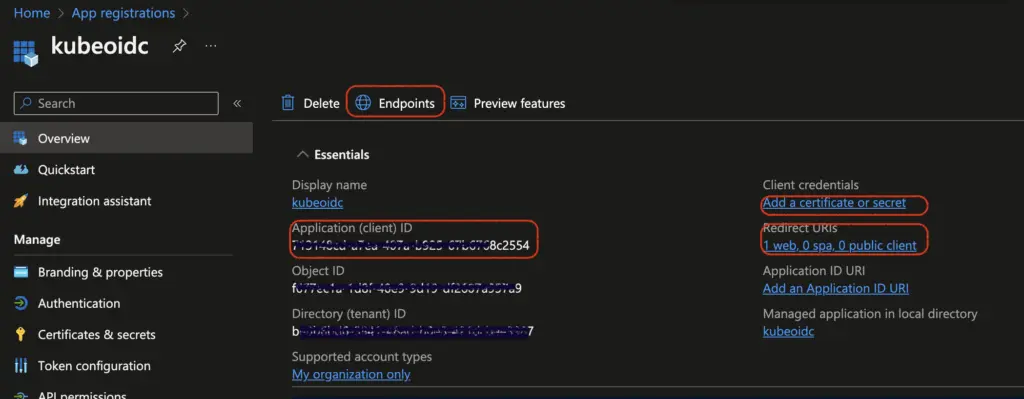
The next page shows the details for this app. The Application (client) ID is important for next steps. Click on “Add a certificate or secret”, then “New client secret”, put in expiry and description. The secret value is generated and displayed on the next page, which is important for our next step.

We also need to find out the issuer URL. From the App page above, click on “Endpoints” and find out the URL from field “OpenID Connect metadata document”. My metadata document URL looks like:
https://login.microsoftonline.com/xx8x8xx8-7777-66yy-55b5-444aaaaa3322/v2.0/.well-known/openid-configurationThe OIDC Issuer URL is the part before .well-known. In this case, it is:
https://login.microsoftonline.com/xx8x8xx8-7777-66yy-55b5-444aaaaa3322/v2.0Now we have collected what we need for the next few steps: ClientID, ClientSecret and OIDC Issuer URL. We can then create the KinD cluster, and reference ClientID and IssuerURL in the cluster configuration:
cat << EOF > kind-config.yaml
kind: Cluster
apiVersion: kind.x-k8s.io/v1alpha4
nodes:
  - role: control-plane
    kubeadmConfigPatches:
    - |
      kind: ClusterConfiguration
      apiServer:
        extraArgs:
          oidc-issuer-url: https://login.microsoftonline.com/xx8x8xx8-7777-66yy-55b5-444aaaaa3322/v2.0
          oidc-client-id: 99999e88-e777-6666-c5c5-c444444d3d22
  - role: worker
  - role: worker
  - role: worker
EOF

kind create cluster --config=kind-config.yaml
The command will create cluster and configure kubeconfig file with a user named kind-kind as admin, which isn’t what we need. Now we use kubelogin helper command:
kubectl oidc-login setup \
  --oidc-issuer-url=ISSUER_URL \
  --oidc-client-id=YOUR_CLIENT_ID \
  --oidc-client-secret=YOUR_CLIENT_SECRET
This command will act as the client in the OIDC flow and prompts you to log in to Azure in a Browser. Once logged on, it gives you the next few commands to run. Since we’ve already created a cluster with the Issuer URL and Client ID, we can skip creating cluster, and run the steps to:
- bind the Azure user to a ClusterRole
- set up the kubeconfig locally with a user oidc, which needs to execute the oidc-login command
Lastly, we can test the oidc user with kubectl --user=oidc get nodes. We can also set the context to use oidc user by default. Voila.
From this example, we learned how to configure OIDC integration for any Kubernetes distros. The steps that we need to take are:
- On the cluster side, we customize kube-api-server flag with OIDC provider info. Specifically, we provided Issuer URL and client ID in this example. In the OIDC Flow diagram, this step establish a trust from the Resource Server (K8s cluster) to the OIDC provider.
- On the kubectl side, kubectl itself cannot fulfill all the duties of a client app in the OIDC Flow. It needs a helper script and we’ve made friend with int128/kubelogin.
- On the Identity Store side, we expect it to be an OIDC-compliant Authorization Server. Otherwise, we consider using Dex as a broker in between.
When it comes to managed service, many allows us to customize the OIDC related flags for kube-api-server. Let’s look at how some managed services get this to work.
Azure Kubernetes Service
I find the kubectl authentication with AKS highly opinionated in its documentation. The recommendation is using Azure Active Directory as identity store but I don’t find it work with other OIDC providers.
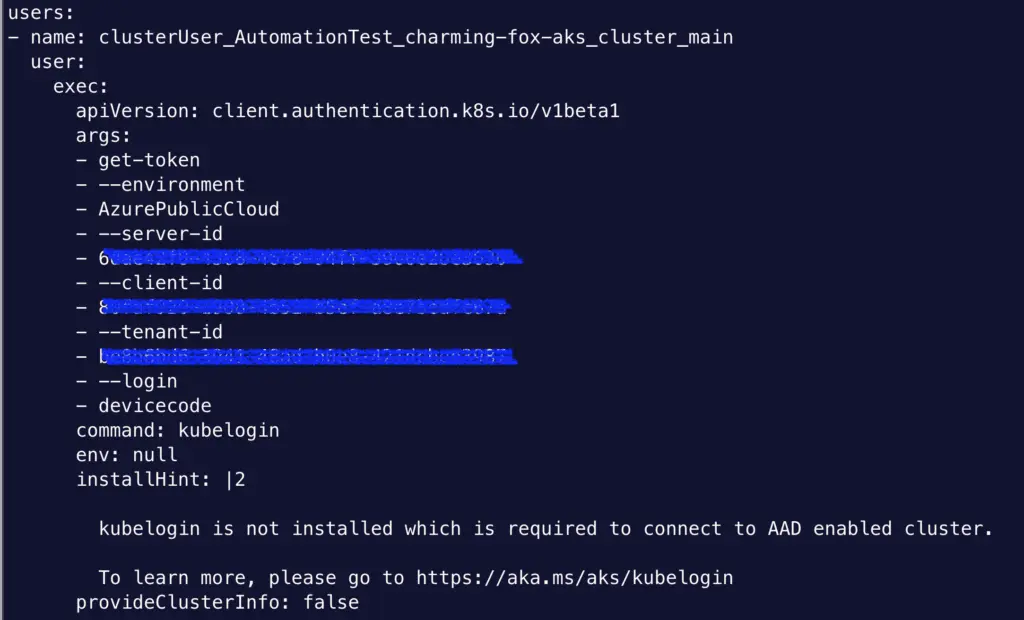
To work with Azure Active Directory, you would configure the cluster and specify Azure role-based access control with the Group UUID in Azure AD. On the client side, you will need to install Azure’s kubelogin utility. Do not confuse it with int128’s kubelogin, which is for any cluster. This kubelogin is just for Azure. Once installed, you can use az-cli command to update your kubeconfig file, which call this utility from kubeconfig. To examine details about client configuration and AAD integration, check out the Terraform template in the azure directory of my cloudkube project.
The document only covers Azure AD integration and I tried to find if there’s a way to integrate with third-party OIDC providers. Unfortunately I have no luck. ChatGPT points me to a page about enabling OIDC provider but it is in the context of workload identity and it does not allow you to customize the issuer. So it’s completely irrelevant. Because you cannot customize OIDC issuer, etc, it simply won’t work with any third-party OIDC provider. Sure enough, most of Azure’s client use Azure AD anyways.
Azure makes it streamlined to configure OIDC integration of AKS with Azure AD, its own identity store. To my disappointment, it is currently not possible to integrate with third-party OIDC provider for authentication at cluster endpoint.
ROSA
RedHat OpenShift on AWS (ROSA) is a. However it reflects how OpenShift configures third-party identity provider.
Let’s first create a cluster off custom VPC and private endpoint. This is covered in my previous post about ROSA. After the cluster creation, we’re at the point where we can run oc command against cluster endpoint from Bastion host because it is a private cluster. However, being a private cluster is irrelevant to how we configure OIDC integration.
We’ll use Azure AD again as OIDC provider. So we need to register an app the same way as I did above in the kubelogin example. We need to have Client ID, Secret and OIDC issuer URL. For RedirectURI, go to your OpenShift console, and under Cluster, click on the cluster name → access control → identity providers → select OpenID. Note the page clearly states that this is Authorization Code Flow, and the OAuth Callback URL is provided. Use it to regiter App in Azure, and fill in the page with Client ID, Secret and OIDC issuer URL. Also fill in other fields accordingly and click on Add. Now you should have it configured!
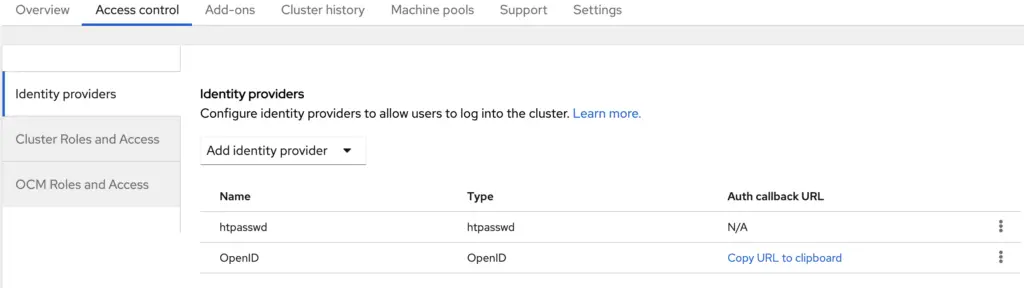
Identity Providers for OpenShift cluster
The next step is trying to login. From Bastion host, run oc login and it will give me an URL to use. The URL contains the cluster endpoint, which resolvable from the Bastion Host itself. However I need a Browser session here, so I have to run Bastion host as SOCKS5 proxy and tell Chrome on my MacBook to use it:
~ open /Applications/Google\ Chrome.app --args --proxy-server="socks5://localhost:1080"
The browser session redirects to Azure AD for log in. Once completed the webpage will display a token that I can use with oc login command. Run this command with token from Bastion, I’m logged in:
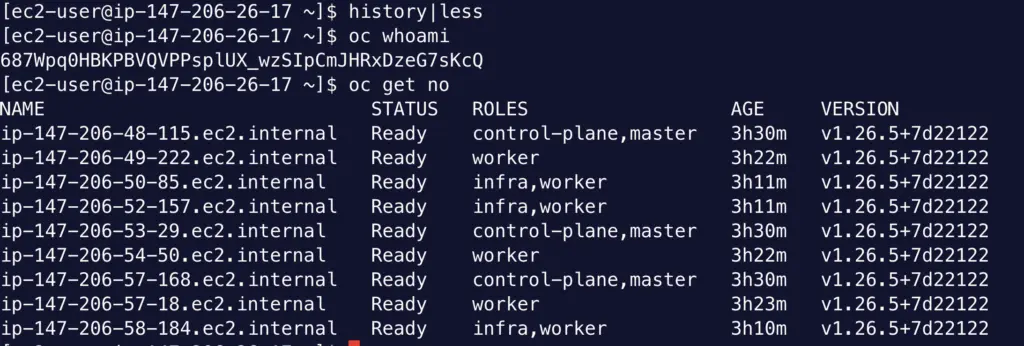
oc login --token=sha256~3ZT5JGWELOcBzfohftEm9D2UwoOVFvATASuZk3_uxps --server=https://api.dhc.62q3.p1.openshiftapps.com:6443
oc whoami
oc get no
At this point, if I run oc whoami, I get the user name. However, this user cannot do anything. This is because it is not associated with a role yet. You grant more permission to this user: go back to OpenShift console, Clusters → ClusterName → Access Control → Cluster Roles and Access → Add user. Here you can map the user name to a role (let’s say ClusterAdmin). Then this user will have its priviledge:
The whole Flow works with private cluster, because the redirect URI is resolvable from the Bastion host. If you chose to expose cluster endpoint publicly (not recommended), you can perform the above steps directly from your MacBook or Laptop.
So the ROSA experience has been smooth. Unlike kubectl, the oc utility can act as the Client App in Authorization Code Flow. The other part of the configuration such as client secret and issuer URL are made in OpenShift console. Good job!
Elastic Kuberentes Service
EKS allows you to specify OIDC issuers from console or CLI to set up third-party OIDC configuration. There is a blog post from Okta on this, which works for private clusters. In the instruction, the author first manually created kubeconfig file with int128 kubelogin, and then bind ClusterRole with the user.
The blog post is very detailed. Instead of repeating it, I would like to discuss two SSO models available in AWS. I summarize them as below:
Both are SSO models for EKS. Model 1 (IAM Identity Center) is home grown as AWS using IAM Identity Center (formerly AWS SSO). Users start with an IAM principal (AWS construct) and use the aws-auth config map to tie them to Kubernetes groups. This AWS blog post and this support article are based on the IAM Identity Center model. On the other hand, Model 2 (Direct OIDC) is the vanilla Kubernetes approach. It takes group claim from OIDC identity token. The Okta blog post is based on this model.
The IAM identity center model works with SAML compliant identity providers, oftentimes Active Directory, although there seems to be a plan to support OIDC-compliant identity provider as well in the future. Even if it was supported today, I’d still prefer model 2 for working with any OIDC compliant identity provider because it’s simple. Why not leverage K8s’ native capability? For identity providers that do not support OIDC natively, or does not issue group claim (e.g. Google workspace), as we discussed, we can also consider alternatives such as Dex as identity broker. However, this model comes handy when a pipeline user with IAM role needs to authenticate into EKS.
One should always go for the direct OIDC model, if the upstream identity provider supports OIDC. The provider itself can even be AWS Cognito User pool. Cognito User Pool itself supports federated identity but again, I would directly connect EKS cluster to the OIDC compatible identity provider, instead of going through Cognito User Pool. As a result, the only use case where Cognito user pool is absolutely necessary, is when we need the Cognito user pool itself as the identity provider, as we have in CloudKube‘s eks directory.
Summary
Configuring OIDC provider for cluster endpoint can be confusing and we need to understand how OIDC flows work. I dived into OIDC in the previous post and in this post, I explained how to get it to work with vanilla Kubernetes. I summarized the three requirements and looked at the OIDC provider option with some managed services. Then I went through OIDC options for AKS, ROSA and EKS.