
Terraform is an excellent Infrastructure-as-Code (IaC) tool based on Hashicorp Configuration Language (HCL). Compared to JSON or YAML based declarative templates (e.g. CloudFormation and ARM), HCL is more concise, thanks to the flexibility of HCL. On the other hand, HCL is not as flexible as general purpose languages. For that sake, I see HCL as semi-declarative IaC. This post is my notes about best practices with Terraform development, from the context of AWS, but also applies to other cloud platforms.
Complex Types
There are three primitive types (string, number and bool) that forms collection types and structural types. Here are some common ones:
- list: element may repeat, and order is maintained:
["orange", "banana", "orange", "apple"]
- set: elements are unique and unordered
["apple", "banana", "orange"]
- tuple: each element has its own type
["a", 15, true]
- object: defined by a schema with named attributes each with its own type
{
  name = "John"
  age  = 52
}
- list of object
[
  {
    alloc_id  = "0b7271a3219bc1fc2"
    subnet_id = "0c02af76c2c3e46fa"
  },
  {
    alloc_id  = "0440c334c48d4247f"
    subnet_id = "02652e69fa2a71de8"
  }
]
- map of string
{
  property = "foo"
  attribute = "bar"
}
- map of object
{
  objkey1 = {
    alloc_id  = "0b7271a3219bc1fc2"
    subnet_id = "0c02af76c2c3e46fa"
  }
  objkey2 = {
    alloc_id  = "0440c334c48d4247f"
    subnet_id = "02652e69fa2a71de8"
  }
}
Whenever applicable, Terraform converts types implicitly or explicitly. For example, when a list or tuple is converted to set, all elements are converted to string and duplicates are removed. Object and map are very similar. Map of string can be converted to object if the attributes comply with the schema. Additional attributes not in the schema are discarded.
HCL Types is similar to Python
Although being totally different beasts, the complex types between HCL and Python are similar, to the point I suspect the HCL design is influenced by Python. I summarize the similarities as such:
| Python Types | list [] | tuple () | set {} | dict {} |
| Terraform Types | list [] | tuple [] | set [] | map {} |
| ordered | Y You can access item by index | Y | N you cannot access an item by index or key; however you can loop over all itmes | N key-value pair that allows you to access item by key |
| changeable (mutable) | Y | N You cannot update, add or remove items | Y Add or remove only. no change to existing elements | Keys must remain unique or the values get overwritten; Values are mutable |
| allow duplicate elements | Y | Y | N | Keys must be unique; values don’t have to |
In Python, list and tuple allow elements of mixed types but in IaC like Terraform we mostly don’t need mixed types. In Terraform, an object is a map without a defined type. In most situations, lists and tuples behave identically, as do maps and objects.
Another area of similarity is with the comprehension of list and dict/maps. In Python for example,
## Supposed you need to create a list:
lst=[]
for x in range(10):
    lst.append(x**2)

print(lst)

### that can be simplified as the following to create the list:
lst = [x**2 for x in range(10)]

## You can even add contidion
even_numbers=[num for num in range(10) if num%2==0]

## You can introduce function calls:
words = ["hello", "world", "python", "list", "comprehension"]
lengths = [len(word) for word in words]

## You can even combine two lists
lst1=[1,2,3,4]
lst2=['a','b','c','d']

pair=[[i,j] for i in lst1 for j in lst2]

print(pair)

## With dict, it's similar
evens={x:x**2 for x in range(10) if x%2==0}
print(evens)
In Terraform, we use similar techniques:
[for s in var.list : upper(s)] # build a tuple/list from a list

[for k, v in var.map : length(k) + length(v)] # build a list from a map

{for s in var.list : s => upper(s)} # build a map from a list

[for s in var.list : upper(s) if s != ""] # build a tuple/list from a list with condition
Note that the documentation of Terraform doesn’t explicitly call them out as comprehensions. However, it’s exactly the same idea as comprehensions in Python. Even the range() function exists both in Python and Terraform.
Modularization
Modules allows you to group related resources together. They can also be re-used and called by other modules. It is fairly straightforward to create a module:
- put the resource declarations into a sub-directory
- define input and output in the directory
However, the introduction of module complicates the directory structure and variable referencing, which is important to take into account before starting creating modules. This guideline has further discussion about when to create a module. I re-wrote the terraform templates in Orthweb project to leverage modularization wherever possible, but there is still some stand-alone resource (e.g. random_id) not belonging to any module.
To reference resources across modules, you need to import those resources (using data source) from within the module. There are a couple of ways. You may pass the argument of data source as input variable, or you can leverage the filter capability of data source. Let’s look at one example of each mechanism.
In the example below, we import a subnet by subnet id:
data "aws_subnet" "private_subnet" {
  id = var.private_subnet_id
}
In the example below, we import a subnet by filtering from all subnets in the VPC by tag:
data "aws_subnet" "private_subnet" {
  vpc_id = var.vpc_id
  filter {
    name   = "tag:Name"
    values = ["Private"]
  }
}
There are pros and cons of each approach. A module with mechanism 1 is more transferrable across different environment, because the ID of subnet is explicitly provided. However, authors needs to manage those explicit variables with code. Mechanism 2 fetches target resources with filter. It depends on a well-implemented tagging policy in the resource farm.
The Terraform Registry (since 2017) contains a lot of pre-built modules for each backend platform (e.g. AWS). If you find any module that can be used in your project, the module repo can be referenced directly by Git repository URL. You should be aware of the risk of this practice though. Many platforms are keen to publish modules for their platform. Anyone can publish their own modules to the community as well.
You can quickly generate module documentation with terraform-docs.
Local Execution
Local execution is the basic workflow mode which is mostly seen with very small collaboration team. In this mode, the developer executes terraform binary (Terraform CLI) from their workstation (e.g. Laptop). The Terraform CLI converts code into API calls to interface cloud provider. The most frequently used commands (from terraform directory) are:
terraform init
terraform plan
terraform apply
The init command initializes the working directory. The plan command figures out the delta between code and infrastructure. It outlines the changes it is about to make. The apply command commits the change. The documentation of Terraform CLI commands is here.
Terraform keeps track of the infrastructure it manages in state file. This article explains the purpose of state. State management collaboration difficult with local execution because the state file by default is created in the working directory on user’s workstation. Although the state file can be configured to be stored in a shared location such as S3, it still requires a mechanism to lock the state in a multi-developer collaboration.
In large operations, the same code base in Terraform, is usually used to created several different sets of infrastructures, for example, in different geographic regions. So it is a 1-to-many relationship between the code repo and the infrastructure state. To further complicate things, each state might have been deployed using different revisions of the code. To overcome that challenge, Terraform introduced the concept of workspace, which is essentially an instance of state describing a particular group of infrastructure being managed by the same source code. When there are many workspaces, it becomes tricky to manage them with CLI commands.
State management is a major challenge that needs to be solved for team collaboration in local execution workflow. Each state must use the same revision of Terraform code. You can use Git in combination as a workaround to that limitation but the point is you cannot tie a workspace to a commit with the workspace commands.
In some enterprise environment, the execution is from a VM (e.g. ADO agent on-premise) without Internet access, which poses another challenge. First, we need to pre-load required providers manually. The enterprise needs a proxy solution to safely download packages from Hashicorp website. One good option is Nexus Repository, with both open-source and pro supports. It is a full-function artifactory repo that can host helm repo, apt repo, yum repo, etc. Second, we also need to configure Terraform so it picks up providers locally. Managing plugins without Internet access requires understanding of the order in which Terraform tries to load plugins during initialization.
Remote Execution
In remote execution, the code is executed in Terraform Enterprise or Terraform Cloud. Both are remote web servers. The difference is that Terraform Enterprise is self-hosted service, requiring IT specialist to install and maintain Terraform Enterprise. Terraform Cloud on the other hand, is a managed SaaS service. The pricing model includes a free plan for small number of users.
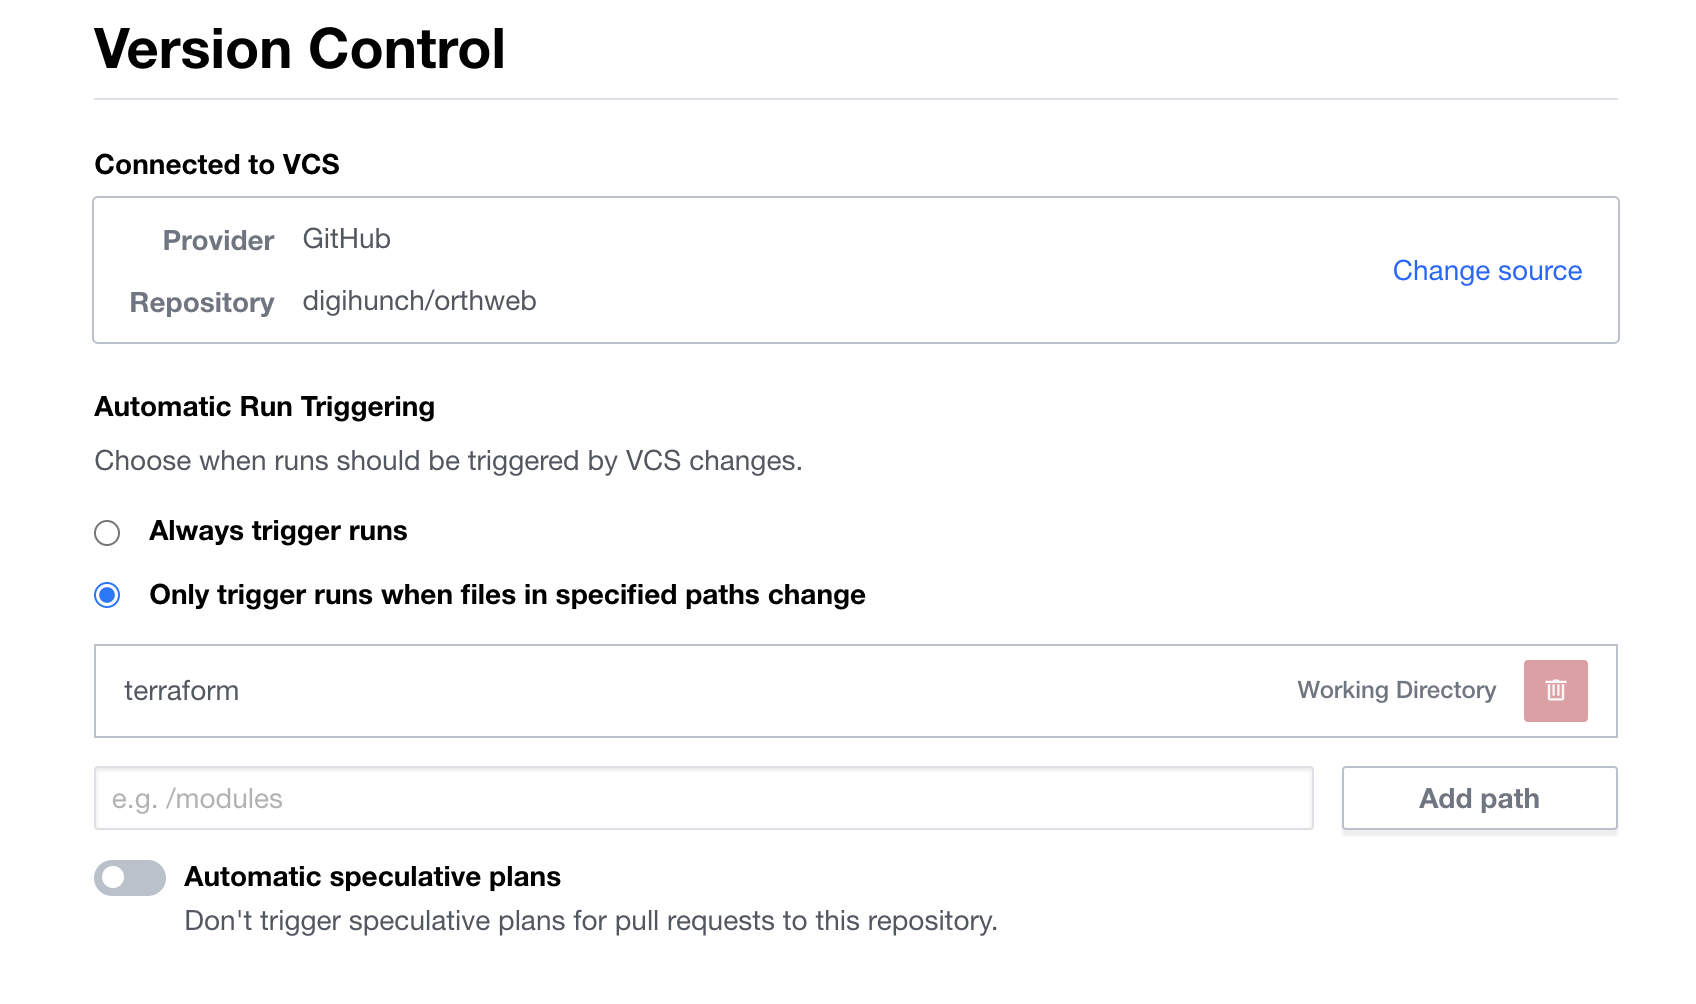
In Terraform Enterprise or Cloud, the remote execution is organized in workspaces. You need to create an organization, and then create workspace under the organization in order to execute code. With each workflow, you can specify version control system (VCS) and subdirectory, to tell the workspace where to fetch Terraform code from. The workspace also allows you to define secrets and variables specific to the workspace. When you execute a workspace plan, the secrets and variables are passed from workspace to the execution logic.
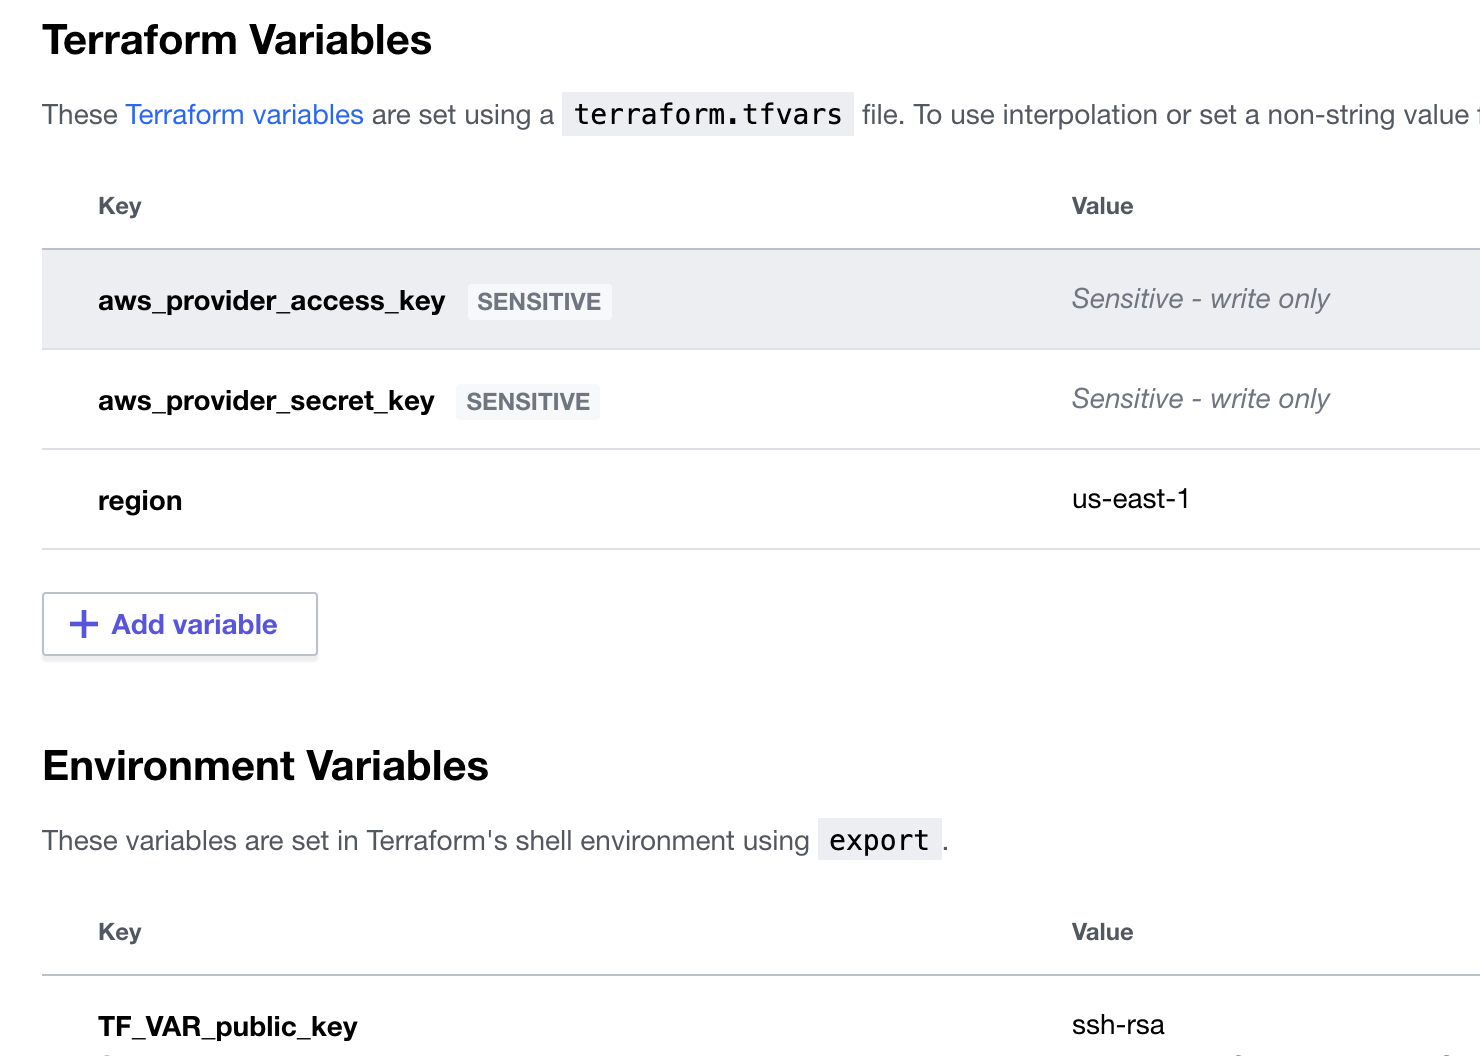
You will also need to design the Terraform code in a way to work seamlessly with the secrets and variables loaded from the workspace. The variable declaration in code should match the definition in workspace. There are already a number of variables that came in handy. Check out this guide.
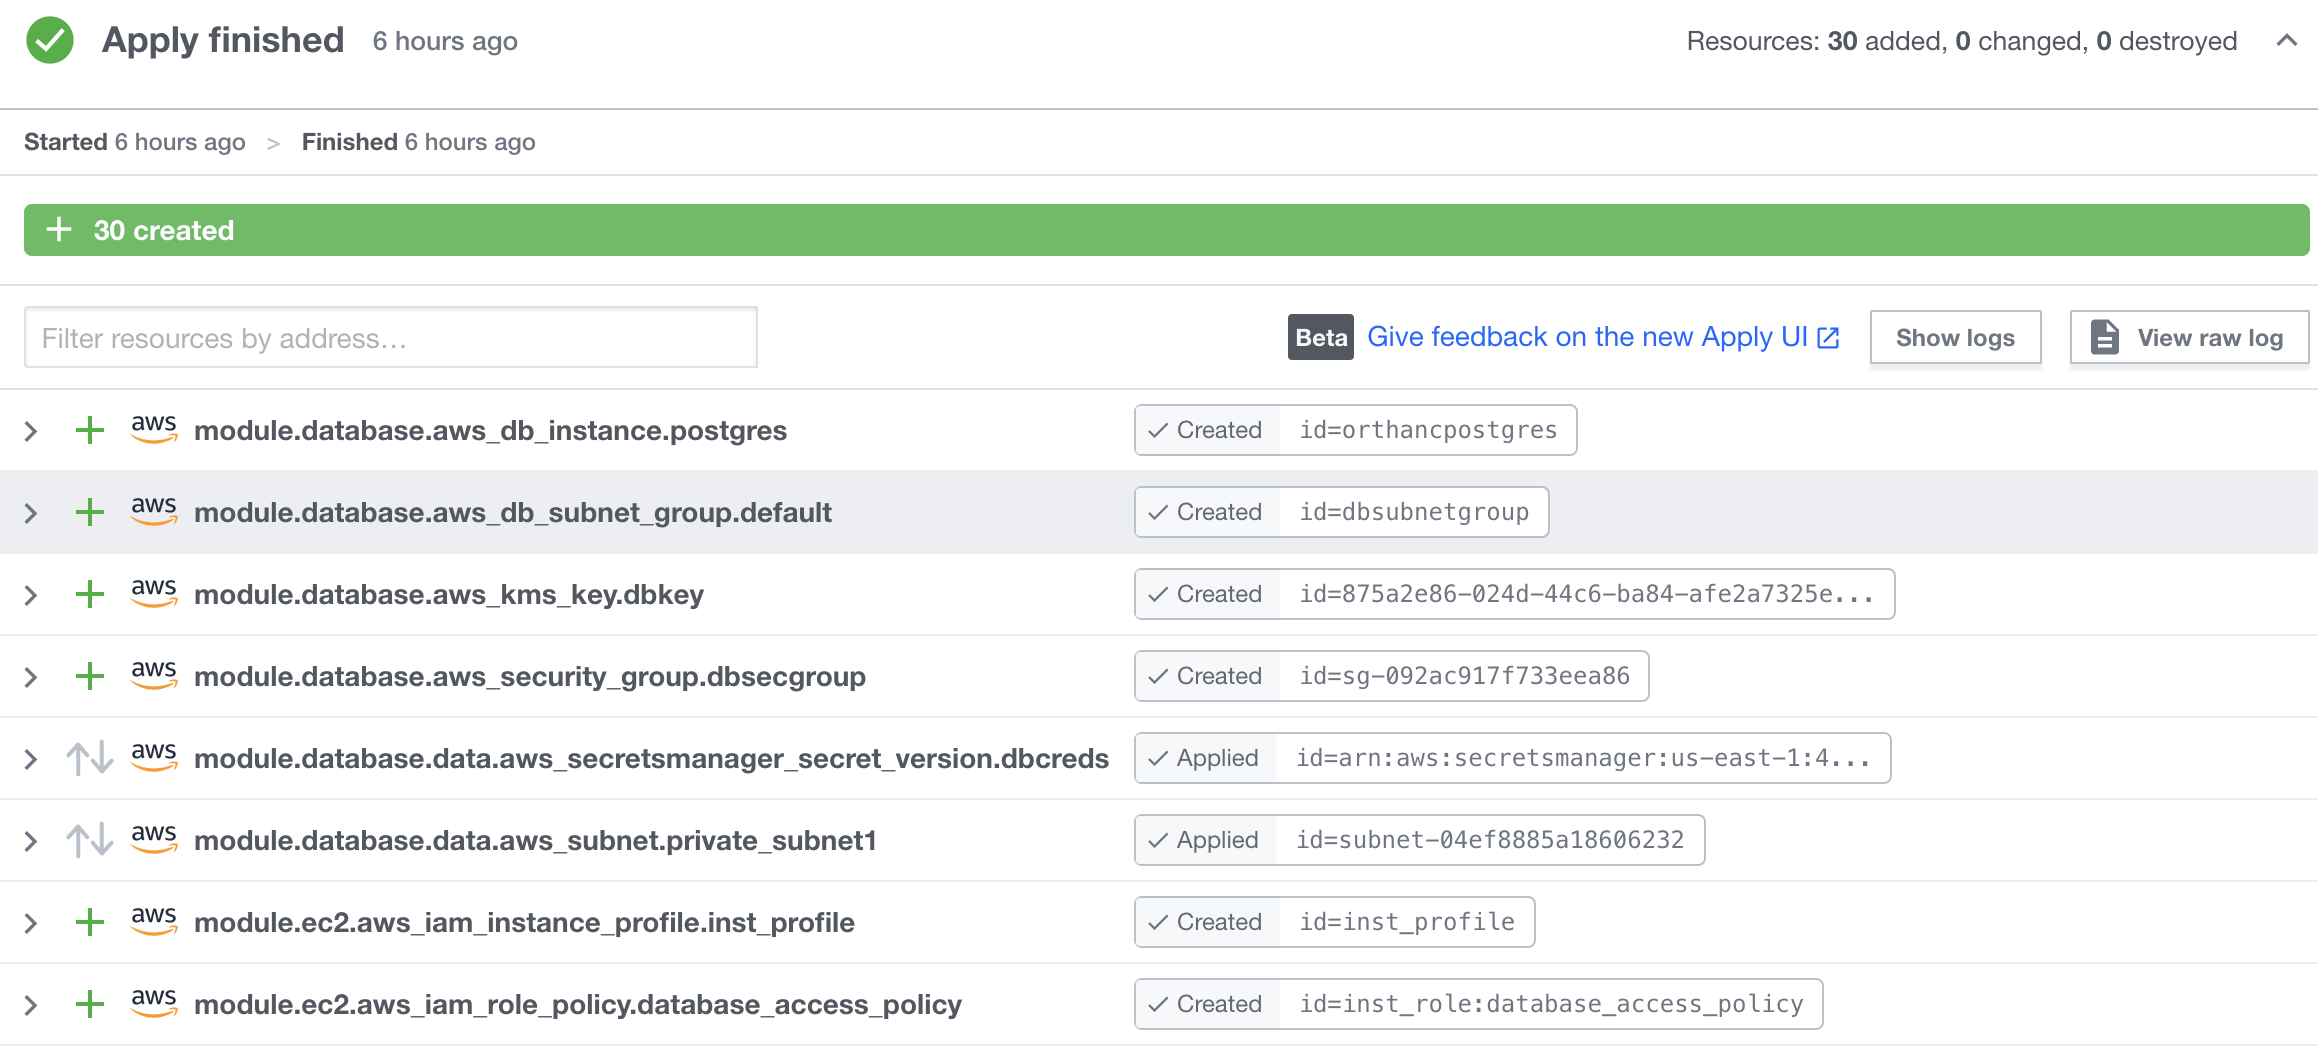
Each execution is referred to as a “run”, with its own run id. A workspace involves may runs, which may succeed or fail. Each run pulls a specific commit of the source repository, and goes through stages such as plan, and apply. The UI from each run result list out the status of each result, in a very easy to read format.
The state data is persisted in the web server as they were generated. Therefore the collaborator do not need to worry about managing state with CLI tools. If there are files that you do not want picked up by the execution engine, their locations can be added to a file .terraformignore. Refer to this guide.
AWS profile
Local execution still has a lot of use cases in enterprises such as testing with temporary resources. A common challenge is authentication. As discussed, Terraform CLI picks up identity information from AWS CLI and authenticates its way into the backend to run API calls against. So AWS CLI must be configured correctly with the sufficient permission to provision resources. On the other hand, enterprises usually offload IAM to an identity store, such as AzureAD, Okta, etc. Putting those together, the pattern of authentication and authorization usually looks like this:
- User logs on via SSO (e.g. SAML). The validation response gives a name of an IAM role.
- Upon successful authentication, user takes the IAM role. The role does not have any capability, except for assuming a second IAM role.
- The second IAM role (the functional role) grants user the permission to do its business.
The steps above, can be carried out in AWS console, or with AWS cli using assume-role command. However, when we put Terraform in the picture, it becomes a little involving because the credential information is updated whenever the functional role is assumed, and the assume-role command takes a pretty long argument.
To skip typing the long command every time, there are some handy tools, such as aws-azure-login. An even better tool that works with a variety of identity stores is saml2aws. The tool allows you to configure identity backend, assume the functional role, and update credential information in aws credential file, all with a single command. The AWS CLI configuration reads:
[default]
region = us-east-1
output = json
cli_history = enabled
cli_pager =
role_session_name = functional_operation

[profile function_user]
source_profile = default
role_session_name = functional_operation
role_arn = arn:aws:iam::9998887766:role/admin-access
region = us-east-1
In Terraform provider, we need to tell it to assume that role as well:
provider "aws" {
  region     = "us-east-1"
  assume_role {
    role_arn     = "arn:aws:iam::9998887766:role/admin-access"
    session_name = "terraform"
  }
}
This will ensure Terraform assumes appropriate role before doing its job.
AWS EC2 SSH Key Pair
RSA key authentication for SSH should be used for Linux Instances. When creating an EC2 instance, we give it our public key so we can then later authenticate through SSH. If the key is already stored in AWS, we just need to tell EC2 the name of the key, in the key_name property. If the code is likely to be executed from several different places by different users, then we can write the code so it picks up public key from user’s workstation (~/.ssh/id_rsa.pub). Here is an example:
variable "local_pubkey_file" {
  type = string
  default = "~/.ssh/id_rsa.pub"
}
data "local_file" "pubkey" {
  filename = pathexpand(var.local_pubkey_file)
}
resource "aws_key_pair" "user-pubkey" {
  key_name   = "runner-pubkey"
  public_key = data.local_file.pubkey.content
}
resource "aws_instance" "bastion" {
  instance_type = "t2.micro"
  key_name = aws_key_pair.user-pubkey.key_name
  ......
}
For remote execution, we can even add an option to pass public key in as variable, to override the key file variable. For an example, check out my orthweb project.
To upload files to EC2 instance from Terraform execution environment, we can use the file provisioner with ssh as connection type.