

In this post I discuss a few aspects when putting istio in operation.
Installation
Istio installation can be confusing, due to architectural and guideline changes as well as renaming of operator CRDs since its release, and especially since 2020. This left lots of information outdated on the web, adding to Istio’s perceived complexity.
Currently, the recommended installation methods are istioctl or Helm. Using Istio Operator manifest (with out istioctl) is discouraged. As to the Helm chart installer, it was once deprecated (around early 2020), but was later re-introduced in the fall of 2021. This back-and-forth had caused some aversion. As of Nov 2021, their re-introduced Helm charts version dropped alpha tag. The Helm repo consists of separate Helm charts, for Istio CRD (base), control plane (istiod), each gateway and CNI respectively. A typical deployment therefore requires multiple Helm Releases (example here). Istio document still considers Helm support as alpha, so I assume the most reliable method to install Istio is istioctl.
The istioctl utility can be used with many options to customize Istio install. For example, we can supply a YAML declaration input (to -f switch) to customize installation behaviours. The YAML file declares a CRD. Two different CRDs have been used: IstioOperator and IstioControlPlane. According to this blog and this post, since Istio 1.5 in early 2020, we’re supposed to IstioOperator CRD exclusively. The IstioControlPlane CRD is left only for legacy support. As stated in the current documentation:
The istioctl command supports the full IstioOperator API via command-line options for individual settings or for passing a yaml file containing an IstioOperator custom resource (CR).
With IstioOperator CRD, we still have a number of options to tweak the install behaviours. Here is a summary of potential options:
- use IstioOperator API via IstioOperator CRD (without using “values” or overlay fields)
- specify an attribute value in argument, including a pre-built profile e.g. –set meshConfig.accessLogFile=/dev/stdout, –set profile=demo
- use K8sObjectOverlay by using “k8s/overlays/patches” field in IstioOperatorCRD
- use Helm API by using “values” field in IstioOperatorCRD
The key-value specified in –set switch overrides the same key-value supplied in the IstioOperator CRD. So option 2 overrides option 1. The value for profile can also be empty if you’d rather start from scratch. However too many –set switches makes the command wordy so we should build our own IstioOperator CRD
For option 4, the document hyper-links Helm API to a section from version istio 1.4, and I appears to exist only for legacy (pre-2020 Helm support) compatibility. Option 3 (K8sObjectOverlay) would be helpful when a field cannot be conveniently customized with option 1 and we have to patch the object like in Kustomization.
So the most practical approach is IstioOperator CRD for per-component customization, potentially with K8sObjectOverlay. No matter which option, istioctl compiles the installation manifest before applying it against Kubernetes API. This manifest can be previewed using “istioctl manifest” command, so that you can take a look before installation.
Thank you Isito for so much confusion just to land on a working installation method. Below is the content of az-istio-operator.yaml file that I use for my installation:
apiVersion: install.istio.io/v1alpha1
kind: IstioOperator
metadata:
  name: istio-install-customization
spec:
  profile: default
  hub: docker.io/istio
  tag: 1.13.1
  revision: 1-13-1
  namespace: istio-system
  meshConfig:
    accessLogFile: /dev/stdout
    outboundTrafficPolicy:
      mode: "REGISTRY_ONLY"
  components:
    pilot:
      k8s:
        hpaSpec:
          maxReplicas: 7
          minReplicas: 1
        nodeSelector:
          beta.kubernetes.io/os: linux
    ingressGateways:
    - name: istio-ingressgateway
      #namespace: istio-ingress
      enabled: true
      label:
        istio: ingressgateway
      k8s:
        hpaSpec:
          maxReplicas: 11
          minReplicas: 1
        serviceAnnotations:
          service.beta.kubernetes.io/azure-load-balancer-internal: "true"
          service.beta.kubernetes.io/azure-load-balancer-internal-subnet: "my-lb-subnet"
    egressGateways:
    - name: istio-egressgateway
      enabled: true
I can preview the install, run the install and validate installation status:
$ istioctl manifest generate -f az-istio-operator.yaml
$ istioctl install -f az-istio-operator.yaml -y --verify
$ istioctl verify-install -f az-istio-operator.yaml
$ kubectl -n istio-system get IstioOperator installed-state-istio-install-customization-1-13-1 -o yaml | less
Note that in the IstioOperator declaration I marked the revision. This is helpful when I run multiple versions of control plane (e.g. during upgrade). I can check revisions of istiod with:
$ istioctl x revision listWe can delete installed istio components
$ istioctl x uninstall -f az-istio-operator.yaml
$ istioctl x uninstall --revision 1-11-5
In practice, it is helpful to use separate operators each for a different component (pilot, ingressGateways, egressGateways). This makes maintenance and upgrade easier.
Debugging
The documentation has a page for common problems that one needs to be familiar with. It covers not only problems, but also steps to troubleshoot each kind of problem (e.g. authorization policy).
Although istioctl is pretty confusing as an installation tool, it is a good utility for many troubleshooting activities. We should probably add its path to PATH environment variable and add the export command (e.g. export PATH=”$HOME/istio/bin:$PATH“) to .zshrc or .bashrc. Istioctl has a few useful subcommands, some of which are only available as experimental and therefore needs to be following an x. Some common commands are given below:
To analyze Istio problems:
$ istioctl analyze -n istio-systemTo look at proxy configuration of an Envoy instance at different levels, use proxy-config sub-command or pc for shorthand:
$ istioctl proxy-config <clusters|listeners|routes|endpoints|bootstrap|log|secret|stats>
$ istioctl pc cluster deploy/istio-ingressgateway -n istio-system  # see what Envoy cluster an ingress gateway knows about
$ istioctl proxy-config log deploy/httpbin --level "rbac:debug"
$ istioctl pc log <pod_name> -n <namespace> --level connection:debug
$ istioctl pc secret -n istio-system deploy/istio-ingressgateway  # check certificates loaded to a gateway
$ istioctl proxy-config listeners deploy/istio-ingressgateway -n istio-system    # query envoy listener configuration
$ istioctl pc routes deploy/istio-ingressgateway -n istio-system --name http.8080   # query envoy route configuration
The last two commands set logging level to the specified workload. If we want to set logging level at mesh level, we can use these commands:
$ istioctl admin log --level authorization:debug
$ istioctl admin log
To look at synchronization status of each envoy in the mesh, use proxy-status sub-command, or ps for shorthand:
$ istioctl ps # ensure data plane is in syncIf an item for a workload shows STALE instead of SYNCED, it means that the configuration has not been pushed from control plane to that instance of Envoy proxy. Check if the Istio configuration change is valid. If the system is newly installed and there is no ingress or egress gateway resources declared, the RDS column for ingress or egress may show “NOT SENT”. The far right column displays the version of istiod connected.
To describe applied istio config:
$ istioctl describe <pod|service>
$ istioctl describe po workload1 -n my-workload # detect misconfigurations on workload
To view dashboard:
$ istioctl dashboard <envoy|grafana|prometheus>To check authorization policy on a Pod,
$ istioctl x authz check mypod -n workloadTo validate istio configuration in a file:
$ istioctl validate -f resource_authorization_policy.yamlSometimes we need to turn on access logging just on the envoy proxy on the Gateway Pod. In that case, we will need to apply Istio’s Envoy filter object. This filter is applied to Pods labelled as gateway. It patches the existing filter chain with the additional defined in the manifest:
apiVersion: networking.istio.io/v1alpha3
kind: EnvoyFilter
metadata:
  name: hcm-gw-access-log
  namespace: istio-system
spec:
  workloadSelector:
    labels:
      istio: ingressgateway
  configPatches:
  - applyTo: NETWORK_FILTER
    match:
      context: GATEWAY
      listener:
        filterChain:
          sni: demo.digihunch.com
          filter:
            name: "envoy.filters.network.http_connection_manager"
    patch:
      operation: MERGE
      value:
        typed_config:
          "@type": "type.googleapis.com/envoy.extensions.filters.network.http_connection_manager.v3.HttpConnectionManager"
          access_log:
          - name: envoy.access_loggers.file
            typed_config:
              "@type": "type.googleapis.com/envoy.extensions.access_loggers.file.v3.FileAccessLog"
              path: /dev/stdout
              format: "[%START_TIME%] \"%REQ(:METHOD)% %REQ(X-ENVOY-ORIGINAL-PATH?:PATH)% %PROTOCOL%\" %RESPONSE_CODE% %RESPONSE_FLAGS% \"%UPSTREAM_TRANSPORT_FAILURE_REASON%\" %BYTES_RECEIVED% %BYTES_SENT% %DURATION% %RESP(X-ENVOY-UPSTREAM-SERVICE-TIME)% \"%REQ(X-FORWARDED-FOR)%\" \"%REQ(USER-AGENT)%\" \"%REQ(X-REQUEST-ID)%\" \"%REQ(:AUTHORITY)%\" \"%UPSTREAM_HOST%\" %UPSTREAM_CLUSTER% %UPSTREAM_LOCAL_ADDRESS% %DOWNSTREAM_LOCAL_ADDRESS% %DOWNSTREAM_REMOTE_ADDRESS% %REQUESTED_SERVER_NAME% %ROUTE_NAME%\n"
The object above enables access logging on the Gateway Pods only, without impacting other Envoy proxies.
Multi-tenancy
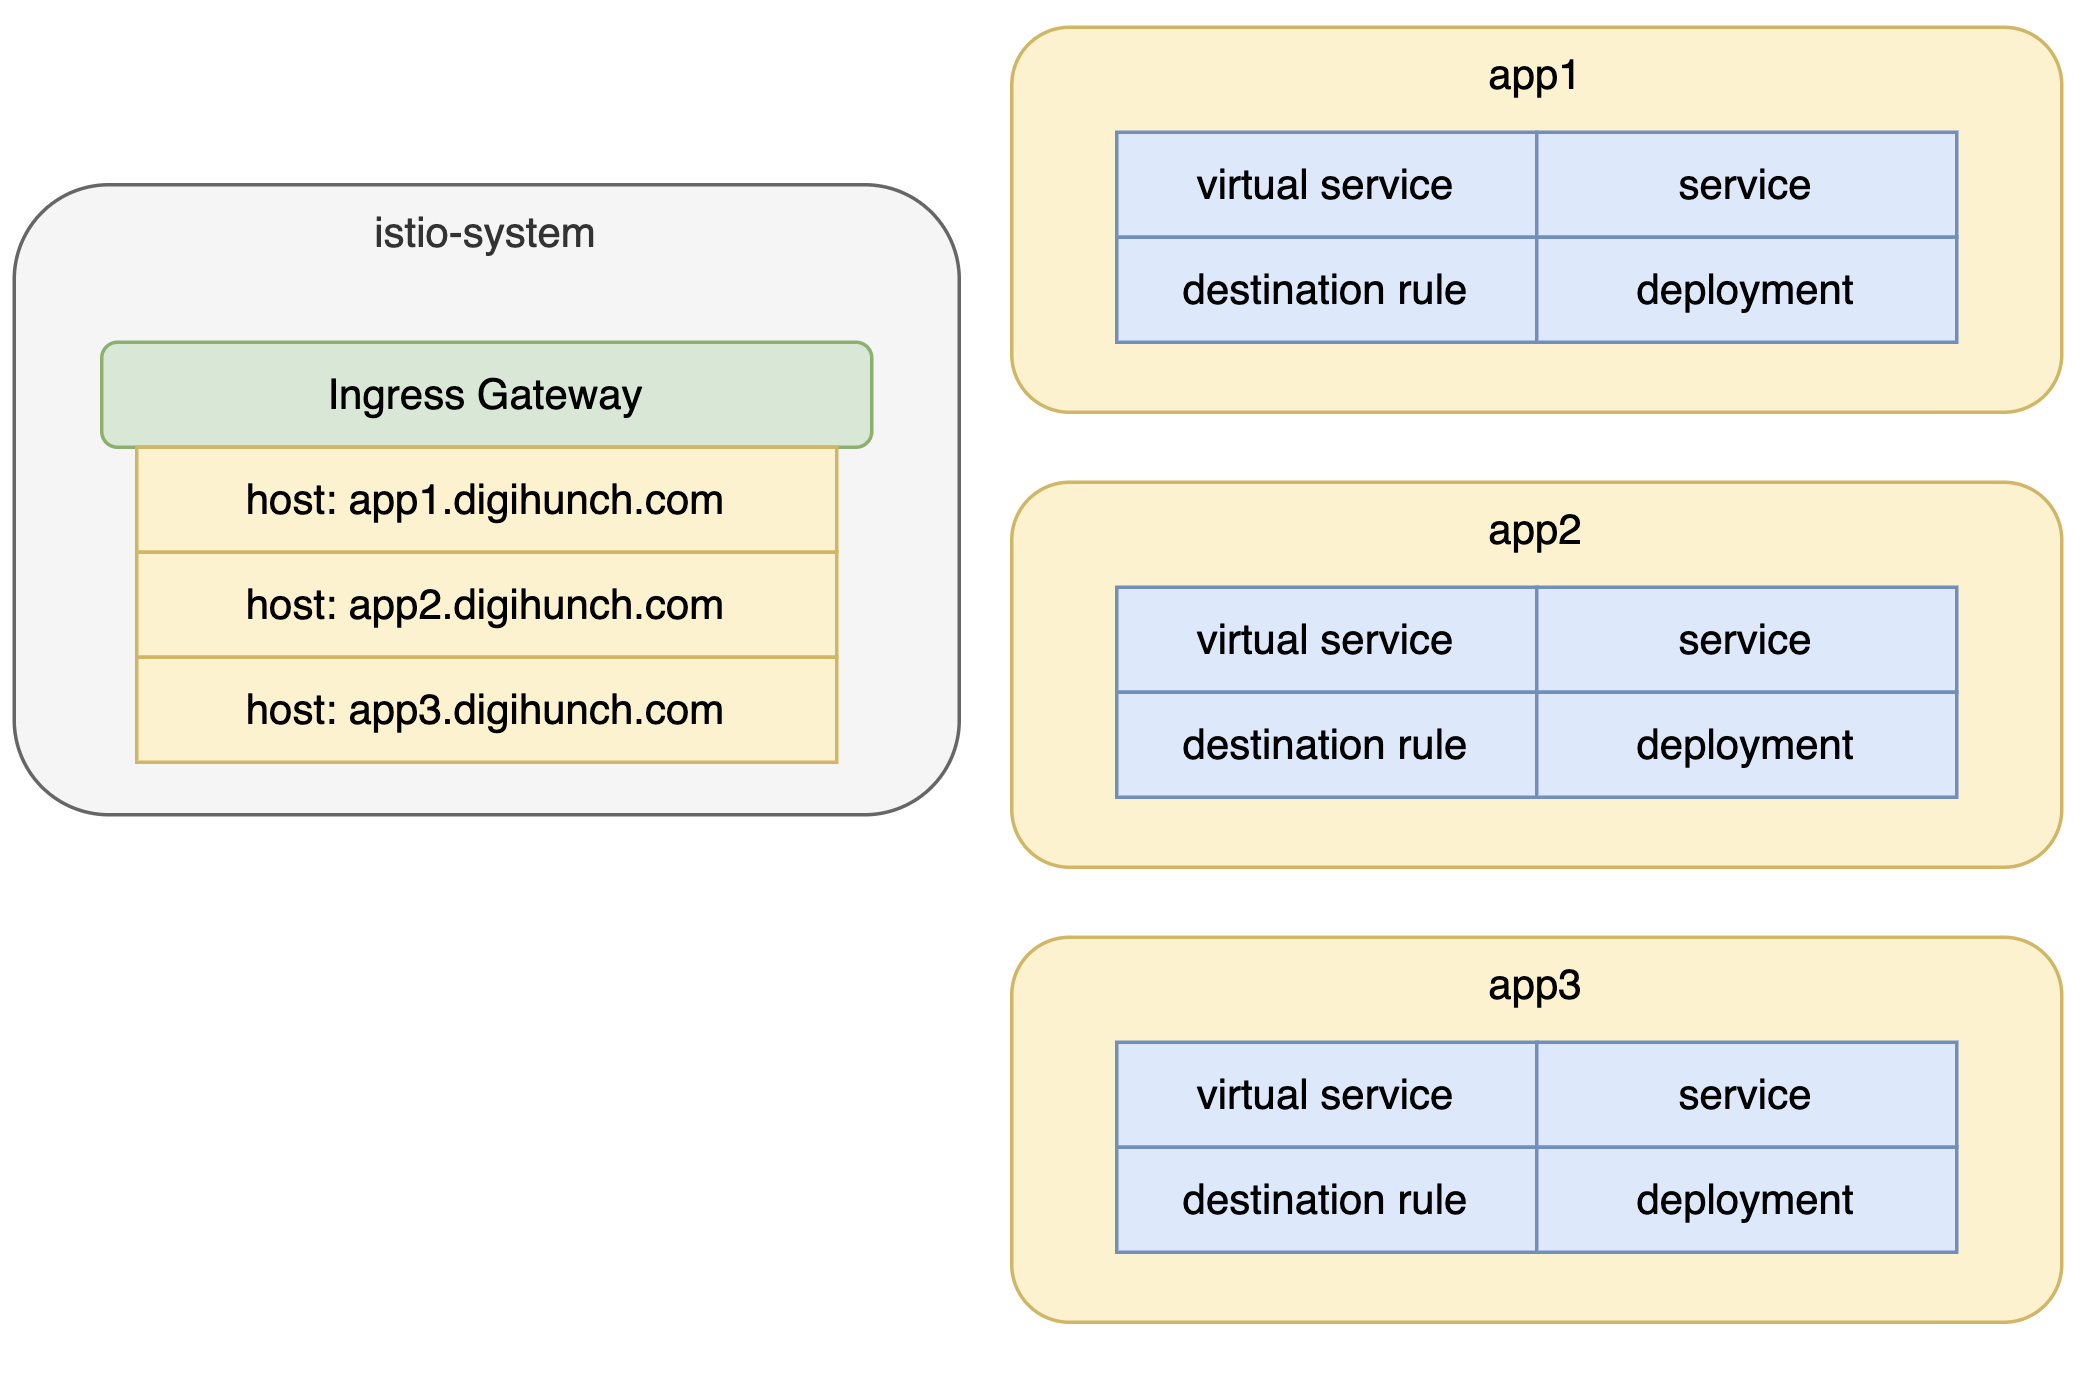
In large enterprises, Istio is usually installed by a platform/operation team. The entire platform is shared by multiple application teams. Istio should not be seen as a responsibility of a single party. It is necessary to break down the Istio CRDs and define the responsibility of each CRD. For example:
- Gateways are placed in the istio-system namespace (or a dedicated istio-ingress namespace in some case). Platform team can decide whether a Gateway is considered a shared infrastructure, or each tenant (application team) uses their own Gateway. In the servers/hosts field of Gateway declaration, add namespace before host to suggest that the routing behaviour of that host must be defined in a certain namespace.
- Virtual Services can be managed in two models as well. They can be managed individually and are all placed in each tenant namespace. Alternatively in a shared responsibility model, Virtual Service can be created in istio-system namespace, and the processing of each match can be delegated to a Virtual Service in each tenant namespace, using the Delegate feature of Virtual Service. Another field that can help with multi-tenancy is the “gateways” field, you can specify a value of mesh to indicate the virtual service is available to the entire mesh.
- Destination Rules are usually placed in each Tenant’s workspace
- Peer Authentication also depends on the configuration. If a mesh level configuration is enforced, it is easier for the Platform Team to manage it and this should be the setup for new clusters. If for historical reasons Peer Authentication is enforced per tenant namespace, it can be delegated to each application team. It can make communication troubleshooting more complex.
- Control Plane and observability workloads such as Kiali are usually the responsibility of Platform team.
- Request Authentication and Authorization Policy should be the responsibility of individual application team.
In a multi-tenancy management model, Istio related resource should be subject to admission control policy, as well as scrutiny by the security and platform teams. Google Anthos has a good page on the constraint templates for Istio resources.
As to restricting traffic between namespaces, apart from the measures from this previous post, we can also use Sidecar CRD to restrict outbound traffic. As its documentation states:
Sidecar describes the configuration of the sidecar proxy that mediates inbound and outbound communication to the workload instance it is attached to. By default, Istio will program all sidecar proxies in the mesh with the necessary configuration required to reach every workload instance in the mesh, as well as accept traffic on all the ports associated with the workload. The Sidecar configuration provides a way to fine tune the set of ports, protocols that the proxy will accept when forwarding traffic to and from the workload. In addition, it is possible to restrict the set of services that the proxy can reach when forwarding outbound traffic from workload instances.
The documentation page also includes two examples. The first is a sidecar at the mesh level that restricts outbound traffic to the same namespace that the sidecar is in, and the istio-system namespace:
apiVersion: networking.istio.io/v1beta1
kind: Sidecar
metadata:
  name: default
  namespace: istio-config
spec:
  egress:
  - hosts:
    - "./*"
    - "istio-system/*"
The second example overrides the mesh level default above, and allows egress traffic to three specified namespaces:
apiVersion: networking.istio.io/v1beta1
kind: Sidecar
metadata:
  name: default
  namespace: prod-us1
spec:
  egress:
  - hosts:
    - "prod-us1/*"
    - "prod-apis/*"
    - "istio-system/*"
As to inbound control, we can expose a Virtual Service to other namespaces by using the exportTo field to specify which other namespaces the Virtual Service should be exported to. If no namespaces are specified then the virtual service is exported to all namespaces by default.
Sometimes we want a virtual services to expose to both outside of the mesh via Ingress, and within the mesh, and we hope to use the same hostname. For this requirement, we can use the ServiceEntry CRD. ServiceEntry enables adding additional entries into Istio’s internal service registry.